August 2008
Monthly Archive
August 31, 2008
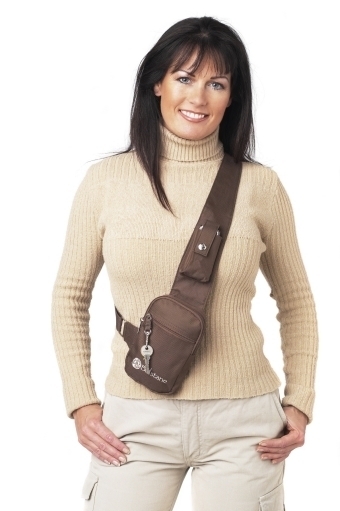 Travelling through the urban jungle isn’t like dustin’ crops, buddy! For one thing, you’ve got to make sure you’ve got all your gear with you. You’ve got a cell-phone, iPod, headphones, keys, wallet, sunglasses… Before you know it, your pockets are bulging, and you’ve got nowhere to hook your thumbs and look cool.
I’ve found this awesome holster that hold lots of gadgets, and keeps them readily available. You never know when you’ll need to grab your cellphone, iPod, wallet, keys, headphones, pen, whatever… so make sure they were right at the ready to go. The pattern is easy and the fabrication is simple.
You will need:
- 1 yd. of cotton poplin or duck, 60″ wide
- 5/8 yd. of fusible interfacing, 60″ wide
- 1 closed 8″ coil zipper
- 1 square ring, 2″ diameter
- 1 slider, 2″ diameter
- 1 dome snap set, 3/4″ diameter
- 30″ of cable cord, ¼” thickness
- Coordinating thread
PATTERN

CUTTING
Cut ring tab and wallet #5 2X and cut all remaining pieces 1X in fabric.
Cut all pieces 1X in fusible interfacing.
Cut 30″ of 1 ¼” wide bias binding for piping.
ASSEMBLY
- Make up piping trim with bias strip and cable cord using a zipper or cording foot.
- Iron the fusible interfacing to the wrong side of all fabric pieces except 1 wallet piece (#5), following the manufacturer’s directions.
- For the cell latch (1), fold right sides together and stitch long edge and one short end using ½” seam allowance. Grade and trim corner. Turn right side out. Press.
- Topstitch around the perimeter. Attach top part of dome snap as illustrated, following manufacturer’s directions.
- For cell pocket (2), sew each miter corner using ½” seam allowance. Trim.
- With right side together, fold pocket in half and align corners one on top each other.
- Sew along the raw edge, leaving an opening on one side for turning. Trim and grade seams.
- Turn right side out and press finished edge. Attach bottom part of dome snap as illustrated, following manufacturer’s directions.
- For ring tab (3), layer both pieces with right sides together. Sew along both shaped sides using ½” seam allowance. Trim and grade seams (the center should be 2″ wide). Turn right side out and press. Topstitch along finished seams.
- For wallet, turn under straight top edge of one piece of #5 and stitch down. Layer this piece with the second #5 piece to create a pocket. Baste outer edges together. Attach top (4) and bottom (5) together, then topstitch this seam. Apply corded piping to outer edge. (clip the piping in the corners to release the buckling).
- Attach zipper around top edge of the face of the wallet, next to the piping. Start midway up side, over the top, and down the opposite side.
- For the wallet side (6), fold strip in half with right side together and sew up short ends using ½” seam allowance. Press seam open.
- Fold “loop” in half with wrong sides together and match up raw edges. Baste together.
- Press the folded edge.
- Pin and baste raw edge of wallet side (6) to zipper and remaining wallet front (4-5) along the piped edge. Sew wallet side (6) close to zipper through all layers using a zipper foot and continue around the face of the wallet section.
- For the holster shoulder strap (7), fold the fabric with right sides together and pin/baste the long edge. Stitch across both short ends and the long edge leaving 5″ opening for turning using ½” seam allowance. Grade and trim corners.
- Turn right side out. Press. Topstitch around the perimeter.
- Wrap ring tab (3) around 2″ square ring.
- Position the holster strap face up with the folded edge of the strap to the left.
- Place the wallet on the wide end of the holster strap. Pin in place. Sandwich the ring tab (3) between the wallet and the strap midway between zipper and bottom of wallet. Baste the wallet in place. Edgestitch through all layers around pressed edge of wallet.
- From top of wallet, measure upward 6 inches. Center cell latch (1) on holster strap face down. Sew across unfinished short end. Trim.
- From top of wallet, measure upward 3 inches. Center cell pocket (2) on holster strap. Pin/baste and edgestitch around finished edge being certain to catch the turn opening in the seam stitching.
- Apply 2″ slider to narrow end of holster strap. Insert narrow end of strap through the square ring and back on itself to the slider. Tack ends in place.
August 31, 2008
 A handkerchief pointed-hem skirt is flattering to all, but especially for short-legged people because the points break up that horizontal hemline. No pattern is needed to make this skirt style. It is a simple block layout.
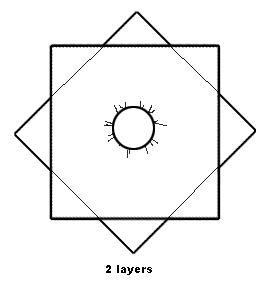
One easy way to get that effect is to hem two squares of fashion fabric, each having four points (called a “handkerchief” hem) and layer them for an eight-pointed look. Experiment with swatches of opaque and transparent fabrics as you design and discover what happens when you overlap two layers of the same colour or harmonizing colours. The top layer could be trimmed shorter than the under layer for a tiered look and the hemline could be decorated with flat braid trim or fringe, if desired. Be creative!
You will need:
- 2 ½ yds. of fashion fabric, 45″ wide
- 1 yd. of waist band elastic, 1″ wide
- Coordinating thread
- 10 yds. of flat ribbon braid (optional)
PATTERN
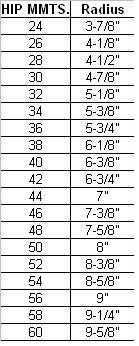
 The size of the circular opening should be just big enough to pull over your hips, and can then be tightened with elastic. The circumference of a circle is about 3 times its diameter, so for a person with 44″ hips, a 7″ radius is needed to create the opening. Use the chart provided to make the circle you need. Fold a square piece of paper in half, then half again. From folded point, measure out a radius to create a circle equal to your hip measurement and draw an arc. Cut on this line and open paper flat. Measure the circumference of your template.*
ASSEMBLY
Cut 2 squares of fabric doubled the finished length.
Hem each square with a narrow double-rolled hem.
Apply trim (optional) parallel to hem, several inches from the edge. Miter at corners.
Layer both squares, with bottom layer FACE DOWN and top layer FACE UP, as illustrated for an eight-pointed look.
 Place template in center of square and trace out.
Stitch on chalk mark. Cut out center of circle allowing for a ¼” seam allowance.
Turn bottom layer out through the opening so that bottom layer lies flat on top. Press seam flat.
Topstitch around the edge of the circle.
Cut elastic equal to your waist measurement less 3 inches.
Butt the ends of the elastic together and zigzag stitch together.
Sandwich elastic between the 2 layers without twisting the elastic.
Stitch through all layers around the opening to encase the elastic. Make casing slightly wider than the width of elastic.
* TIP: Increase or decrease the circle by 1/8″ to change the overall total circumference measurement by 1/2″.
August 30, 2008
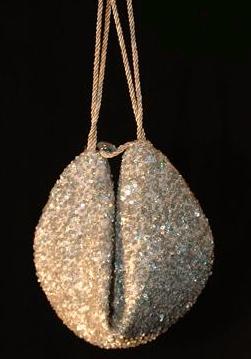
 Confucius say: “Make this bag and good fortune will bestow upon you.”
You will need:
- ½ yd. of Fashion fabric, 45″ wide
- ½ yd. of Satin lining, 45″ wide
- ½ yd. of Fusible interfacing, 22″ wide
- 1 yd. of Cording
- Coordinating thread
- 1 Closed nylon zipper, 12″ long
- 1 shank button
PATTERN
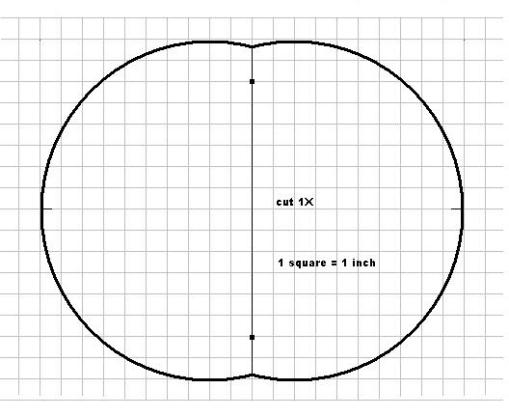
CUTTING
Cut fashion fabric, lining, and interfacing each 1X.
Cut cording 16″ long 2X; button loop 4″ 1X
ASSEMBLY
 Iron fusible interfacing to wrong side of fashion fabric following manufacturer’s directions.
- With right sides together, lay lining on top of fashion fabric. Baste together.
- On centerline, draw a narrow rectangle equal to the zipper length + 1/8″.
- Staystitch around this outline.
- Cut down center of rectangle and diagonally into the corners at each end using sharp pointed scissors. Remove basting.
- Flip fabrics right side out by inserting lining through slashed opening.
- Press seams of opening flat for a neat professional look.
- Place zipper face up in center of opening. Pin and baste into place.
- Topstitch around the zipper opening. Open zipper.
- Add 2 long cord loops, one on each end of bag. Double the cording to form a large strap loop. Attach cut ends side-by-side at end of zipper. Sew a button loop to on end and attach a shank button on the other (as shown in model). *
- With right sides together, fold the fashion fabric in half and match notches. Pin and baste together along curved edge. (Keep lining free).
- Stitch curved seam and catch cording in the seam using a ½” seam allowance. Clip and notch seam allowance along curve.
- Repeat procedure for lining, leaving a 5″ opening.
- Turn bag right side out through zipper opening and slip stitch lining seam closed.
- To form the fortune cookie shape, “fold” purse and latch button to the button loop.
* OPTION: You can also make 1 long strap loop to slip through the button loop and draw up on it and omitting the button, if desired.
August 29, 2008

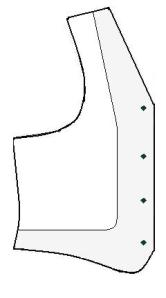
Leather vests are an ideal fashion in traditional or western design for all seasons. It makes a bold statement when worn as outerwear when the weather is too warm and unforgiving for a jacket. Vests with simple styling and function can replicate your looks and will make you look simply outstanding. So get in this garb and feel the punch in any season.
You will need:
- cowhide leather
- kasha lining
- fusible interfacing
- coordinating polyester thread
- double-sided leather tape, 1/4″ wide
- leather machine needle
- 4 dome snaps
- bone turner
MEASUREMENTS
Chest – measure just under the arms around the upper body.
Back waist length – measure from nape of neck to waistline.
Back width – measure from armhole to armhole across shoulder blades.
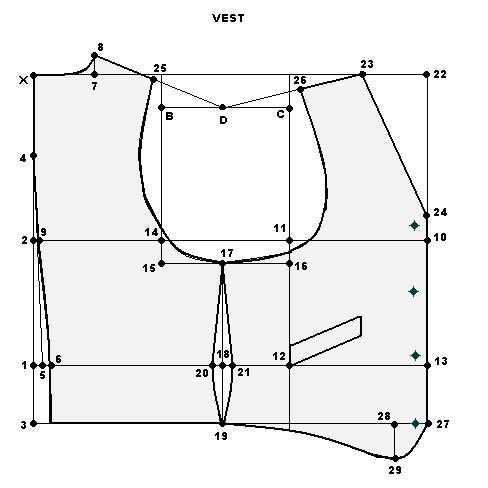
PATTERN

Draw a straight line and locate a point. Label X.
1 from X = back waist length + ½”
2 from 1 = midway between X and 1
3 from 1 = 3″
Square lines across the paper from these points.
4 is located midway between X and 2
5 from 1 = ½”
Join 4 and 5 with a straight line.
6 from 5 = ½”
7 from X = 3 ½”
8 from 7 = 1″
9 is located where line 4-5 intersect line 2
10 from 2 = ½ chest measurement + 3″
Square up and down from 10.
11 from 10 = 1/3 the distance from 2 to 10.
Square up and down from 11
12 is located at intersection of line 1.
13 is located at intersection of 1 and 10.
14 from 2 = ½ back width + ½”
Square up and down from 14.
15 from 14 = 1″
16 from 11 = 1″
17 is midway between 15 and 16.
Square down from 17 to locate 18 and 19.
20 and 21 are ½” on either side of 18.
Shape the side seam as shown.
22 is located at the intersection of X and 10.
23 from 22 = 3 ½”
24 from 10 = 1″
Join 23 and 24 with a straight line.
B from 16 = 6″
C from 11 = 6″
D is located midway between B and C.
Join 8 and D with a straight line.
25 from 8 = 4″
26 from 23 = 8 to 25
Shape armsyce with a deep curve in the front and a shallow curve in the back.
 27 is the intersection of 10 and 3.
28 from 27 = 2″
29 from 28 = 2″
At point 12, draw a welt pocket opening 6″ x 1″ as shown.
Shape the front hem as shown.
Trace off the front of the vest, from the shoulder down to the front, and the bottom edge to the side seam. Make a front facing pattern with at least 1 ½ inch width at shoulder and hem.
Trace off welt and double its width. Add seam allowance.
CUTTING
Vest Front – cut 2X
Vest Back – cut 2X
Vest Facing – cut 2X
Front Lining – cut 2X
Back lining – cut 2X
Front interfacing – cut 2X
Welt – cut 2X
ASSEMBLY
- Sew the welts onto the front sections of the vest.
- Place the vest backs right sides together. Leather tape the back seam. Sew the CB seam. Flatten the seam with a bone turner and clip seam allowance if necessary.
- Place the vest back and vest fronts right sides together. Leather tape the back and front together along the shoulders and sides.
- Stitch the vest back and fronts together along the shoulders and sides, using 1/2 inch seam allowance. Flatten the seams with a bone turner.
- Iron the fusible interfacing to the wrong side of the front facing using a low heat setting and presscloth.
- Sew the front lining to the front facings.
- Sew the lining fronts and back together the same way as the outer portion in step 3 and 4.
- Place the vest and the lining right sides together, lining them up along the edges, and use small paper clamps to keep them together. Stitch the vests along the front and neckline, and around the armholes. Stitch along the lower edge of the vest front, leaving the lower edge of the vest backs unstitched.
- Turn the vest right side out. Use the bone turner to gently push out the edges of the vest.
- Turn the un-sewn edges of the lower back to the inside of the vest, so that the folded edge is even with the rest of the back. Press the folded edges under, and leather tape them together.
- Top-stitch along the outside edges of the vest and the armholes. Make sure the lower edge of the back of the vest gets sewn closed in this seam.
- Apply the snap domes to the front of the vest following the manufacturer’s directions.
(Note: A man’s vest closure laps from left to right).
August 27, 2008

Silk charmeuse is pure luxury. It is soft, elegant, and surprisingly versatile. Charmeuse is a medium weight, woven silk with a lustrous appearance, rather like the surface of a pearl. And like the pearl which it resembles, it is an elegant classic!
Try it to create this alluring halter gown… the perfect creation in a super flattering style. Very easy pattern to make, the halter is not fitted, so slips over the head and ties at the nape while a fabric rosette adds interest detail for a romantic touch.
You will need:
- 3 ½ yds. of charmeuse, 54″ wide
- 3 ½ yds. of sheer organza, 54″ wide
- 3 yds. of satin ribbon, 3″ wide
- Coordinating thread
PATTERN
CUTTING
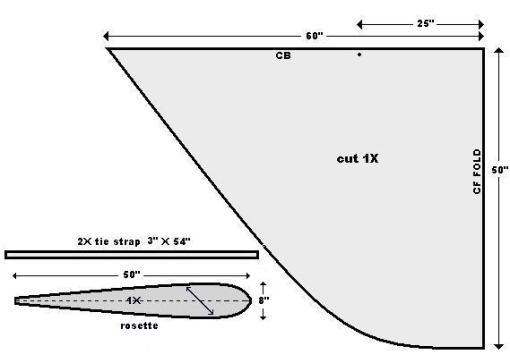
 Fold fabric in half on crossgrain with selvedges aligned. Baste selvedges together with long stitches.
Place centerfront [CF] of pattern on fold. Weight down and cut out fabric 1X on fold.
For rosette, cut pattern 1X on true bias grain
ASSEMBLY
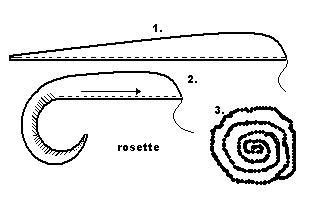 To make rosette, pink curved edge. Fold fabric lengthwise in half. Sew a running stitch along the folded edge and gather tightly. Starting with the narrow end, spiral the fabric onto itself and tack gathered edge as you form the rosette.
 Staystitch 1″ either side of notch [●] on centerback seam [CB] using ½” seam allowance. Clip seam allowance to stitching.
With wrong sides together, layer the charmeuse and organza. Pin and baste between ● to CF. Sew seam using ½” seam allowance. Clip a V-notch in seam allowance at CF. Press seam open.
Along curved edge, match edges and sew both layers together using a 1/2″ seam allowance. Trim seam allowance. Turn right side out through CB seam.
Press seams flat. Baste CB seam together. Topstitch along curved seam through both layers to finish the hem.
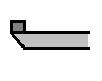 Cut ribbon in 2 pieces for strap ties. On one end, fold the ribbon at a 45°angle with a ½” extension.
Align the L-shape to the CB with the garment face up and place the ribbon on top of the finished edge, stopping 3″ from CF. Repeat in reverse on the opposite side of the CF.
Topstitch ribbon ties through all layers of the garment on both edges of the ribbon.
With right sides together, pin and baste CB seam. Stitch back seam using ½” seam allowance. Press seam open.
 Crisscross strap ties at a 90° and sew through opposite corners of the layered ribbon. Fold back “point” at CF and tack down. Attach rosette at CF.
TIP: Check this link for working with charmeuse and organza fabrics.
August 27, 2008
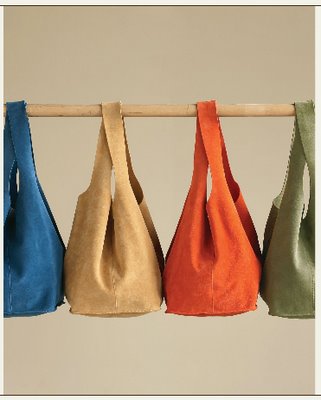 Suede is a natural Aniline leather that has been surface brushed or buffed on the grain side of the leather creating a nap and leaving a texture similar to velvet (softest of all leathers to the touch). Usually suede has a natural finish, but may have a light protective coat and a transparent leather dye for colour. This process increases the leathers surface exposure making it extremely absorbent. Water drops will darken the leather but it returns to its original colour after drying.
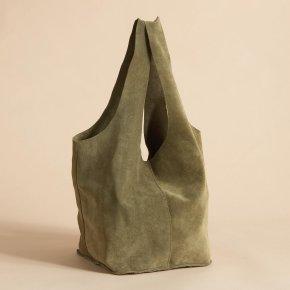
Irresistible in butter-soft suede is this chic Italian bag from Sundance. It deftly adapts to bulky or bitty loads with ease. Zen-like styling (no zips, pockets or snaps) make this easy and versatile carryall for virtually everything.
You will need:
- 1 – 4 oz. [1/16″ thick] Suede split hide, 16 square ft.
- 1 spool of cotton or nylon thread
- 1 leather machine needle
- Kraft paper
- 1 rotary cutter with pinking blade
- 1 roll of double-side mounting tape, 1/4″ wide
PATTERN
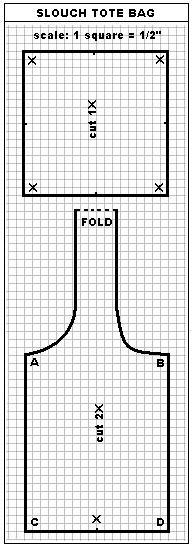
Transfer pattern onto graph paper. Each square equals 1/2 inch.
Copy onto a folded piece of kraft paper so you have the entire pattern for easy 1-ply cutting of the leather.
Dimensions: Approx. 11″H x 9-1/2″W.
CUTTING
Check skin for any tears and blemishes on the face of the suede. Chalk around them to avoid them when cutting.
Chalk out pattern on skin and cut out using pinking blade of a rotary cutter. Use a cutting mat to protect cutting surface. Cut base 1X and sides 2X. (Raw edges will not fray).
ASSEMBLY
Tape one seam [AC] with mounting tape of each side section of the tote.
On one side section, with right sides together, remove the backing on the tape and align with opposite end of section [AC] to form a bag loop. Stitch ¼” seam allowance along AC. With a bone turner, crease the seam open. Fold the seam allowance to one side and edgestitch along seam on the face through all the layer. (I use a Teflon ® presser foot to reduce drag).
Repeat the above directions for the other section.
Join each side with right sides together from B to D with mounting tape. Stitch ¼” seam allowance. Now you will have 2 handles. 
At each X mark on the side section, snip a ¼” slit.
Tape the perimeter of the base on the wrong side with mounting tape. Place the X notch of the side sections at each corner of the base. (The slit will create a square corner). Remove backing one strip at a time and join with wrong sides together. Machine-stitch from D around the bottom, pivoting at X and continue around the base of the tote.
August 25, 2008
 Old-fashioned silks or snazzy brocades, pop polka dot or preppy pinstripes. Or score vintage fabrics from thrift stores or even from clothes that might be out of date. Solid or stripe, paisley or Art Deco, a bow tie can do a rare thing to a man’s wardrobe: add notes of polish and surprise at the same time. Bow ties traditionally come in two varieties, the classic thistle or butterfly cut, (as pictured here) and the sleeker bat-wing variety. Hugh Laurie or Elvis Costello? Sean Combs or Daniel Craig? Which one you prefer depends on whether you’re going for a tongue-in-cheek panache or a certain punk minimalism.
Beats fashion, and according to the New York Times, the bow tie is back this year. That’s the great thing about being playful with your wardrobe – sooner or later everything will be in vogue again.
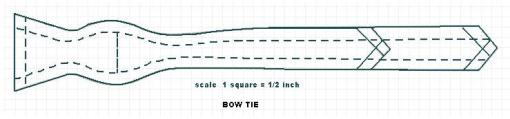
CLASSIC THISTLE BOW TIE
Dimensions: 4.5″ long x 2.5″ wide
You will need:
- 5/8 yard of silk fabric, 45″ wide
- 1/4 yard of fusible interfacing, 45″ wide
- coordinating thread
- 1 bow tie set *
PATTERN
Enlarge the pattern on graph paper. Scale is 1 square = ½ inch
ASSEMBLY
1. Cut along the pattern’s thick solid lines for a classic thistle shape bow tie, using the outline for the longer piece first. Fold the fabric in half. Pin the pattern to the fabric, aligning it parallel to the fold (or, if you want diagonal stripes, at a 45-degree angle to the fold). Cut the fabric through the two thicknesses.
2. Repeat the process, using the pattern for the shorter piece. Now you’ll have two long pieces of fabric and two shorter pieces. 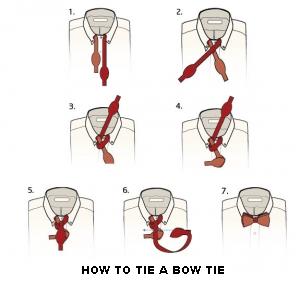
3. Cut out one long piece and one short piece from the interfacing. Iron the interfacing to the wrong side of one of each length of the fabric pieces, according to manufacturer’s directions.
4. Pin the right sides together of each bow tie section to each interfaced bow tie section. Stitch using ½ inch seam allowance, leaving a 2-inch-wide opening along the straight side of both pieces.
5. Grade the edges (trim ¼ inch from the top edge to reduce the bulk) and trim the corners, then turn each piece right-side out (I use a loop turner) and steam press. Slip stitch the openings.
6. Attach the pieces of the bow tie set: Thread the end of the longer tie piece through the adjuster, then through one of the hook pieces. Slide the end of the tie back through the adjuster and slip stitch the end in place. Thread the shorter tie piece through the other hook piece, turn back the end and slip stitch the edges.

* A bow tie set is a very inexpensive pair of hooks and a metal adjuster that attaches to both ends of the tie. This allows you to adjust the circumference and to tighten and loosen the tie once you’ve put it on. To find bow tie sets, check the notions section of your local fabric or tailor supply stores.
August 25, 2008
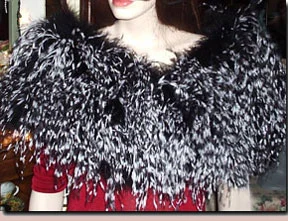
Featured: Ostrich Feather Shawl by Genaconti
Wrap yourself in elegance with a dramatic feathered shawl. Follow these easy directions, and see how simple it is to be chic.
You will need:
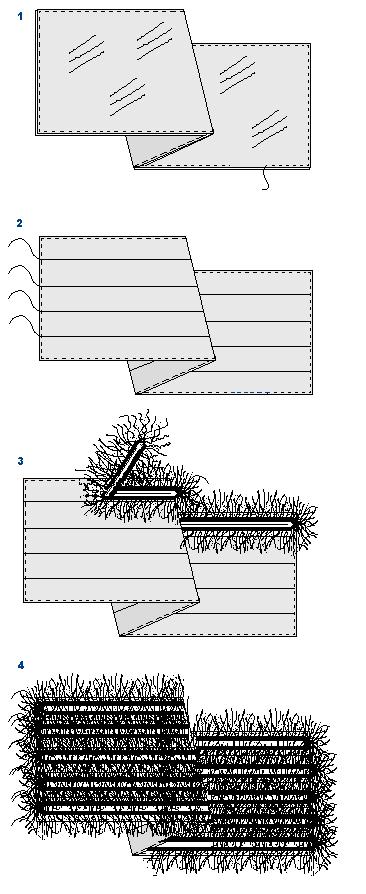 1. Cut two pieces of organza 21″ wide X 73″ long.
2. With right sides together, stitch shawl sections together with a ½” seam allowance, leaving a 5″ opening along one long edge.
3. Turn right side out. Stitch opening closed.
4. Mark and sew four lengthwise rows of stitching 4″ apart. Topstitch ¼’ around the outer edge.
5. Center one boa between each row of stitching. Whipstitch each piece in place catching only one layer of the shawl.
August 24, 2008
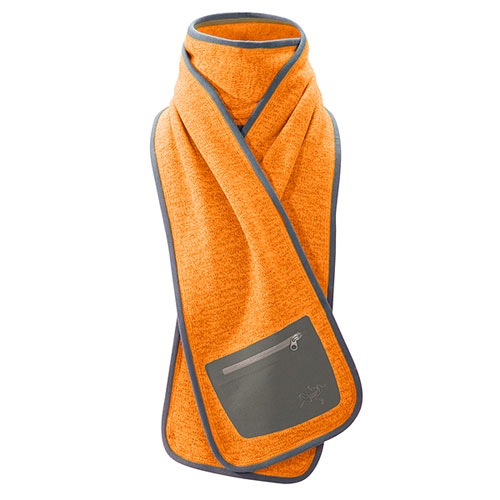 Hit the town this fall with the unique style of the Covert Scarf. A warm cozy neck wrap like this one made by Arc’teryx™ is made with Polartec® Thermal Pro® sweater knit fleece for supreme itch-free comfort and warmth on chilly nights out. The Covert Scarf is nicely bound-finished with a zippered stash pocket laminated on it to hold house-keys and ID when you don’t want to pack a purse.
You will need:
PATTERN
Draw a rectangle 60″ X 8″. At the center taper in 1″ on each side and blend lines gradually to reduce the bulk around your neck. At each end round the corners.
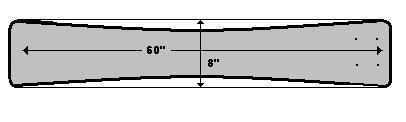
Cut out in thick pill-free polar fleece.
Draw a patch pocket 8″ X 7″ and round off the 2 bottom corners. Add ½”seam allowance all around. Cut out in poplin or cotton duck.
MAKING BIAS BINDING
Binding is a way of neatening a raw edge using a separate length of fabric, usually in a contrasting colour or fabric. The binding trim is cut on the bias as this makes it slightly easier to shape around curves. Cut out in poplin or cotton duck.
Instructions on Cutting Bias Strips
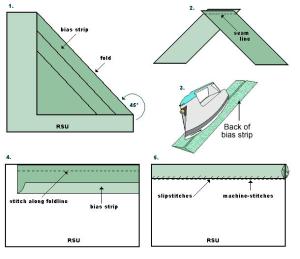 To cut bias strips fold the fabric diagonally so that a straight edge is parallel to the selvedge at a 45°angle.
Press this fold and use this crease as a guide to mark parallel lines for bias strips. (fig.1)
To join bias strips place two lengths, right sides together, right angles to each other and stitch.
Open out, press seam open and trim off the overlapping edges. (fig. 2)
Instructions on Binding the Scarf Edge
Cut bias strips 4 times the finished width of the binding required (the model shown is ½” wide).
Fold both raw edges to the centre on the back, down the length of the bias strips and press. (fig.3)
Open up one side of the binding. Place this side of the binding onto the right side of the scarf with raw edges matching and baste. (fig. 4) Machine stitch on foldline of bias binding. Do not stretch bias strip and ease around curved corners.
Fold the binding over the raw edge to the wrong side of the scarf fabric.
Pin and slipstitch the fold of the binding to line of stitches on the wrong side to encase the edge. (fig. 5)
MAKING STASH POCKET
Cut out the patch pocket in poplin or cotton duck.
 Find and mark the position where you would like the zippered opening to lie on the patch pocket. This should be on the right side of the fabric. You can put a strip of fusible interfacing on the “wrong” side of the fabric at that position, to make the opening a little sturdier.
Next, place and pin a strip of fabric for the facing (3″ X 7″) so that its center covers the pocket opening position, with right sides together. Baste in place.
Chalk a narrow rectangle that’s just a little bit longer than your zipper. Sew around this outline. (fig. 6)
Carefully cut a line through both fabrics within the rectangle, as shown at left, with diagonal cuts towards the corners. The closer you can get to the stitching, the neater the pocket’s finished appearance will be. Use sharp pointed scissors. (fig. 7)
Turn the zipper facing towards the inside, through the opening. You may want to press at this stage, so that the opening is neat and professional looking.
Center the zipper into place and baste. Using a zipper foot, topstitch around the opening to secure the zipper. (fig. 8 )
Stitch along the bottom of the facing to secure to the patch pocket. (This stitching is visible on the right side.)
Turn under ½” seam allowance all around the perimeter of the stash pocket. Press. (fig. 9)
Center stash pocket on one end of scarf and edge stitch around the pocket.
August 23, 2008
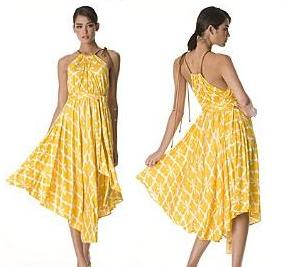
An exotic twist on the classic wrap dress, this deliciously flattering style is designed for drapey, fluid fabrics like silky jersey, luscious rayon or lightweight cottons. The dress has a below-knee length half-circle wrap skirt, and features a gathered neckband on a halter tie. This great wrap-around is sure to become a staple of your wardrobe – it’s your go-to style for dressy daywear or a low-key evening outfit on the town. The dress is easy to make, requiring only two pattern pieces, and no fitting is required.
You will need:
- 2 ¾ yds. of fashion fabric, 45″ wide
- Coordinating thread
- 60″ drawcord
- Kraft paper
PATTERN
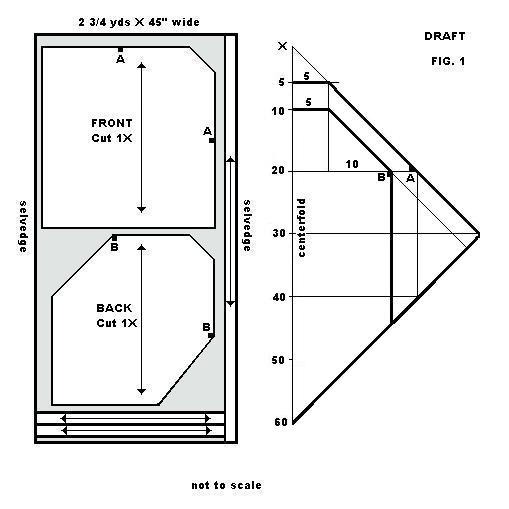
Begin by taking a square sheet of paper and folding one corner to its opposite corner at 45 degrees.
On the folded edge, mark a point X. (see fig. 1)
FRONT WRAP
From X measure 10-inch intervals to a maximum of 60 inches.
Square a line across the paper at each point.
Divide the distance between X and 10″ mark is half. Square across.
On this line, measure 5″.
At the 20″ mark, measure 1/4 of hip measurement. Label this point A.
At the 30″ mark, measure 30″.
Join X to this point with a straight line passing through A.
Join the 60″ mark to this last point at the 30″ interval.
BACK WRAP
On the 10″ mark, measure 5″. Square down to the 20″ interval.
From this intersection, measure 10″. Label this point B.
Join the point at the 10″ interval to point B.
Square down from point B to the bottom line.
Cut the line at the 5″ interval.
Open the draft and trace onto a new sheet of paper. This is the FRONT.
Re-fold the draft and cut out the solid heavy line beginning at the 10″ interval. This is the BACK.
CUTTING (see diagram for cutting marker)
Cut front 1X
Cut back 1X
Cut along selvedge fabric strip for front ties. Cut in half (2 ties).
Cut along width of remaining fabric, 2 fabric strips for back ties.
Fabric tie strips = 3″ wide.
ASSEMBLY
On all edges press under 1/4″.
Turn all edges 1/2″ except for tops and stitch down. Miter at corners.
Along each top edge, turn under 1″ and stitch to create a casing.
Press under 1/4″ along the long edges of the fabric strips and one short edge.
Fold strip in half lengthwise with wrong sides together. Stitch along open edge. Press. Stitch along folded edge.
At notch A and B sew on a waist tie.
WEARING THE WRAP.
Insert drawcord through back casing and front casing to gather neckline. Tie over one shoulder and adjust the slack of the cord based on where the waist ties are positioned on the body.
Wrap back around body and tie in front.
Wrap front over back and crisscross tie straps around waist and draw fullness in close to body. Tie ends with a bow.
Next Page »
 Travelling through the urban jungle isn’t like dustin’ crops, buddy! For one thing, you’ve got to make sure you’ve got all your gear with you. You’ve got a cell-phone, iPod, headphones, keys, wallet, sunglasses… Before you know it, your pockets are bulging, and you’ve got nowhere to hook your thumbs and look cool.