April 2008
Monthly Archive
April 27, 2008

Eye Pillows provide soothing relief in two ways:
- Chill an eye pillow in a ziplock bag in refrigerator or use at room temperature to provide soothing relief for your eyes.
- Heat for up to 30 seconds in the microwave to use as a “mini” heat pad for other parts of your body. (Do not use heated product on your eyes.)
Eye Pillows are perfect for:
- Migraines and other headaches
- Sinusitis
- Rest for tired eyes
- Hand or foot warmers
Eye Pillows are made with 100% cotton covers (size 4″ by 9″) filled with natural grains such as millet or rice, or seeds like flaxseed or linseed, or an herb mix, such as lavender which is a favorite for calming nerves.
Combine Eye Pillows with soothing music and scented candles to maximize your relaxation experience.
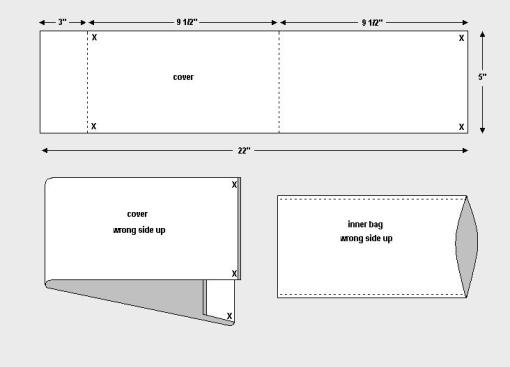
To make an eye pillow, select 100% cotton percale or sateen for the inner bag. Cut a rectangle 5″ by 19″ [13 cm by 49 cm].
For the outer cover, select 100% cotton sateen or flannel. Preshrink fabric. Cut a rectangle 5″ by 22″ [13 cm by 56 cm].
To assemble outer cover, turn and stitch a ¼” double-roll hem on each short end of rectangle. Fold one end of rectangle with right side together (RST) 2″ [5cm] to create a flap. Fold opposite end of rectangle with RST to align ½” [1.25 cm] short of flap fold. (see X location on diagram). Stitch through all layers along long edges. Turn right side out.
To assemble inner bag, fold rectangle in half with RST and stitch along long edges. Turn right side out. Fill bag with a ½ lb. [200 g] of grain/seed/herb mix. Turn under ½’ [1.25 cm] at open end to inside and stitch opening closed. Insert inner bag into cover.
April 19, 2008

 John Lennon sang on the White Album of the Beatles; “Your inside is out, when your outside is in” to express the paradox of the oneness free from illusion of a multidimensional world. The German mathematician and astronomer- theoretician A. F. Möbius discovered at the beginning of the nineteenth century, that something with two sides can have one surface: the möbius ring. The inside is the outside when one joins the two short ends together with a twist into a ring – think of the cyclic of time; visualize by joining the frontside to the backside. Isn’t it amazing?
The möbius ring is a popular pattern used by knitters to create scarves and wraps into wonderful fashion accessories out of yarn. I thought the same idea could be achieved by using double faced fabrics such as Yukon fleece. Both sides of the fabric are identical and raw edges do not fray.
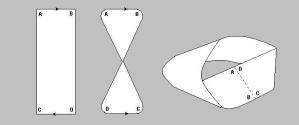
The shoulder shawl, similar like the one above designed by Judy Scott of Mountain Color Yarns http://www.mountaincolors.com, can be easily made from a rectangle of two-ply polar fleece. No pattern is needed.
- Start with a rectangle (ABCD) approx. 20″ long x 60″ wide.
- Give the rectangle a half twist.
- Align the short ends so that they overlap and A matches D and B matches C.
- Stitch through the overlapped layers and trim closely to the stitching.
April 12, 2008

You buy organic, ride public transit and recycle. It’s time to achieve the truly ultimate green lifestyle. Create your own reusable canvas shopping tote bag to replace your plastic and paper bags.
Eco-friendly and reusable, you can design a wide-range of fashionable organic totebags — numerous styles, sizes, and colours. These sustainable alternatives to your traditional shopping bags are often made using hemp, bamboo or, most popular of all, organic cotton.
What you will need:
Self fabric – 1/2 yd. of 54″ width natural fibers
Contrast fabric – 3/4 yd. of 54″ width natural fibers
Matching thread
Card or Bristol board – 6″ x 18″
If you want to launder the tote, serge or zigzag the edges of the fabric, preshrink it in the washer and dryer, then cut the bag pieces to size. (note: allow extra yardage if preshrinking)
You should have a new sewing machine needle for this project and match the size to the weight of fabric being used.
All seam allowances are ½” unless stated otherwise. RST = right sides together.
INSTRUCTIONS
Step 1: No pattern is needed. From self fabric [A], cut two 25″ x 14″ panels.
From contrast fabric [B], cut one 25″ x 15″ rectangle for bottom section, two 19″ x 7″ rectangles for the base, and a strip 54″ x 5″ for the handles.
Step 2: Fold fabric B in half lengthwise. Cut out a 2.5″ square at the lower corners of each folded end.

Step 3: For bag straps, fold strip in half lengthwise with WST and press. Open strip and fold raw edges to centerfold. Refold strip on pressed fold. Edge-stitch along open edge, then edge-stitch along fold. Press. Cut in half for handles.
Step 4: Press under top edge of each panel section (fabric A) 1-1/4″ turn. Divide top edge into thirds and mark with a pin. Open folded edge of front panel and place face up. Align strap ends to each pin location and stitch ends in place along edge. Repeat on back panel.
Step 5: Stitch each panel section to bottom section along its width, with RST. Press seams to one side.
Step 6: Fold body of bag in half with RST, aligning side seam at seam of contrasting fabric and at top edge foldline. Stitch fabric pieces together on the sides and press open.
Step 7: Matching the side and bottom seams of the fabric at point X, stitch across corners.
Step 8: Turn under ¼” along bag top and turn under foldline to create a 1″ facing at the top opening. Drop straps inside bag. Stitch facing at top edge catching the handles on the front and the back.
Step 9: Then, flip strap handles up, out of bag. Stitch 1/4″ topstitching at top edge catching handles once more to reinforce.
Step 10: On each base piece, press under seam allowance on one short end. With RST, match both pieces and stitch around edges leaving folded edge open. Grade corners. Turn right side out and slip in cardboard. Stitch open edge closed. Drop lined base into bottom of bag to reinforce.
April 10, 2008

No pattern is required for this easy fit yoga pant as there is no waste. Chalk out cutting lines directly onto the fabric. Working off of a rectangle, I cut a triangular gusset and inverted it, re-attaching to the leg. How wide the leg fabric is depends on how full you want the final pants to be (narrower for a tapered style, wider for a relax fit). Be careful not to cut the rise too large as it will stretch and droop some resulting in a larger drop than you might think.
Use full width of 45″ fabric and select a fabric that can be cut in either direction. (eg. up or down its length). I prefer a lightweight fabric as it gathers easily with an elastic waist.
Straighten cut ends to a right angle [90 degree].
Fold the fabric, with right sides together (RST), in half lengthwise so that selvedges align. Chalk out 2 lengths for each pant leg.

The minimum outseam length is the measurement from your waistline, over the buttock and down the leg to your heel. Take this measurement while touching your toes. Add 2″ for a waist casing, 1″ for hem allowance and 1″ for seam allowance [total = 4″]. Square across fabric width. (see cutting diagram)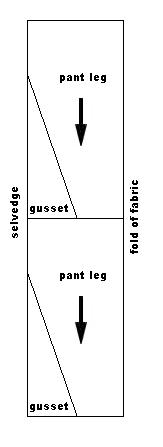
At bottom of rectangle, measure half the distance from foldline to selvedge to create the leg cuff . This measurement may be tapered if you desire a smaller opening at the ankle.
For the rise, measure down 13″ from the waist along the selvedge edge. Join this point with the leg cuff point with a straight line.
The remaining piece of fabric from the leg cut with be inverted and become the leg gusset. [2 pieces for each leg].
 Open each leg and sew a gusset piece to each inseam RST using a ½” seam allowance. Press seam open.
Fold each leg portion RST and align gusset seams. Sew using ½” seam allowance. Press seam open.
Turn one leg inside out. Insert right-side-out leg into inside-out leg with RST. Sew up crotch seam using ½” seam allowance. Turn legs right side out.
Turn under ½ ” seam allowance along waist edge. Press. Turn under 1-1/2″ once more to create casing. Sew along fold edges. Casing may be for elastic or a drawcord. Leave an opening to insert drawcord or elastic.
Turn up hem allowance ½” and press. Turn ½” again and sew double-turned hem.
Front and back of pants are the same, so if I use an elastic waist I sew a small button to inside CF. This “belly button” indicates the front of my pants.


