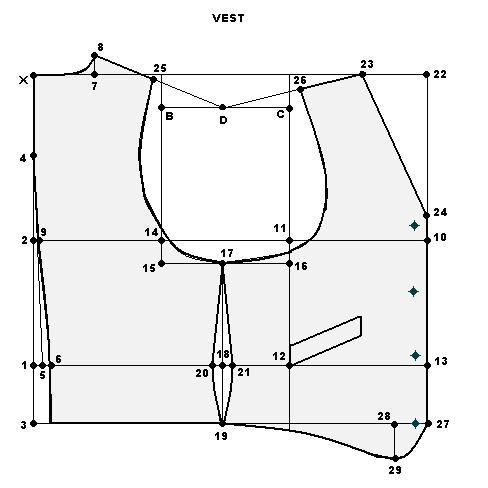
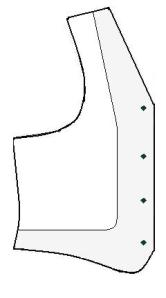
 Featured: Club Jacket by Sanmar
In the fashion world, colour-blocking is in. You might fret that you look ridiculous wearing a burnt-orange shirt and navy-blue pants, but you will find that designers are actually creating single-piece garments in literal blocks of stark colour contrasts. For the daring fashionista, choosing contrasting colours from opposite ends of the colour wheel can result in surprisingly appealing combinations. Here are the rules to the art of colour-blocking: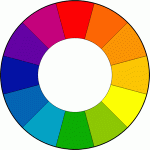
- Three is the magic number
- Keep colours in the same family
- Be loud and proud
- Keep it simple
Discover analogous, triadic, and split-complementary colour combinations.
You will need:
- Up to 1 ½ yds. [1.4 m] of fashion fabric, colour A*, 45” [114 cm] wide.
- Up to 1 ½ yds. [1.4 m] of fashion fabric, colour B*, 45” [114 cm] wide.
- Up to 2 ½ yds. [ 2.3 m] of lining fabric, 45” [114 cm] wide
- Approx. 2 yds. [1.8 m] of elastic, 1” [25mm] wide
- ½ yd. [0.5 m] of fusible interfacing, 24” [61 cm] wide
- 1 separating zipper **
- Coordinating thread
- Kraft paper
* see Cutting Instructions to determine the yardage required as it is dependent upon the colour-block styling. Feel free to use a third colour in your combination; the featured model uses two colours.
** zipper length = distance from top of collar to garment hem minus 1” [25mm].
Design Tip: Match colour of zipper to lightest fabric colour used in colour blocking
MEASUREMENTS
Chest – measure around the upper torso just below the arms
Waist – measure around the narrowest part of torso, just above the navel.
Seat – measure around fullest part of hip, about 9”[23 cm} below waist.
Back width – measure across the shoulder blades from armpit to armpit.
Shoulder – measure from neck to ball socket of shoulder.
Back waist length – measure vertically from nape of neck to natural waistline.
Armsyce depth – measure vertically from top of shoulder to nipple.
Neck – measure around base of neck.
Arm length – measure from end of shoulder to wrist.
Finished Length – measure vertically from nape of neck to desired length.
PATTERN
Easy fitting coats, jackets and smock shapes can be drafted from a simple grid which maps the basic control points of the body shape. The grid lines can be used for reference. Simple dramatic shapes can be achieved from this type of draft, like the club jacket from Sanmar. The grid is constructed to basic body measurements; substantial ease must be added for movement and styling. Once it is completed, the draft is aligned at the shoulder-sleeve seam and stylelines are drawn in and cut apart for colour-blocking. As the designer, you may create any shape of style lines desired and they may flow seamlessly from front to back. (Try to avoid any sharp angles and corners for ease of assembly.)
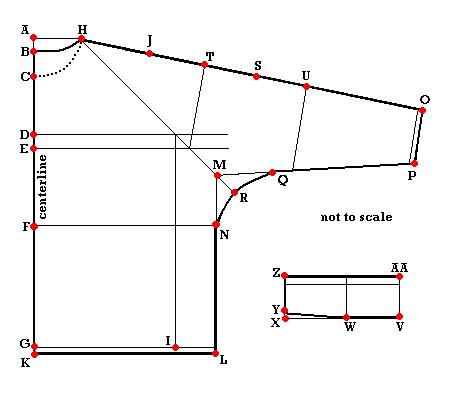
Body Grid
Draw 2 lines from A at a 90° angle.
A-B = ¾” [20mm]
A-C = 1/5 of neck measurement minus ⅛” [2 mm].
B-D = armsyce depth; square across.
D-E = 1” [25mm]; square across to mark chestline.
B-F = back waist length; square across.
F-G = 9” [23 cm]
A-H = 1/5 of neck measurement; draw in back neck curve from B to H, as shown.
Draw in front neck curve from C to H, as shown.
G-I = ¼ of chest measurement; square up to the armhole.
Draw a tangent line from H at a 17°angle from the line at point A.
H-J = shoulder measurement.
Style Adaptation
Mark point K on the centerline at the desired finished length + 1” [25mm] turn; square across.
K-L = ¼ of the seat measurement + ⅓ the distance of G-I for ease
Draw a construction line from H through the armhole (intersection of D and I) as shown.
Square up from L to locate M at the intersection of the lines.
Locate N at the waistline.
Extend the shoulder line from J; J-O = arm length + 1” [25mm] turn.
O-P squared from O = 12” [30.5 cm]; join P-M.
M-Q is the measurement M-N.
Draw a smooth underarm curve from N to Q; R is located at the intersection of lines, as shown.
Collar Section
Measure front and back necklines from draft. Compare amount with actual neck measurement. If necessary, increase neckline on draft so total is at least 1” greater than actual body measurement. (This amount may be greater than 1 inch if desired)
On a straight line, V-W = ½ of the back neck measurement.
W-X = ½ of the front neck measurement; square up.
X-Y = ⅜” [10mm].
X-Z = 4” [10 cm].
V-AA = 4” [10 cm]. (CB line)
Join Z and AA.
Fold on CB line and trace out mirror image of collar.
Add seam allowance.
Colour Blocking
S is midway between J and O.
Lay a set square on the sleeve line at S and draw a line at a 90°angle to touch on the line from E. Label this point, T.
S-U = distance of S-T.
Square a line from U to the underarm line.
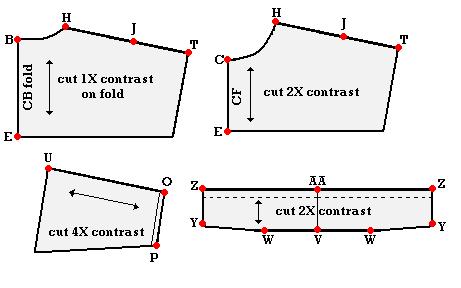
For the back yoke, trace out B-H-J-T-E-B.*
For the front yoke, trace out C-H-J-T-E-C.*
For the sleeve bottom, trace out U-O-P-U.*
* Add seam allowance and label CONTRAST.
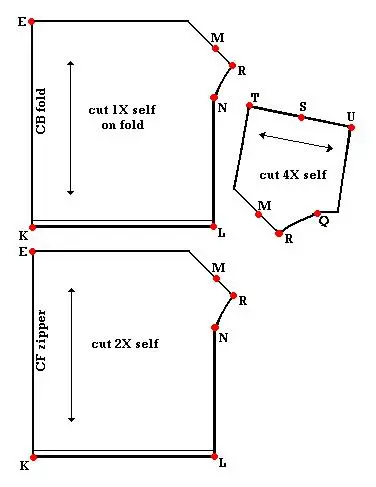
For the upper sleeve, trace out T-S-U-Q-R-M-T.**
For the front and back body, trace out E-M-R-N-L-K-G-F-E.**
** Add seam allowance and label, SELF.
Lining
For front lining, trace out C-H-M-R-N-L-K-G-F-E-D-C.***
For the back lining, trace out B-H-M-R-N-L-K-G-F-E-D-B. ***
For the sleeve lining, place sleeve line (H to O) on foldline of paper and trace O-P-Q-R-M-H. *** 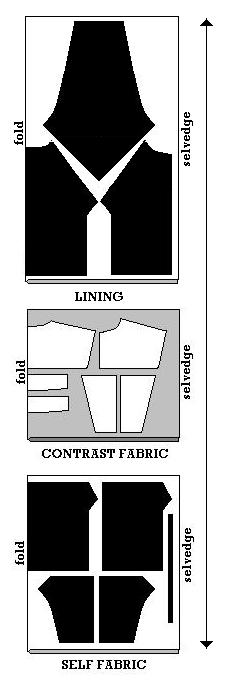
*** Add seam allowance and label, LINING.
CUTTING
Fabric A (self)
Front Body – cut 2X self
Back body – cut 1X self on fold
Upper Sleeve – cut 4X self (reverse)
A 2” wide strip equal to length of collar.
Fabric B (contrast)
Front yoke – cut 2X contrast
Back Yoke – cut 1X on fold contrast
Sleeve bottom – cut 4X contrast (reverse)
Collar – cut 2X on fold contrast
Lining
Front – cut 2X lining
Back – cut 1X on fold lining
Sleeve – cut 2X lining
Interfacing
Collar – cut 2x fusible
Design Tip: Select 2 to 3 colours from the same kind of fabric for colour-blocking. If you are creating a bold outer-shell, keep the lining subdued; or if the shell is somber in colour, choose a bright lining.
ASSEMBLY
1. Iron fusible interfacing to wrong side of collar pieces following manufacturer’s directions.
For outer collar, stitch contrast strip 1” [25mm] from edge across top of collar with right sides facing together (RST). Flip trim FACE UP and trim any excess fabric if necessary.
2. For lining, sew sleeves to each side of back with RST.
Sew one front to each sleeve with RST.
With RST, attach untrimmed collar piece to neckline of lining.
Fold sleeves in half with RST and align and match underarm and side seams of body. Pin/baste and sew seams. Press seams open. Set aside.
3. For shell, sew sleeve bottoms to upper sleeves with RST for the front and back sections.
Sew sleeve halves to body with RST for the back and front sections.
Sew back yoke to back body section with RST, pivoting at the armhole seam.
Sew one front yoke to each front body section with RST, pivoting at the armhole seam.
With RST, align and match fronts to back at all seams on sleeve line. Pin/baste and sew shoulder and sleeve seam.
With RST, attach trimmed collar piece to neckline of shell.
4. Insert separating zipper to front edge from top of collar to within 1” [25mm] of hemline.
Fold sleeves in half with RST and align and match underarm and side seams of shell.
Pin/baste and sew seams. Press seams open.
5. To insert lining, place sleeves of shell into sleeves of lining with RST. Align and match outer edges of the garment. Pin/baste together. Stitch along the zippered edges and across top of collar. Trim corners of collar to reduce bulk. Turn garment RIGHT SIDE OUT. From between the shell and lining, attach the seam allowances of the collar and neckline together. (This can be machined or basted by hand.)
With garment FACE UP, topstitch along zipper edge and collar.
6. At the wrists and the hemline, turn in 1 ¼ ” [30mm] on the shell portion only and press. Align the edge of the lining along the creaseline. (This will allow for a bit of slack in the lining.) Turn under ¼” [6mm] on the shell fabric and stitch a 1” [25mm] casing for the elastic. Leave a small opening to thread the elastic through each casing.

7. To complete the jacket, draw elastic through casing at wrists and zigzag ends together. Stretch out elasticized cuff to distribute the elastic evenly and stitch up opening. “Stitch in the ditch” through the sleeve seams to prevent elastic from twisting in casing.
8. Draw elastic through casing at hemline. Tack each end of elastic at the end of the casing at the CF. Stretch out elasticized hem to distribute the elastic evenly and sew through the sideseams using the “stitch-in-the-ditch” method to prevent the elastic from twisting.


