 Old-fashioned silks or snazzy brocades, pop polka dot or preppy pinstripes. Or score vintage fabrics from thrift stores or even from clothes that might be out of date. Solid or stripe, paisley or Art Deco, a bow tie can do a rare thing to a man’s wardrobe: add notes of polish and surprise at the same time. Bow ties traditionally come in two varieties, the classic thistle or butterfly cut, (as pictured here) and the sleeker bat-wing variety. Hugh Laurie or Elvis Costello? Sean Combs or Daniel Craig? Which one you prefer depends on whether you’re going for a tongue-in-cheek panache or a certain punk minimalism.
Beats fashion, and according to the New York Times, the bow tie is back this year. That’s the great thing about being playful with your wardrobe – sooner or later everything will be in vogue again.
CLASSIC THISTLE BOW TIE
Dimensions: 4.5″ long x 2.5″ wide
You will need:
- 5/8 yard of silk fabric, 45″ wide
- 1/4 yard of fusible interfacing, 45″ wide
- coordinating thread
- 1 bow tie set *
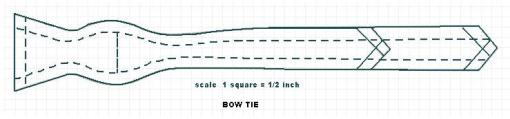
PATTERN
Enlarge the pattern on graph paper. Scale is 1 square = ½ inch
ASSEMBLY
1. Cut along the pattern’s thick solid lines for a classic thistle shape bow tie, using the outline for the longer piece first. Fold the fabric in half. Pin the pattern to the fabric, aligning it parallel to the fold (or, if you want diagonal stripes, at a 45-degree angle to the fold). Cut the fabric through the two thicknesses.
2. Repeat the process, using the pattern for the shorter piece. Now you’ll have two long pieces of fabric and two shorter pieces. 
3. Cut out one long piece and one short piece from the interfacing. Iron the interfacing to the wrong side of one of each length of the fabric pieces, according to manufacturer’s directions.
4. Pin the right sides together of each bow tie section to each interfaced bow tie section. Stitch using ½ inch seam allowance, leaving a 2-inch-wide opening along the straight side of both pieces.
5. Grade the edges (trim ¼ inch from the top edge to reduce the bulk) and trim the corners, then turn each piece right-side out (I use a loop turner) and steam press. Slip stitch the openings.
6. Attach the pieces of the bow tie set: Thread the end of the longer tie piece through the adjuster, then through one of the hook pieces. Slide the end of the tie back through the adjuster and slip stitch the end in place. Thread the shorter tie piece through the other hook piece, turn back the end and slip stitch the edges.


January 29, 2009 at 1:00 am
Many thanks (from London) for thjis extremely helpful piece on the pattern cutting.
March 22, 2009 at 7:03 pm
I am looking for bow tie kit/s so that I can make several bow ties for my grandsons & friends. I got a pattern by taking apart an old one which allows sizing with a piece of ribbon which has an eyelet every quarter inch. I wanted to locate that or find another way to make the ties adjustable.
I can’t find the hardware. Can you help me locate a source to purchase them?
March 31, 2009 at 6:55 pm
Pam: a few of my favorite bow ties are made in two pieces: buttons and button holes allow for adjustment. The other suggestion I’d have is in the ribbon liner of one side, cut your small openings, similar to button holes and just use the small hook of a hook-and eye to stop it. At the risk of being indelicate, the adjustment buckle from a bra strap might just complete your needs. Good luck.
May 7, 2009 at 8:58 am
[…] Fliege Hinweis: Bei den folgenden Links ist die Anmeldung auf der verlinkten Seite erforderlich. Darauf achten dass bei “Price” “FREE” angegeben ist, danach ”Print at home” anklicken. […]
July 24, 2009 at 6:07 am
I was wondering how to tie a thistle bow tie? I know it is different to a normal bow tie but no-one can tell me how to do it. Not even Dad!
July 24, 2009 at 12:31 pm
Check out this site to see a step-by-step demo on tying a bowtie.
http://www.videojug.com/film/how-to-tie-a-bow-tie
WD
November 29, 2009 at 2:18 am
Generally I do not make a comment on blogs, but I have to mention that this post really forced me to do so. Really nice post!
February 14, 2010 at 7:59 pm
[…] Found here! […]