September 2007
Monthly Archive
September 29, 2007
 Learn to make skirt patterns according to your measurements; and they’re guaranteed to fit! To give you an illustration of how easy it is to make a pattern, let’s make a 8-gore skirt like the model is wearing. For the example, we’ll use a waist measurement of 32 inches, hip 42 inches and skirt length of 24 inches. Remember, when you make the skirt for yourself you simply use your waist, hip, and skirt length measurements instead of these sample ones.
Let’s establish your height parameters.

Square across the paper to make a “T” shape. This will be the waistline.
Then measure down 8″ [20 cm] and draw a parallel line squaring from the centerline. This is the hipline.
Measuring from the waistline, draw a second parallel line equal to your desired skirt length and square from the waistline. This will be the hemline.
Now that you have your grid set up, it is time to use your body measurements to set the girth parameters.
Start by deciding how many gores you wish to create. Even numbers (4,6, 8, 10, etc.) will make your skirt symmetrical, but I like to use the “rule of 3s”. Odd numbers (5, 7, 9, 11, etc.) makes for a more interesting look. Either way, the number of panels used will create a gore skirt that will fit.
For the waistline, take your waist measurement divided by the number of panels desired.
For example, to create a 8-gore skirt to fit a 32″ [81.5 cm] waistline.
32″ divided by 8 = 4″[10 cm]
The hipline is normally 8″ [20 cm] below the waist, so at that point you’ll make a horizontal like equal to hip divided by number of panels desired + ¼” [6 mm].
Our sample hip measurement is 42″ [107 cm], so the horizontal line is 5 ¼ ” [13.5 cm] plus ¼” [ 6mm] = 5 ½” [14 cm].
With a straight yardstick, draw in the outside lines of the skirt, connecting the waist to hip to the hemline and draw in the bottom line.
At the top of the”T”, measure down ¼” [6 mm] and make the slight waistline curve.
The outside edges of the bottom are measured up ¼” [6 mm] each and the slight hemline curve drawn.
Make your waistband to equal your waist measurement plus 1 ½” [40 mm], and the width is 2 ½” [65 mm] (your finished waistband will be 1 ¼” [32 mm] wide).
Remember you have not allowed for seams yet, so after making the skirt pattern, mark the 1/2″ seam allowance all around and add a 2″ hem. The seam allowance will be drawn around the skirt as well as the waistband.
Remember you will need to cut multiples of this pattern equal to the number of panels desired. Eg. cut 8 of the skirt pieces, since it is a 8-gore skirt.
The vertical center line of the pattern will be used as the “straight grain” line, when placing the pattern on the fabric.
September 22, 2007

In the 1920s, the fur stole was the elegant secret of radiant Hollywood divas, worn with delicate low-cut evening gowns – and even worn provocatively with trouser suits by the “enfants terribles” of the time. Today the fur wrap is once again the height of fashion – made from faux fur with a bow tie. Now, as in the 1920s, it goes with evening dresses, but also with business suits and simple knitted dresses, and today it is still at its most seductive worn against bare skin. Arrange this shapely fur around your shoulders and tie the opulent double-sided satin ribbons into a large bow. Extraordinarily beautiful and elegant, the colour – a rosé shade that is perfect for winter, looks good with all dark colours, natural shades, and greys of the season.
The soft, deep-pile woven fur is anti-static, soft and probably feels even better than real fur. It will keep its look for years, without losing hairs, and will never smell of mothballs. Measures approx. 40″ x 10″ (102 x 26cm).
You will need:
1/3 yd. (30 cm) of woven fake fur: 100% acrylic.
1/3 yd. (30 cm) of “Kasha” satin lining: 100% acetate
1/3 yd. (30 cm) of lamb’s wool interfacing: 100% wool
1 yd. (90 cm) of double-sided satin ribbon: 100% acetate
7 yds. (6.5 m) of ¾” wide twill tape: 100% polyester
 With your piece of faux fur atop the work surface, place the wrong side up and chalk an “arrow” pointing the direction of the fur pile. The hairs of the fur will point “downward”. Chalk mark the center of the fabric, and measure out 20″ [51 cm] on either side of the centerline. Square from this point to create a rectangle, 40″ by 10″ [102 by 26 cm].
 Using a large dinner plate, chalk mark curved pattern outlines on each corner (see illustration). Cut out the backing with razor blade without cutting fur. Hold the fabric backing slightly off the table and pull as you slash. Do not cut out with scissors or you will cut the hairs.
For the lining, fold and pin the fabric right sides together, and measure 22″ [56 cm] from the foldline. Square a chalk line from this point to create a rectangle, 44″ by 12″ [112 by 30 cm] and repeat the arc pattern on each corner. Chalk a notch point on each end of the foldline. Cut out the lining on the fold and open flat.
 Sew a length of twill tape along the centerline of the fur piece with a hand herringbone (zigzag) stitch, keeping edge of tape flat with back of the fur. These stitches can be large as they will not show on the right side of the fur.
Sew twill tape on the outer edges to be sewn, with a hand herringbone (aka catch) stitch, keeping edge of tape flush with edge of fur backing and outline the perimeter with it. Since the “fur” has no seam allowance this will stabilize the edges from stretching and puckering.

Now, starting at the centerline, work with one fur side toward you and place the twill tape on top the fur edge to sandwich the fur edge between two layers of twill tape. Keep edges even and push hairs away from getting caught in tape. Join twill tape to edges with a close whip (overhand) stitch. Since the tape is necessary for reinforcement, be sure to catch both tapes as you do so. Sew around the perimeter of the fur piece. fig 1
Center the lamb’s wool interfacing on the back of the fur and baste along the center and to the edges. These stitches can be large ones as they will not be visible on the right side. Trim away any excess.
Turn the outer twill tape over the seam and pin to the inside edge on the back while wrapping over the interfacing. Baste twill tape to fur piece. fig 2
Cut the ribbon length in half and secure one end to each of the “X” points. (see illustration) to the fur piece. Cut the loose end on the diagonal.

Turn in 1″ (25 mm) seam allowance on the satin lining and baste along fold. Align notches at centerline. Pin lining to edges covering the twill tape and interfacing. If lining edge puckers, clip shallowly into seam allowance to release. Slipstitch along folded edge of lining to seam edge of fur. Remove basting thread.
September 15, 2007
 This pattern design method can be used to determine drafting measurements from a given figure height combined with girth measurements for the chest, waist and hips. Knowing the person’s height allows for formulations of various lengths based on the Golden Mean and combined with established size parameters, a trouser or torso pattern can be drafted for an average human body.
H = full length of body; also the span of laterally outstretched arms, measured from finger-tip to finger-tip, is equal to the height of the body.
1/2 H = upper part of body (torso) or lower part of body (legs)
1/4 H = length of leg from ankle to knee and length from chin to navel
1/6 H = length of foot and length of forearm (measured from elbow to wrist)
1/8 H = length of head from crown to bottom of chin
1/10 H = height of face; also length of hand
Drafting By Height: Trousers (based on 8 heads per figure)
The theory based upon the Golden Mean can be used to determine drafting measurements from a given figure height of an average or off-proportioned body. You need the following measurements to draft a trouser pattern: height, waist and hips. The scale is one head equals 1/8 of the total height.
Example:
for a person who is 5 feet 8 inches tall, one head length is 8 ½”
5′ 8″ = 68″ 68″/8 = 8.5″
Rise is 1 head plus 1″ ease plus width of the waistband
eg. rise = 1/8 height + ease + waistband width
Inseam is 4 heads minus Y (amount taken off for width of trouser cuffs)
eg. inseam = 1/2 height – Y
Outseam is inseam plus rise, or
5 heads plus ease minus Y plus waistband width
eg. outseam = 5/8 height + ease – Y + waistband width
Example:
Given a height of 5 feet, 8 inches, trouser cuff width of 18″ and a waistband 1-1/2″ wide, then:
rise = 68/8 + 1 + 1.5 = 11
inseam = 68/8 – 2.5 = 31.5
outseam = 5/8 x 68 + 1 – 2.5 + 1.5 = 42.5
Table for Leg Reduction (Y amount)
| for bottom width |
take off Y amount * |
| 24″ |
1″ |
| 23″ |
1.25″ |
| 22″ |
1.5″ |
| 21″ |
1.75″ |
| 20″ |
2″ |
| 19″ |
2.25″ |
| 18″ |
2.5″ |
* for shaped trouser cuffs, use less Y amount (0.5″ to 0.75″)
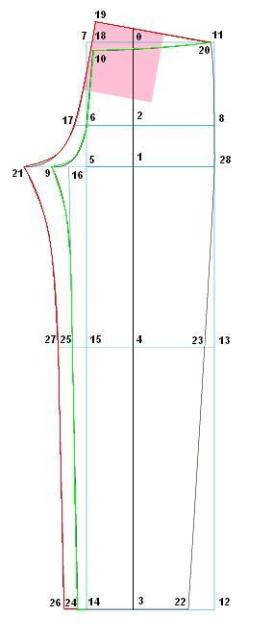 Trouser draft:
square both ways at 0.
0-1 = body rise + 3/8″ [1cm]; square across
0-2 = waist to hip; square across. (approx. 8-9″ [20-23 cm]).
0-3 = outseam; square across
1-4 = midway between 1-3 minus 2″ [5 cm]; square across.
1-5 = 1/12 hip mmt. + 5/8″ [18 mm]; square up to locate points 6 and 7.
6-8 = ¼ hip mmt. + 3/8″ [10 mm]
5-9 = 1/16 hip mmt. + 3/8″ [10mm]
7-10 = 3/8″ [10mm] squared across and 3/8″ [10 mm] squared down
Join 10-6 with straight line and join 6-9 with a curve line as shown.
This is the centerfront crutch seam.
Square up and down from point 8.
10-11 = ¼ waist mmt. + 3/8″ [10mm] (note: point 11 will “sit” on line 7.)
12 is located at intersection of 3 and 8.
13 is located at intersection of 4 and 8.
Square down from 5 to locate 14 and 15
5-16 = 1/2 mmt of line 5-9
6-17 = ¼ mmt of line 5-9
7-18 = 3/8″ [10mm]; join 17-18 and extend as a tangent line
19-20 = ¼ waist mmt. + 3/8″ [10 mm], taken at a 90 degree angle from tangent line so that line 19-20 touches the line 7-11. (Note: point 19 will be located on the right angle and the constructed line may not touch at point 11 as shown.)
9-21 = ½ mmt. of 5-9
Join 17-21 with curved line as shown
3-22 = 1/4 trouser cuff width minus 1/4″ [6 mm]
23 is located on kneeline.
3-24 = ¼ trouser cuff width minus 1/4″ [6 mm]
4-25 = 4-23
Join 24-25 with a straight line and 25-9 with a curved line as shown.
24-26 = 3/4″ [20 mm]
25-27 = 3/4″ [20mm]
Join 26-27 with a straight line and 27-21 with a parallel curved line as shown.
5-28 = ¼ hip mmt. + 1/4″ [6 mm]
Join 22-23-28-8 and gently curve into 20 to draw outseam leg seam.
This is an easy fit type trouser pattern. Trace off front and back patterns. If you desire extra ease (seat angle) in crutch of trouser’s back portion, cut along back hipline and open a wedge about 1-1/2″ [40 mm] wide at CB to nil at side seam. Redraw centerback seam.
September 14, 2007
 How about an adult version of “connect-the-dots” to create some men’s wear? Sometimes known as a tropical shirt, Hawaiian or aloha shirt, this casual type shirt is loose fitting, short-sleeved and features a convertible collar with a rever. Make it up in a border print or traditional floral print fabric.
Take the following measurements of your man: chest, neck, arm length and finished length (usually hip level).
Note: 3/8″ seam allowance is included in draft
Working Scale = 1/3 chest measurement + 6″ (15.5 cm)
example: for a men’s medium size the scale = 42/3 + 6 = 20
PLOT EACH POINT & CONNECT-THE-DOTS
Mark point 0 and square both ways from it.
1 from 0 = ½ scale + 1″ (25 mm)
2 from 0 = ¼ scale
3 from 0 = 1/8 scale
4 from 0 = full length (30″/ 76 cm)
5 from 4 = 1 ½” (40 mm) for turn up.
Square all points across the paper.

6 from 0 = 1/6 scale + 3/8″ (1 cm); square up to 7.
7 from 6 = 1 ¼” (32 mm)
8 from 1 = 1/3 scale + 2 ½” (65mm); square up to locate 9 and 10.
11 from 10 = 1″ (25mm)
12 squared from 11 = 1″ (25 mm); join 7 to 12.
13 from 1 = 2/3 of half the chest measurement + 2″ (50mm)
14 from 1 = ½ of chest measurement + 2 ¾” (70 mm)
15 from 14 is midway between 13 and 14; square up to 16.
16 from 15 = ½ scale + 2 ¼” (58 mm); join 16 to 10.
17 is the distance between 7 and 12 – ¼” (6 mm) and is located on line 16-10.
Join 17 to 13; 18 from 17 = 1 ¼” (32 mm) and is located on line 17-13.
19 is midway 8 and 13; square down to locate 21 at hemline.
20 from 19 = 1 ¼” (32mm)
Shape armhole as shown with French curve ruler.
22 from 21 = 1″(25mm)
Join 20 to 22 for forepart side seam.
23 is located at intersection of hemline and centerfront (CF) line.
24 from 23 = ¾” (20 mm); shape front hem from 24 to 22 with 90° corners as shown.
25 is located at intersection of lines squared from 16 and 14.
26 from 16 = 1/12 scale + ¾” (20mm)
27 from 25 = 1/6 scale
Connect 26 and 27 and continue 1 ½” (40 mm) more to locate 28.
29 from 16 = ¾” (20 mm) for collar stand and creaseline of rever.
30 and 32 are each 1 ½” (40 mm) from CF line (overlap extension) as shown.
31 from 30 = 1″ (25 mm); join 31 to 29 to indicate roll-line of rever.
33 from 27 = ½” (13mm) for collar step.
Fold along line 28-32; trace out front shoulder, front neckline and front hem.
Shape self-facing as shown, making it 3″ 75 mm) wide at hem and blending uo to the shoulder for 1 ½” (40 mm). Note: The gray-shaded area should be interfaced.
Grainline is parallel to CB and CF lines. The CB may be cut on the fold.
Convertible Collar
Point 33 is the collar step for the collar and rever.
Trace out front neckline and rever, front shoulder, and roll line.
0 is located at intersection of roll line and shoulder
1 from 0 = back neck measurement (line 0-7 on body draft)
2 from 1 = 2″ (50mm)
3 from 0 = ½” (6 mm)
X is located where roll line crosses front neckline.
4 from X = 1 ½” (40 mm)
Shape 4 to 2 through point 3 with a French curve ruler.
5 from 3 = 1″ (25 mm)
Join 5 to 2 with a dash line and square on point 2 to locate 6 and 7.
6 from 2 = 2 ½” (65 mm)
7 from 2 = 1″ (25 mm)
Join 6 to 4 passing through point 3 with a French curve ruler.
To locate 8, swing an arc from 28 which is 2 1/8″ (55 mm) and another of equal size from 33.
Connect 8 to 33 and 8-7 with a slight curve. Then blend line 7-3-4. into point X.
Trace out as a separate piece for the top and under collar with the line 6-7 along a folded piece of paper.
Note: The under collar should be interfaced.
Grainline is parallel to line 6-7.
Short Sleeves*
* This may vary due to styling. Measure the circumference of the armhole from your draft.

Fold paper in half lengthwise.
Plot point 0 on folded edge.
1 from 0 = 1/6 armhole circumference + 1″ (25 mm)
2 from 0 = half of arm length.
3 from 2 = 2″ (50 mm)
4 from 0 = ½ armhole circumference (as it falls on line 1)
5 from 3 = 1/3 scale.
Divide 0-4 into 3 equal parts to locate 6 and 7.
8 from 7 = 3/8″ (10 mm)
9 from 7 = ¾” (20 mm)
10 from 6 = 5/8″ (17 mm)
Shape front sleeve cap 0-8-6-4 with a French curve ruler.
Shape back sleeve cap 0-9-10-4 with a French curve ruler.
Trace out the sleeve and the sleeve cap back portion.
Fold along line 3-5 and trace out bottom facing as shown.
Unfold paper for full short sleeve pattern piece
Note: grainline is located on line 0-2.
September 13, 2007
 With the current fashion flashback to the 1960’s, try a ruffled shoulder peasant-style blouse. A great piece for casual daywear with any skirt, or an evening out because this kind of soft blouse is flattering for most figure types. And the best thing is, no pattern is required.
You will need:
- approximately 1-1⁄2 yards (1.37 m) of fashion fabric that is at least 41 inches (104 cm) wide. If using a washable fabric, pre-shrink fabric before sewing.
- approximately 1-5/8 yards (1.48 m) of 1/4″ inch-wide (0.6 cm) elastic.
- sewing thread to colour-match.
Pattern Key – see chart for cutting instructions
*The blouse: 1 piece
*Upper ruffle: 4-1⁄2 inch (11.4 cm) wide bias strips – total length of 92 inches (234 cm)
*Lower ruffle: 5-1⁄2 inch (14.0 cm) wide bias strips – total length of 92 inches (234 cm)
Important Note: Seam allowance is 1⁄2 inch (13mm) unless otherwise indicated.
Cutting Chart

Eight Easy Assembly Steps
 1. Fold and stitch blouse as shown. Blouse width is equal to your bust measurement plus 3-1⁄2 inches (8.9 cm). See cutting chart.
2. Stitch a 1⁄2-inch (1.3 cm) hem on bottom edge of blouse. Stitch a 5/8-inch (1.6 cm) hem on top edge of blouse to form a casing for elastic.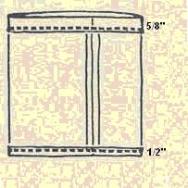
3. On the inside of the blouse, open the casing at the side seam to create a small opening in which to insert the elastic. Draw 25 inches (63.5 cm)* of elastic through entire length of casing, pulling elastic out though the same opening. Overlap ends (be careful not to twist elastic), and sew the two layers securely. Slipstitch closed the opening of casing.
* If this elastic is too tight, take your chest measurement and subtract 3 inches (7.6 cm). You want this elastic to be snug so that the top will not slip down.
4. Join bias strips for upper ruffle and cut strip so it totals 92 inches (234 cm). Join ends to form a circle. Repeat for lower ruffle.
5. Stitch a narrow hem on one raw edge of each ruffle. With right side of upper (shorter) ruffle against wrong side of lower (longer) ruffle, align the two layers so that the raw edges are even. Stitch together.
6. Bring lower ruffle up and over the upper ruffle so that now the wrong side of the upper (shorter) ruffle is against the right side of the lower (longer) ruffle. Stitch 5/8 inches (1.6 cm) from top as shown, creating a casing. Thread or pin baste the mid-points of the ruffle, which will be the center front and center back.
7. Make a small opening in one of the joining seams of this casing in which to insert elastic. Draw a 32-1⁄2 inch (86 cm) length of elastic through casing in same manner as above, pulling elastic out though same opening, and sewing ends together. Stitch opening closed.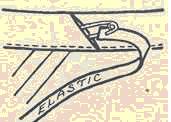
8. Lay ruffles over top of blouse, right sides up. Pin ruffle casing to blouse, matching center fronts and center backs. Hand sew ruffle casing to blouse for 2-1/4 inches (5.7 cm) on either side of center front and center back, making sure not to catch the ruffle in the stitching.
September 8, 2007
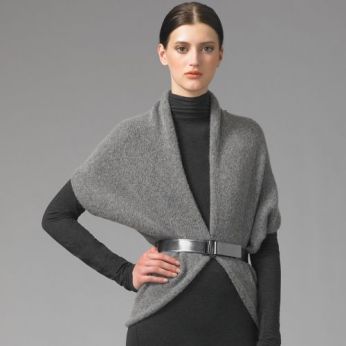 Saks Fifth Avenue features this season’s trendy cover up, the shrug by Vince. The shrug pattern is an ideal project with which to experiment with fashion design for several reasons — it is knitted or sewn in one piece, there is minimal finishing, it is easy to wear, and relatively quick to make. The Vince version is an angora knit but can be made up in any stretch fabric. Try mohair, stretch velvet, or double knit. Plus, these shrug patterns are easy to adjust. For instance, this basic shrug pattern is relatively snug and feature elbow-length sleeves. If you want to make longer or shorter sleeves or make the back larger, adding or subtracting length is easy. Wear it belted like the model.
SHRUG MEASUREMENTS: SIZE S (M, L)
Cuff-to-cuff: 45 ½ (46 ½, 47 ½)”
Width at back: 16 ½ (17 ½, 18 ½)”
Top-to-hem: 21 (22 ½, 24)”
NOTE: The greatest stretch of the knit fabric runs around the girth of the body (usually the crosswise grain from selvedge to selvedge). Most stretch fabrics are available in 60″ widths. You’ll need about 2/3 yds. (65 cm).
Measure a rectangle 21″ by 45½” (length X width) for a size SMALL. (Use the measurements above for MEDIUM or LARGE.)
Measure 14½” in from each short end of the rectangle and mark as A,B,C, & D according to the diagram.

Measure 4½ inches down from the top & up from the bottom of each long end of the rectangle and mark as E, F, G, & H.
Measure 2½ inches down from A, B & up from C, D. Mark as I, J, K & L.
With a ruler, draw a line from E to K, F to I, G to L and H to J.
Blend a gentle arc between AF, BH, CE, & DG.
Cut along these 4 lines.
Fold fabric with right sides together. Pin points E to F, A to C, B to D & G to H.
Sew ½” seam allowances along edges A to F and B to H, leaving an opening between AB & CD to form the “body” portion. Turn right side out.
Turn in raw edges at cuffs and body opening by 1″ and hem. Add a large hook & eye as a closure at waist level.
September 7, 2007
 The lined beret is sized in small, medium and large with an inside grosgrain ribbon band. Measure your head, placing the tape measure around your forehead and skull. Choose your size by comparing your measurement to the hat measurements below. The beret in the photograph is made up in lightweight woolen fabric; I can suggest choosing a tweed, double knit, velvet, or synthetic suede fabric as well to make it up.
SMALL BERET - 22" (56cm)
MEDIUM BERET - 23" (58.5)
LARGE BERET - 24" (61 cm)
You will need:
½ yd. (.5 m) of fashion fabric
½ yd. (.5 m) of satin lining
7/8 yd (.8m) of 5/8″ (15 mm) grosgrain ribbon for headband
Matching colour thread
Pattern Pieces Key
1. Upper Section
2. Lower section

Enlarging The Pattern
Each square = 1″ (2.5 cm)
Includes 5/8″ (15 mm) seam allowance.
Enlarge your pattern on 1″ graph paper or a pattern tracing material such as Red Dot TM by HTC.
Pieces 1 and 2 are quarter pieces; for cutting ease, make each of these full pieces.
Cutting
Upper Section – 1 fabric, 1 lining
Lower section – 1 fabric, 1 lining
Ribbon – S – 23″ (58.5 cm)
M – 24″ (61 cm)
L – 25″ (63.5 cm)
Marking
Mark quarter points on the inner edges of lower section and lining.
Make A Beret in 6 Easy Steps

1. With right sides together, pin fabric upper section and lower section together; stitch. Press seams towards lower section, notching where necessary.

2. Topstitch lower section ¼” (6mm) from seam. Trim seam allowance.

3. Construct Lining upper and lower in same manner as Fabric. With wrong sides together and raw edges even, pin the Lining inside the fabric; baste.

4. Lap the ends of the ribbon headband, turning under ½” (13mm) seam allowance. Stitch in place. Using the seam as the center back, divide into quarters and mark.

5. Matching markings, pin the Headband to the Beret lower section, placing the edge along the seamline. Stitch close to the inner edge and again ¼” (6mm) away. Trim the Beret seam allowance close to the second stitching.

6. Turn the Headband to the inside along the seams; press. Tack the Lining at quarter points.
September 7, 2007
 (Courtesy of Vogue/Butterick)
The wraparound obi style belt is sized in small, medium and large. Choose your size by measuring your waist and comparing your measurement to the chart below.
| |
S |
M |
L |
| IN. |
24-25
|
26-28
|
30-32
|
| CM |
61-63.5 |
67-72 |
76-81 |
You will need:
3/8 yds (.35 m) of synthetic suede or leather fabric.
Matching polyester thread.
SOBO TM Fabric glue.
Pattern Piece Key
1. Front
2. Sides
3. Tie Ends
4. Tassel

Enlarging the Pattern
Each Square = 1″ (2.5 cm)
Includes ¼” (6mm) seam allowances.
Enlarge your pattern on 1″ graph paper or a pattern tracing material such as Red Dot TM by HTC. Pieces 1 and 3 are given on a fold. For ease of cutting, makes theses full pieces.
Cutting
Front – cut 1
Sides – cut 2
Tie ends – cut 2
Tassels – cut 2
Marking
Use a water-soluble tracing paper and tracing wheel or marking pen. Mark the pleat lines on the wrong side of the belt. Mark the cutting lines for the tassel fringe on the wrong side of each tassel section. Cut along the lines.
Make A Belt In 6 Easy Steps

1. Make tucks on the FRONT section by bringing the lines of small ●’s together: stitch. Turn in ¼” (6mm) on the curved edges; then stitch 1/8″ (3mm) from the edges. Note: These edges may also be glued in place.
2. Turn in ¼” (6mm) on the long edge of the SIDE sections. Stitch 1/8″ (3mm) from these edges. Note: These edges may also be glued in place.

3. With right-sides together, stitch the SIDES to the FRONT. Turn the seam allowances towards the sides; from the right side stitch close to the seam and again 1/8″ (3mm) away.

4. Fold each TIE END into lengthwise thirds by turning in ¼” (6mm) on one long edge; then turning in ¼” (6mm) on the remaining long edge. Note: Glue edges in place.

5. Fold the ends of the SIDE section over the TIE ENDS, lapping ¾” (20mm). Starting on SIDES, stitch securely through all thicknesses close to the raw edge. Pull thread ends to the inside and knot.
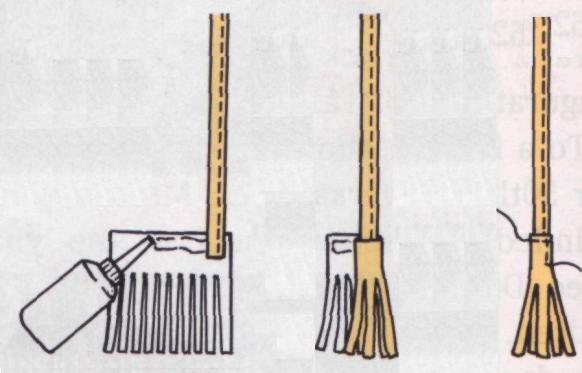
6. Place TIE ENDS on the wrong side of TASSEL section. Overlap about ½” (13mm). Apply a bead of fabric glue to the upper edge of the TASSEL. Roll the TASSEL around the TIE END. Let glue dry. If desired, stitch close to the edge and across the top of the tassel to secure.
September 1, 2007

This is a very easy ruana to create. Select a wool or cashmere blend fashion fabric where both sides of the fabric look good. You will love the feel and look of this comfortable wrap – make it very warm and soft. Similar ruanas in department stores can cost as much as $100. or more. It measures 36 inches as it hangs from your shoulders to your knees. Each panel in front is 22 inches wide and across the back it is 44 inches in width.
It has a 4 inch (10 cm) fringe at each short edge.
Begin by purchasing 2 yds. (1.85 m) length of loosely woven 54″ (137 cm) wide fashion fabric (plain weaves are best).
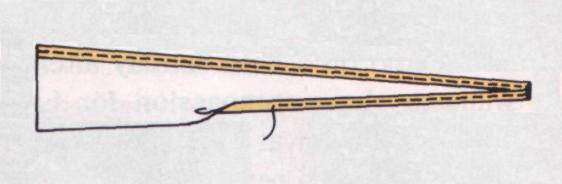
Square up the two cut ends of your fabric to create a 72″ rectangle. This can be done by drawing the crosswise yarns across the short ends. Fray each short end about 4″ (10 cm). The frayed edges may be trimmed if necessary. Machine-stitch with matching thread across top of the frayed area. This will create a fringe. (A)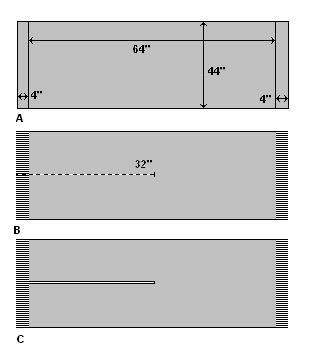
Next step is to fold the fabric along its length so that both selvedge edges align. Measure 32″ (81 cm) from one frayed edge, along the fold and slash to that point. (B)
Cut 4″ (10 cm) from each selvedge edge along its length.
Machine-stitch a narrow double-rolled hem (eg. turn in ¼” then turn ¼” again) along the slashed opening and along each of the selvedge edges. (C)
Voila! …your stylish ruana wrap is ready!

