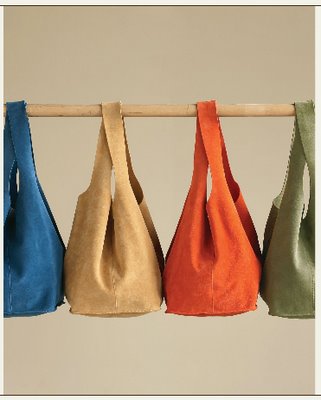
Suede is a natural Aniline leather that has been surface brushed or buffed on the grain side of the leather creating a nap and leaving a texture similar to velvet (softest of all leathers to the touch). Usually suede has a natural finish, but may have a light protective coat and a transparent leather dye for colour. This process increases the leathers surface exposure making it extremely absorbent. Water drops will darken the leather but it returns to its original colour after drying.

Irresistible in butter-soft suede is this chic Italian bag from Sundance. It deftly adapts to bulky or bitty loads with ease. Zen-like styling (no zips, pockets or snaps) make this easy and versatile carryall for virtually everything.

You will need:

  • 1 –  4 oz. [1/16″ thick] Suede split hide, 16 square ft.
  • 1 spool of cotton or nylon thread
  • 1 leather machine needle
  • Kraft paper
  • 1 rotary cutter with pinking blade
  • 1 roll of double-side mounting tape, 1/4″ wide

PATTERN

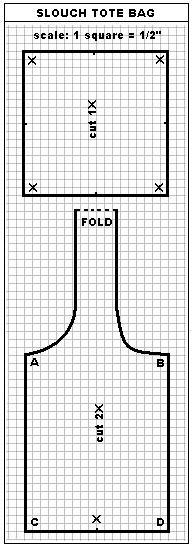
Transfer pattern onto graph paper. Each square equals 1/2 inch.

Copy onto a folded piece of kraft paper so you have the entire pattern for easy 1-ply cutting of the leather.

Dimensions: Approx. 11″H x 9-1/2″W.

CUTTING

Check skin for any tears and blemishes on the face of the suede. Chalk around them to avoid them when cutting.

Chalk out pattern on skin and cut out using pinking blade of a rotary cutter. Use a cutting mat to protect cutting surface. Cut base 1X and sides 2X. (Raw edges will not fray).

ASSEMBLY

Tape one seam [AC] with mounting tape of each side section of the tote.

On one side section, with right sides together, remove the backing on the tape and align with opposite end of section [AC] to form a bag loop. Stitch ¼” seam allowance along AC. With a bone turner, crease the seam open. Fold the seam allowance to one side and edgestitch along seam on the face through all the layer. (I use a Teflon ® presser foot to reduce drag).

Repeat the above directions for the other section.

Join each side with right sides together from B to D with mounting tape. Stitch ¼” seam allowance. Now you will have 2 handles.
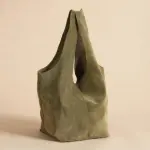
At each X mark on the side section, snip a ¼” slit.

Tape the perimeter of the base on the wrong side with mounting tape. Place the X notch of the side sections at each corner of the base. (The slit will create a square corner). Remove backing one strip at a time and join with wrong sides together. Machine-stitch from D around the bottom, pivoting at X and continue around the base of the tote.
 

Thin or wide, bright, basic or bejeweled, a belt is an easy way to add polish to any outfit. Here’s how to update your look with the season’s most stylish belt.

Cinch Belts are the perfect way to introduce a chic pop of colour, texture or ‘bling’ to any outfit; this waist-wringing item is one of few accessories that can take any outfit up a notch, from fine to fantastic. Cinching a wide belt around the smallest part of your torso – your natural waist – emphasizes and slims this very feminine zone while accentuating sexy curves. Thick belts create the most dramatic, waist-narrowing looks since they brace your body in a corset-like fashion.

Featured: Cinch Belt by Cynthia Rowley

If you want to stand out, get creative and fashion yourself a belt out of leather and suede can be a real joy as they are the oldest and most luxurious of all natural materials. Selecting cowhide, pigskin or lambskin for your leather project will help you to create a fashion accessory that you will cherish for years to come!

You with need:

  • Leather or suede hide
  • Covered buckle kit
  • Leather machine needle
  • Rubber cement
  • Topstitching thread
  • Metal straightedge ruler
  • X-acto knife or rotary cutter
  • Awl
  • Rubber mallet

COVERED BUCKLE FORM

Cut leather 2 times the width of buckle.  Fig.1

Trace outline of the topside blank from the buckle kit in the center of leather (wrong side up).

On inner parts of buckle, slash through each center and diagonally into corners at each end.  Fig.2

On the wrong side of leather, spread a thin layer of rubber cement.

Allow to become tacky.

Repeat glue-ing directions on face of buckle form.

Center the buckle form face down onto the leather. Smooth the leather.

Fold in edges of leather inside the buckle form with fingers – outer edges with thumb. Carefully trim away any bulk with pointed tips of scissors.

Take backing plate (the smaller piece from the kit) and insert in top portion, pressing well in to secure the leather inside. Fig.3

MAKING THE BELT

1. Choose leather and a buckle kit for your belt.

2. Cut your belt from the leather. The belt should be 1 foot longer than the waist measurement and equal in width to the interior width of the chosen buckle plus 1 1/4″.

Cut the leather using a sharp X-acto knife or rotary cutter and a metal straightedge to do this. DO NOT USE SCISSORS. (I like to use a cutting mat to do the cutting as well).

For the model sample shown,

  • Approx. length:  S=36″, M=38″, L=40″, from inside edge of buckle to tip.
  • Approx. width: 2 1/2″.
  • Approx. dimensions: buckle 2 1/4″W x 3 1/2″H.

3. Decide what shape you want the free belt-end to take. You can make it pointed, rounded, square – whatever shape you like. (The model has a squared end). Mark the belt-end and use an X-acto knife to cut it to the desired shape. (Curved shapes may be carefully cut with scissors).

4. Fold the uncut end of the belt back so that a crease is made 1 1/2 inches from the belt end. Using a metal straightedge and an awl, lightly score this line on the back of the leather.

5. Repeat along the perimeter of the belt and score 3/8″ within the edge. Turn in the edge and lightly crease.

6. Since leather will not fray, use rubber cement to finish the edges. Daub a thin layer of rubber cement ½” wide along the perimeter (wrong side only) and allow the glue to become tacky. Then, carefully fold turning edges and working from the buckle end to the corners. Work the folding in both directions to miter the excess into the corners. Trim the “ears” away. (See diagram). Gently tap along the edges with the rubber mallet.

7. Topstitch the perimeter of the belt ¼” from the edge. (Use a new leather needle in your sewing machine. Try a walking presser foot or Teflon presser foot to prevent drag. Loosen your tension and increase the stitch length for better results).

8. Insert the buckle end through the slot of the buckle so that the buckle is correctly positioned. Fold the uncut belt end back so that the bucket is face up and lined up with the scored line.  Machine stitch the end using double topstitching to secure.