
Silk charmeuse is pure luxury. It is soft, elegant, and surprisingly versatile. Charmeuse is a medium weight, woven silk with a lustrous appearance, rather like the surface of a pearl. And like the pearl which it resembles, it is an elegant classic!
Try it to create this alluring halter gown… the perfect creation in a super flattering style. Very easy pattern to make, the halter is not fitted, so slips over the head and ties at the nape while a fabric rosette adds interest detail for a romantic touch.
You will need:
- 3 ½ yds. of charmeuse, 54″ wide
- 3 ½ yds. of sheer organza, 54″ wide
- 3 yds. of satin ribbon, 3″ wide
- Coordinating thread
PATTERN
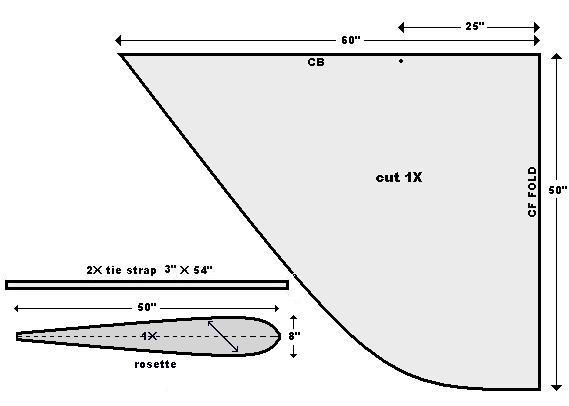
CUTTING
 Fold fabric in half on crossgrain with selvedges aligned. Baste selvedges together with long stitches.
Place centerfront [CF] of pattern on fold. Weight down and cut out fabric 1X on fold.
For rosette, cut pattern 1X on true bias grain
ASSEMBLY
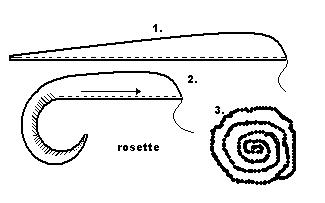 To make rosette, pink curved edge. Fold fabric lengthwise in half. Sew a running stitch along the folded edge and gather tightly. Starting with the narrow end, spiral the fabric onto itself and tack gathered edge as you form the rosette.
 Staystitch 1″ either side of notch [●] on centerback seam [CB] using ½” seam allowance. Clip seam allowance to stitching.
With wrong sides together, layer the charmeuse and organza. Pin and baste between ● to CF. Sew seam using ½” seam allowance. Clip a V-notch in seam allowance at CF. Press seam open.
Along curved edge, match edges and sew both layers together using a 1/2″ seam allowance. Trim seam allowance. Turn right side out through CB seam.
Press seams flat. Baste CB seam together. Topstitch along curved seam through both layers to finish the hem.
 Cut ribbon in 2 pieces for strap ties. On one end, fold the ribbon at a 45°angle with a ½” extension.
Align the L-shape to the CB with the garment face up and place the ribbon on top of the finished edge, stopping 3″ from CF. Repeat in reverse on the opposite side of the CF.
Topstitch ribbon ties through all layers of the garment on both edges of the ribbon.
With right sides together, pin and baste CB seam. Stitch back seam using ½” seam allowance. Press seam open.
 Crisscross strap ties at a 90° and sew through opposite corners of the layered ribbon. Fold back “point” at CF and tack down. Attach rosette at CF.
TIP: Check this link for working with charmeuse and organza fabrics.

August 27, 2008 at 5:54 pm
Just wanted to say I love your blog. I find it very useful and the fact that the advices are easy to understand is only another +. You got something going on here!
Great job!
Thank you for all the patterns and for the , lets call them classes in sewing and pattern making.
Keep up the great work!
August 28, 2008 at 7:35 pm
what a fantastic blog you have! found you this morning through a member at burdastyle, and i’m very excited to traipse through. also dreamt last night of this exact dress shape, which is fortuitous…
thanks for sharing!
August 28, 2008 at 7:38 pm
well thank you to all the members at burdastyle!
December 19, 2008 at 4:38 am
I am a little confused about how the ribbon is attached to the dress in the back. Won’t the little half inch extensions stick out? I’m just confused as to where they end up because I can’t seem to figure out how they go together at the CB seam. I would like to make this dress as a back-up gown for a Mardi Gras ball I will be attending in January and just need this bit of clarification to get started. If you could break it down for me a bit more I would be ever so grateful.
April 20, 2009 at 8:39 pm
Hi!
I made this gorgeous dress (with a little extra help from you) for a wedding. I used a dark green colour and metal heart instead of the flower. Everyone asked where I had bought it. Thank you SO much, it’s my favorite dress now.
Thanks for your emails and help.
keep up the great stuff!
L
May 7, 2009 at 8:47 am
[…] Kleid 13 […]
August 8, 2009 at 1:31 am
love it love it love it
September 22, 2009 at 2:15 am
This dress is fantastic!you made it so easy and it is so chic.I made it in less then 2 hrs.and I don’t usually draft patterns
September 22, 2009 at 12:59 pm
Thx Steffie…. 2 hour pattern drafting…that is quite impressive. congrats
January 27, 2010 at 3:56 am
I love, love, love your blog. It’s amazing how much information you have supplied us with. Thanks so much for inspiring me to create beautiful things!
March 18, 2010 at 3:07 am
I made this dress (I shortened it to knee length) to wear to a wedding and received so many compliments and questions about where I bought it!
Thanks for the inspiration!
July 19, 2011 at 2:35 pm
[…] will just about cover my modesty, 3 layers if I want to be less saucy. I’m thinking maybe this halter dress from Weekend Designer for the pink fabric. Not that anyone out there reads this […]
September 11, 2014 at 1:47 am
modest wedding dresses
HALTER GOWN | Weekend designer