September 2008
Monthly Archive
September 28, 2008

Featured: Vest from Chulo Pony
There’s something a bit redneck/hillbilly and then there also a sort of British Hunting Party aura too. One thing’s certain, buffalo plaid is going to take a front seat on all sorts of garments this fall! Buffalo plaid flooded the Ralph Lauren New York runway and that of Vancouver’s Chulo Pony during Fashion Week. This is an easy-fit boxy vest that is easy to sew.
MEASUREMENTS
Bust – measure just under the arms around the fullest part of chest.
Waist – measure around narrowest part of torso.
High Hip – measure 6 inches [15.5 cm] below waist around the hips.
Back-waist length – measure from nape of neck to waist level
Shoulder length – measure shoulder from ball socket to side of neck.
Armhole depth – measure from nape of neck to under arm level.
Back width – measure from armhole to armhole across shoulder blades.
Neck – measure around base of neck.
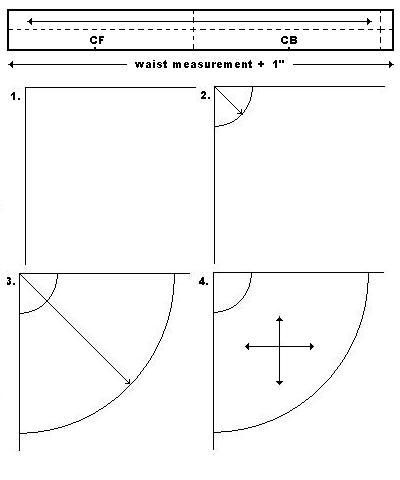
PATTERN DRAFT

Square down from 0; square halfway across the block.
0-1 = 5/8″ [1.5 cm]
1-2 = armhole depth plus 1″ [2.5 cm]; square across.
2-3 = half bust plus 3″ [7.5 cm]. Square up and down; mark this line the CF line.
3-4 = 0-2 (add 1/8″ [0.3 cm] for every size above size 14 [bust=36″])
Square across from 4.
1-5 = back waist length; square across to 6.
5-7 = waist to hem (6″ [15.5 cm] + 2″ [5 cm] hem allowance = 8″ [20.5 cm])
Vest Back
0-9 = 1/5 of neck size minus 1/8′ [0.3 cm]; draw in back neck curve 1-9.
1-10 = 1/5 of armhole depth minus 3/8″ [1 cm]; square halfway across draft.
9-11 = shoulder length plus 3/8″ [1 cm]. Draw back shoulder line to touch the line from 10.
2-12 = half of the back width plus 3/8″ [1 cm] ease; square up to 13.
12 – 14 = half the measurement of 12-13.
Vest Front
4-15 = 1/5 of neck size minus ¼” [0.7 cm].
4-16 = 1/5 of neck plus 5/8″ [1.5 cm]; draw in front neck curve 15-16.
17-16 = 2″ [5 cm]. Square down to locate 20. This is the front closure extension.
18-3 = half chest plus 5/8″ [1.5 cm]; square up.
19-18 = half the measurement 3-16 minus ¾” [2 cm].
21-11 = ¼” [0.75 cm]; square out 6″ [15 cm] to 22.
23-15 Draw a tangent line from 15, shoulder length plus ¼ ” [0.75 cm] to touch line from 21-22.
24-18 = midway between 12 and 18; square down to point 25 on waistline and point 26 on hemline.
At side seam, measure out ½ ” [1.25 cm] on either side of point 25 and shape with a smooth curve for waist suppression.
Draw armhole as shown on draft touching points 11, 14, 24, 19, and 23.
Vest Collar
27-15 = 0-9; square up from 27.
28-27 = 5/8″ [1.5 cm].
29-28 = 20″ [51 cm]. This is the collar depth.
30-15 = 28-29.
Draw the outer edge of collar parallel to line 15-28, passing through point 30 and gently tapering the curve to point 17.
Vest Collar Facing
Measure 2″ [5 cm] from 15 on shoulderline.
Measure from 8 the length of 8-20.
Join these 2 point as shown with dotted line.
Trace off the front edge, collar, shoulder, dotted line, hem and CF line to create the facing piece.
Grainlines are parallel to CB and CF lines.
A hem allowance is 2″ [5 cm] turn under. Seam allowances are 3/8″ [1 cm}.
Sash
A-B = 9″ [23 cm].
A-C = 2 times waist measurement plus ¾” [2 cm].
 C-D = A-B.
B-D = A-C.
E = half of A-B
F = half of C-D
Join E and F to create foldline of sash.
CUTTING
Vest Front – cut 2X self
Vest Back – cut 1X on fold; cut 1X lining on fold
Vest Collar Facing – cut 2X self; cut 2X interfacing
Sash – cut 1X self
Front Lining – cut 2X lining (NOTE: add ¾” [2 cm] to front edge of this piece for seam allowance.)
ASSEMBLY
- Fold sash piece with right sides together and stitch along the raw edges leaving a 5″ [13 cm] opening to turn out. Grade corners and turn right side out. Slipstitch opening closed and press edges. Topstitch around perimeter of sash.
- Iron fusible interfacing onto back of collar facing pieces, following manufacturer’s directions.
- With right sides together (RST), pin/baste collar facing to front lining. Sew seam and press seam allowance towards lining.
- Staystitch shoulder-neck point (#15) on collar facing to reinforce corner. Clip seam allowance to the stitching at a 45° angle.
- With RST, pin/baste lining fronts to lining back at sideseams and shoulders. Sew seams and press open.
- With RST, pin /baste CB seam of collar facing together. Sew seam and press open. Then pin/baste the collar to the back neckline and sew between the two clips. Press seam open.
- Staystitch shoulder-neck point (#15) on vest fronts to reinforce corner. Clip seam allowance to the stitching at a 45° angle.
- With RST, pin/baste vest fronts to vest back at sideseams and shoulders. Sew seams and press open.
- With RST, pin /baste CB seam of under-collar together. Sew seam and press open.
- With RST, pin /baste CB seam of collar together. Sew seam and press open. Then pin/baste the collar to the back neckline and sew between the two clips. Press seam open.
- Place the lined portion with the vest right sides together, aligning them up along the edges. Pin/baste the two halves of the vest together.
- Stitch the vests along the front and collar, and around the armholes. Do a parallel row of stitching 1/8″ [0.25 cm] on armholes and trim seam allowances away. Grade seams and trim corners.
- Stitch along the lower edge of the vest front facing only, 2″ [5cm] and trim away the excess material. Leave the lower edge of the lining unstitched.
- Turn the vest right side out. Use a bone turner to gently push out the edges of the vest and make sure it’s fully right side out. Entering from the bottom, match up the seam allowances of the back neckline and collar and baste together.
- Turn the bottom edge 2″ [5 cm] to the inside of the vest, so that the hemline is even with the rest of the facing. Press the folded edges. Turn the bottom edge of the lining and lay on top of the hem just shy of the fold. Baste the two layers together.
- Topstitch along the outside edges of the vest and the armholes, 1/4 inch [0.5 cm] from the edge. Make sure the lower edge of the back of the vest gets sewn closed in this seam.
- Add dome snaps or Velcro® tabs to front closure of the vest, if desired.
September 17, 2008
 Featured: Ruffle bag by Rianrae (India Rose Textiles)
A beautiful drawstring totebag made of soft cotton with a cascade of ruffles.
You will need:
- Fashion fabric, 45″ wide equal to 3.5 times your bag circumference measurement (W).
- Coordinating thread
PATTERN

This draft is an exercise in proportion. It is based on two measurements:
X = ruffle depth + 1″
W = circumference around the bag + 1″ (or 2 X finished width + ½”)
CUTTING
Ruffle strips – cut 6X self
Bag – cut 1X self
Drawstring casing – cut 1 ½”strip equal to W, cut 1X self
Draw cord – cut 1 ¼” strip equal to 2 x W, cut 1X self
ASSEMBLY
- Take 2 of the ruffle strips and with right sides together (RST), fold each strip in half lengthwise. Pin/baste and sew using ½” seam allowance.
- Turn each piece right side out and press flat. Edge stitch perimeter of each strap.
 On remaining 4 ruffles strips, match up short ends together and join with a narrow French seam to create a “tube” on each strip. Hem top and bottom edges of each tube with a narrow double rolled hem. Then, sew a gathering stitch ½” below the top edge to gather the ruffle.
- On bag piece, hand-baste 4 rows of running stitches according to dimensions shown in illustration. Once completed, fold the bag piece in half lengthwise with RST and match up side seam. Pin/baste and sew seam using ½” seam allowance. Press seam open. Turn bag right side out.
- Beginning at the lowest running stitch, pin gathered ruffle to bag aligning the gathers on top of the running stitch line. Match ruffle seam with bag’s side seam. Distribute gathers evenly around the body of the bag. Turn bag wrong side out and machine stitch through the gathers on the ruffle. Remove running stitches.
- Repeat this step with each tier of ruffles on each subsequent row of running stitches. Each ruffle will overlap the last one.
- On wrong side of bag opening, centre each handle strap on half of the bag width without twisting the strap. Pin and baste upside down to top edge of bag.
- Take the drawcord casing strip and turn under the short ends ½” and press. Edgestitch along the short ends. Then, turn under ½” along one long edge. Press.
- Start at the midpoint between one of the handle loops, pin/baste raw edges together with right side of casing facing wrong side of bag opening. Butt the two short ends together. Sew around top of bag and encase strap ends using a ½” seam allowance. Grade seam.
- Turn bag right side out and fold over casing strip to the outside of the bag along the seam. Press casing flat. Baste casing strip along the face of the bag. Keeping bag straps free, topstitch along bottom and top edges of casing.
- Take drawcord strip and with wrong side together, fold in half lengthwise and press.
- Open fold and fold raw edges to center. Press again.
- Turning in short ends to the inside, refold strip and edgestitch around the perimeter to create a drawcord tie. Thread tie through casing.
 To complete the bag, turn bag wrong side out and flatten from side seam. Match up bottom raw edges and pin/baste. (Do not catch ruffles in seam.) Stitch across bottom. Press seam open.
- At bottom corner, line up side seam on top of bottom seam to create a right angle with the fabric. Stitch across the point as shown. This seam will equal X (or 1/2X on either side of center seam). Repeat on opposite corner. Turn bag right side out.
September 14, 2008

Featured: Layered 3-tier skirt by ASOS
A three tiered/layered skirt that is flirty and so sexy.
You will need:
- 2 yds of Fashion fabric, 45″ wide
- 1/4 yds. of Fusible interfacing, 45″ wide
- 1 closed skirt zipper, 5″ long
- 2 sets of hook & eyes, size 0
- Coordinating thread
- Kraft paper
- String
- Push pin
- Tracing wheel
- Tape measure
PATTERN

Measure your waist and use R from chart to draw an arc from intersecting right angle. (90°)
For each tier, add 5 inch intervals to R. eg. R + 5″; R + 10″; R + 15″
To create the arc, use string and pencil as a compass and measure the string length equal to the tier lengths above. Attach string to push pin anchored at intersection (●). Holding string taut, draw arc from horizontal line to vertical line. Repeat with new lengths for each tier.
Trace off each layer separately on paper and add ½” hem and seam allowances.
For waistband, measure a line equal to your waist plus 1 ½”. Draw a parallel line 3″ next to it and join the ends of both lines. Add ½” seam allowance to perimeter.
Grainlines are parallel to horizontal lines of draft on all pieces.
CUTTING
Cut each tier 2x self in fashion fabric. *
Cut waistband 1X self in fashion fabric.
Cut waist interfacing 1X fusible in Pellon®
ASSEMBLY
- Iron fusible interfacing to wrong side of waistband piece, following manufacturer’s directions.
- Turn under ½” along one long edge and press.
- Stay-stitch waistline on each tier piece from side seam to center. Neaten raw edges of side seams with a seam finish.
- Layer tiers in pairs with right sides together. Pin/baste side seams, leaving 5 ½” open at waist on left-hand side. Sew seams and press open.
- On each tier, hem bottom with a ¼” double rolled hem. Press.
- Layer tiers one on top of one another (right sides out) and match up waistline and side seams. Baste together.
- Apply zipper on left-hand side, from waistline to bottom of top tier, using center slot application.
- With right side of waistband to wrong side of skirt, pin waistband piece to skirt’s waistline, extending waistband 1 ½” beyond zipper on back portion. Also allow for ½” seam allowance on each end of waistband piece. Baste waistband in place following stay-stitching. Sew waist seam.
- Press under seam allowances on each end of waistband and fold waistband in half, aligning pressed edge with machine stitching. Pin/baste. Edge-stitch around perimeter of waistband.
- Handstitch hook and eye sets to extension of waistband.
* If you wish a crinoline for this skirt (like that one featured on the model), use the third layer pattern piece and cut it 1-inch longer. Cut 2X in netting. Join side seams using a French seam technique and leave 5″ slit opening on left-hand side at waist. Overcast or bind waistline of crinoline. Sew a narrow “india” tape to the waist and leave 12-15 inches “loose” ties on either side of the slit opening.
September 9, 2008
 Jammin’ jammers for the budding beach bum.
You will need:
- 1-5/8 yds. of fashion fabric, 45″ wide
- 1-1/4 yds. of waistband elastic, 1 ½ ” wide
- 1-1/2 yds. of cable cord, 1″ thickness
- 1 VelcroTM tab
- Coordinating thread
PATTERN

Measure hip about 9″ below the natural waistline and around the fullest part of the seat. Finished length is approximately 22″ (knee length).
CUTTING
Cut 2X self on straight grain of fabric. Save crotch cut-out for pocket.
ASSEMBLY
- Take one piece of crotch cut-out and turn under top edge 2″. Press. Centre hook side of VelcroTM tab (just below the foldline) with pocket right side up. Stitch around the tab. Turn top edge 2″ again. Press. Topstitch facing of pocket below the tab.
- Turn under ½” seam allowance around perimeter of pocket rounding the “corners”. Press. (NOTE: The pocket opening should measure at least 5″ minimum for functional use.)
- Place pocket on placement line (black dots) on back of right-hand side piece. Align the loop side of the VelcroTM tab with the pocket tab. Stitch loop tab in place to pant. Match up hook to loop and fasten together. Pin/baste edges of pocket to pant. Topstitch pocket edges.
- Layer fabric with right sides together, and stitch crotch seam using ½” seam allowance.
- Match front side seam with back side seam on each leg, with right sides together. Pin/baste seam. Stitch side seam and press open.
- At waist, turn under ½” and press. Turn under 2″ to create a casing. Topstitch along top and bottom of inside edge of the turn.
- Cut waistband elastic equal to your waist measurement less 3″.
- Carefully remove stitches at CF between the 2 topstitching lines on the casing (see red dots) to create an opening. Draw elastic through casing without twisting elastic.
- To join elastic, butt ends of elastic over a piece of fabric cut twice the width of the elastic. Wrap elastic with fabric scrap. Zigzag-stitch the ends of elastic to fabric scrap. This method eliminates bulk in elastic and works to prevent frayed ends from protruding.
- Thread cable cording through casing on top of elastic. Knot cord ends.
- Hem leg bottoms with a ½” double rolled hem.
September 8, 2008
 Featured: Square Tufted Box Pillows by Restoration Hardware
Young or old, few ever outgrow the love of laying on the floor while visiting or watching television. What you need are some big comfy floor pillows that you can use for those times when the gang is over at your house and there is no room on the couch. If the pillows are big enough (24 to 36 inches) they can also be seat cushions around a big coffee table for the overflow from the dining room. If you can’t quite envision these in your house, how about making a stacking set of these giant pillows to give to a student or a young couple in a new apartment. They never have enough seating. Cover the cushions with an upholstery fabric and pipe the edges for a real professional look.
Dimensions:
Small Square Cushion: 18″ sq.
Medium Square Cushion: 24″ sq.
Large Square Cushion: 30″ sq.
You will need:
- Approx. 17 yds. of cable cord, ½” thickness
- Approx. 4 ½ yds. of brushed cotton, 54″ wide colour A
- Approx. 3 ½ yds. of brushed cotton, 54″ wide colour B
- 2 yds. of hook & loop fastener, ½” wide
- Coordinating thread
- 1 covered button kit, 1″ diameter (6 buttons), optional
- Heavy-duty thread (optional)
- 2 yds. of polyester batting, 60″ wide
- Polyethylene Foam, 4″ thickness/30″ wide x 72″ long
- Upholstery spray adhesive
PATTERN

MAKING A BOX CUSHION:
CUTTING
To prepare the welt, cut 2 pieces of fabric each measuring, the length of the cushion (X) plus 8″ by the required depth less 1″, adding ½” to all edges for seams.
Cut 1 piece of fabric measuring, the width of the cushion (X) times 3 less 8″ by the required depth, adding ½” to all edges for seams. Make sure to cut the depth from down the length of the fabric.
Cut the top and bottom cushion pieces to the required size, (X by X), adding ½” to all sides for the seam allowances. If patterned fabric is used, make sure to centre any design on the fabric.
Cut bias strips of contrasting fabric 1 ½” wide to make the piping. Make enough length to go around the perimeter of each cushion plus 5″, twice.
Cut foam to size. (X by X)
ASSEMBLY
Spray each foam pad with spray adhesive and wrap in batting on all sides.
Cover 2 button blanks with contrasting fabric for each cushion.
Join enough bias strips for the required length and wide enough to cover the cable cord plus the seam allowance. Lay the cord in the centre, on the wrong side of the bias strip.
 Fold the bias strip over the cord matching the raw edges. Stitch the 2 sides of the bias strip together along the length. Use a zipper foot or cording foot on the sewing machine to ensure that the stitches are close to the cord.
On the 2 smaller welt side pieces, turn under ¼” and then 5/8″ along one long edge, making sure that any design or nap on the fabric is the right way up on all the pieces. Press. Open the fold and center the hook side of the fastener tape on one piece and the loop side of the other, leaving 4-1/2″ free on each end. Stitch fastener tape in place. Re-fold edge and sew length of turned edge.
Lap hook and loop together to create a width of 5″ when combining the 2 welt side pieces. Sew across the ends to secure.
Join the welt pieces together to form a ring, making sure that any design or nap on the fabric is the right way up on all the pieces.
Pin the ends of the strips, right sides together, and stitch, ½” in from the raw edges, using a flat seam. Press the seams open.
 Place the contrasting piping around the outer edge of the bottom cushion piece, right sides together and matching the raw edges. Align the seams on the welt to the corners of the cushion piece so that the piping gently curves around at the corners (clip cording seam allowance if necessary). Starting and finishing at the back of the cushion and joining the ends of the piping cord to neaten. Baste in place, 1/2″ in from the raw edges. Sew in place using a zipper foot.
Stitch the welt to the bottom cushion piece.
Attach the piping cord to the perimeter of the top cushion piece. Starting and finishing at the back of the cushion and joining the ends of the piping cord to neaten. Pin the top section to the top edge of the welt, ½” in from the raw edges and matching the corners. Stitch in place using a zipper foot on the sewing machine so that the stitches are close to the piping cord. Turn right side out through the opening.
Insert the covered foam pad into the cushion and close the lapover on the opening.
If using, attach a covered button to one end of heavy-duty thread and anchor through center of cushion. Draw thread throuh foam pad and out other side of cushion. Attach a second covered button and return thread through center. Tighten up slightly to tuft pillow and pass thread through first button. Knot thread.
September 7, 2008
 Featured: Urban Wrap by Disappearing Creek Ranch
Step into a world where sculpture and the human form combine; where the lines of fashion and art blur and merge as one. This beautifully sculpted “urban wrap” vest from the Disappearing Creek Ranch company, comes with asymmetrical fronts that hug the body in all the right places and its uneven edges ‘confuse’ the eye, altering perception, and camouflaging figure faults we may think we have, all the while adding style and sophistication. Choose the double-faced fashion fabric that’s most comfortable and flattering for your body type, and know that with the generous lap over, fit can easily be adjusted.
You will need:
- 1 yd. of felted wool, 54″ wide
- Coordinating thread
- Stick pin
- Roll of kraft paper
- Tracing wheel
MEASUREMENTS
Chest – measure just under the arms around the fullest part of the bust.
Backwaist length – measure from nape of neck to waistline.
Back width – measure from armhole to armhole across the shoulder blades.
PATTERN

Fold the kraft paper in half. The foldline will be the centreback.
Mark a point on the foldline and label it 1.
2 from 1 = backwaist length + 5″
3 from 1 = ½ backwaist length – 1 ½”
Square lines from 1, 2, and 3 across the paper.
4 from 3 = ½ the chest measurement + 2 ½”
Square a line up and down from 4.
Points 5 and 6 are located at the intersections of lines 1 and 2.
7 from 1 = ¾ backwaist length + 1½”
Square a line from 7 across the paper.
8 is located at the intersecting lines.
9 from 8 = 4″
Square line down from 9 to locate 10 and 11.
12 from 1 = ½ back width + 4″
Square a line down from 12 to locate 13 and 14 at the intersecting lines.
15 from 12 = distance from 12 to 14.
Join 14 and 15 with a straight line and locate 16, 2 inches from 14.
Draw a shallow curve from 12 passing through 16 and onto line 3.
17 from 5 = 4″
Draw a straight tangent line from 6 passing through 17.
Square a line from the tangent line radiating from point 13. Smooth point 13
with a blended curve.
Trace out lines 7-8-6-1 for the right-hand side of the collar.
Trace out lines 3-16-12-6-17-13-2 (blue lines) for the right-hand side of the vest.
The left-hand side of the vest is outlined in red.
Cut out lines 1-12 16-3.
Unfold the paper and rule off the tracing with a straightedge.
Cut out the vest and collar separately.
Grainlines run parallel to centerback.
Seam allowance is included in the patterndraft.
CUTTING
Due to the fabric surface being seen from both sides, a double-faced felted wool is suggested. *
Vest body – cut 1X self
Collar – cut 1X self
ASSEMBLY
- Staystitch the upper back and armscye of the vest about a ½” from the edge. Turn edge under to inside and baste down. Steam the rolled seam to relax it. Topstitch along rolled edge. Remove basting.
- Take the vest body (right side up) and the collar (wrong side up) and lay them side-by-side, along the neckline. Overlap the neck seams (1/2″) so the actual seam lines sit one on top of the other across the top of the garment. The seam allowance from the collar should be hanging over into the body (the collar piece is on top) and the vest seam allowance should be towards the collar. If you stitch down the seam line through both layers, you will have a seam allowance pointing toward the collar on one side of the garment, and a seam allowance pointing toward the body on the other side. Turn under the raw edge of one seam allowance and topstitch in place. Repeat on the second seam allowance. This is a lapped seam technique.
- Staystitch the hemline about a ½” from the edge. Turn edge under to inside and baste down. Steam the rolled edge to relax and shape the curved edge. Topstitch along rolled edge. Remove basting.
- On the front edges from the neckline downward to hem, roll a double-roll edging along the fronts and slipstitch to hold in place.
- On outer edge of collar, turn under 1″ and topstitch in place. Trim close to stitching.
Hold vest close with a stick pin.
* Based on your selection of your fashion fabric, you may need to choose a more appropriate seam finish. Fabrics like felted wool do not fray. Ideally, a fine satin overlock would be appropriate if the fabric frays.
September 5, 2008
 Knotted fringe is actually quite easy to make and can be a lovely addition to any number of fashion design ideas such as on a vest, a skirt hem, or even, curtains. The first thing you must decide is whether your design project requires the addition of fringe or whether the fringe can be knotted from existing strands. You can apply the fringe trim similar to the macramé knotted fringe on this luxurious alpaca and silk shawl from the Viva Terra collection.
The second option, that of loosing weft (horizontal) threads leaving the remaining warp (veritcal) threads hanging. Measure out how long you want the fringe to be and mark that measurement with a line of stay-stitching. Then draw out the threads up to that stitching line. Decide how many threads you want to bundle together to tie in a knot. Then tie the knots and you will have a lovely fringed trim.
You will need:
CUTTING
 Cut a rectangle 60″ X 21″ from the fashion fabric.
Cut a piece of cardboard about 8″ wide and half as long as desired length for finished strands (add extra length to account for take-up of knotting for thicker yarns). Wind yarn loosely around cardboard, cut across one end when card is filled. Repeat several times and then start fringing; you can wind more strands as you need them.
ASSEMBLY
 Finish the edges of the rectangle with a narrow hem around its perimeter.
Hand-stitch a blanket stitch to the two narrow ends of the rectangle using yarn and darning needle. Use this stitching as the anchor to apply the fringe.
Follow these instructions from the Craft Yarn Council of America for knotted fringe to create a diamond pattern of knotting.
For single knot fringe, hold the number of strands specified for 1 knot of fringe together and fold in half.
With crochet hook draw folded end through space or stitch. Pull loose ends through folded section and draw knit up tightly. (fig. 1 & 2)
For double knot fringe, after completing fringe as above, turn so right side of work is facing you. Work knots in a diamond pattern as shown in diagrams to left. (fig. 3 & 4)
material source: Craft Yarn Council of America
September 5, 2008

Featured: Hooded wrapcoat by Mara Hoffman
The appeal of the flat-felled seam is that it makes the joint stronger by running two lines of stitches through each piece of fabric, while simultaneously encapsulating the raw edges and preventing them from unraveling. This is the special seam that designers use to create your denim jeans. What’s more, it’s pretty simple once you get the concept. You can make it even easier by running an iron over the seam after you make each fold. Set it to a low heat so that you don’t scorch your fabric and try making a hooded wrap coat like this one from Mara Hoffman. Use a cozy double-sided winter coating and skip the lining.
You will need:
- 3 1/4 yds. of fashion fabric, 54″ wide
- 2 yds. of stay tape. 5/8″ wide
- coordinating thread
PATTERN

Add a 3-1/2″ hem allowance to the body pattern pieces and appropriate seam allowances for desired size of flat-felled seams (I used 3/4″ for 3/8″ flat-felled). All other seaming can be 1/2″ seam allowance.
CUTTING

ASSEMBLY
- Layer the pocket placket (right side) to the patch pocket (wrong side) pin/baste and stitch seam. Press seam allowance upward and grade. Turn under 1/2″ seam allowance and press.
- Aligned pressed edge to machine stitching and topstitch the placket in place.
- Topstitch the top edge of the pocket.
- Press under seam allowance on patch pockets and edge stitch on fronts.
- Join fronts and back at shoulders with RST*.
- Secure a stay tape on shoulder seams. Double topstitch shoulder seams.
- Join sleeves to armholes with RST. Grade seam and secure with a stay tape. Double topstitch armscye seams.
- Fold body and sleeves with WST*. Pin/baste side seams and underarm seam. Stitch seams with a flat-felled seam.
- Make loop carrier. Cut into 3 equal lengths.
- Stitch belt loops to side seams 5″ below armholes.
- Fold the remaining loop at the CB neck and baste in place.
- Layer hood pieces together with WST. Pin/baste center seam. Stitch center seam with flat-felled seam.
- Pin/baste hood to neckline with WST. Pin/baste neck seam catching back neck loop. Trim. Sew neck seam with a flat-felled seam.
- Fold up hem 3″ and topstitch.
- Fold cuffs in half RST and sew up short ends. Press open.
- Pin/baste cuffs (RSU) to sleeves (WSU). Sew sleeve cuff opening. Grade seam and press seam allowance towards cuff.
- Turn under 1/2″ on cuff and align turn with machine-stitching. Topstitch the cuff seam. Topstitch cuff edges.
- Pin/baste front placket to front edges and hood with WST. Sew placket to coat using 1/2″ seam allowance. Grade seam and press towards placket.
- Turn up short ends of placket and turn under 1/2″ of placket. Press. Align pressed edge to machine-stitch and topstitch. Topstitch placket edge.
- Press under 1/2″ on short ends of sash. Fold sash in half (RST) lengthwise and stitch the long seam. Grade. Turn sash right side out and press flat. Topstitch around perimeter.
* RST= right sides together WST = wrong sides together
THE FLAT-FELLED SEAM
To begin, lay one piece of fabric on top of the other. The bottom piece of fabric should extend beyond the upper piece by the width of the seam (the seam-to-be, that is). Sew a line of stitching in from the edge of the top piece by the width of the seam.

Flip the bottom piece out from underneath so that both are lying flat on the table and the extra flap sticks up in the air. Fold the longer flap down over the short one and then fold both of them down flat, as shown. Sew a line of stitches to hold down the flap. When you sew this second row of stitches, be sure to gently pull the two pieces of fabric taut and press the overlap flat as you feed it through the sewing machine. This will result in a cleaner and stronger seam.

September 4, 2008
 Featured: Dirndl Skirt by Valentino
The Dirndl skirt (a full skirt with a gathered waistband) has come a long way since its origins in traditional German costume. Lots of prominent designers have included dirndl skirts in their collections recently. The Dirndl featured above is from the Valentino collection.
You can incorporate this adorable look into your wardrobe. The Dirndl skirt looks great on everyone! In contrast with the full skirt, the tight waistband highlights curves and minimizes your waistline. The full skirt also makes legs appear thinner.
Overall, the look is very figure flattering and feminine.
You will need:
- 2 – 3 yds. of fashion fabric, 60″ wide
- 1 – 1 ½ yds. of fusible interfacing, 22″ wide
- 1 skirt zipper, 7″ long
- 2 hook & eye set, size 0
- Coordinating thread
- Heavy-duty thread
- Kraft paper
PATTERN
 On kraft paper, draw a line equal to your waist measurement. Add a 1 inch extension.
Draw a parallel line 4 inches from first line. Connect the 2 lines by joining the ends together. Draw the grainline through the center of the pattern. Add ½” seam allowance to the perimeter. This is the waistband.
Draw a right angle on kraft paper. (1)
From the right angle, pivot an arc using a compass equal to your waist measurement. (choose radius from the chart). (2)
 From the right angle, swing an arc equal to the chosen radius measurement plus 22 inches or desired finished length. (3)
Draw grainlines parallel to the vertical and horizontal axis in the center of the pattern piece. Add ½” seam allowance to the waistline and ¾” seam allowances to the side seams. (4)
CUTTING
Cut waistband 1X self
Cut skirt 2X self
Cut waistband interfacing 1X fusible
ASSEMBLY
- Mark the center on each skirt piece.
- Staystitch the waist seam on each skirt piece. Do this from the side seam to the center.
- Do a seam finish on the side seams to neaten raw edges. (I used pinking shears).
- Layer the skirt pieces with right sides together and pin/baste the left side seam. Stitch the seam beginning 7 ½” from the top, using a ¾” seam allowance. Press seam open.
- Insert skirt zipper using a lapped zipper application.
- With right sides together, pin/baste the right side seam. Stitch seam using ¾” seam allowance. Press seam open.
 Open zipper and place heavy-duty thread slightly above the waist staystitching. Zig-zag stitch over the thread. Do this along the whole waistline. (Use a wide, long zig-zag and loosen your machine tension slightly).
- Turn under the seam allowance on one long edge of the waistband and press.
- At one short end, clip seam allowance 1 ½” from end for the extension.
- Fold the waistband in half with right sides together, and stitch the short ends. Grade seam and trim corners. Turn right side out.
- Divide the waistband in quarters excluding the extension. Beginning from the back of the skirt, pin the unpressed edge of the waistband to the skirt matching quarters to the CF, CB and side seams.
- Gather up excess fabric by drawing up on heavy-duty thread and shirr the skirt waist evenly and in proportion. Sew seam slightly beneath the staystitching at the waist.
- Turn the raw seam up into the waistband and encase it. Align the pressed edge of the waistband to the machine stitching. Slip-stitch the waistband to the skirt and the opening on the extension tab.
- Stitch a pair of hook and eyes on the inside of the waistband and the extension tab.
- Hem the bottom of the skirt with a ¼” double-rolled hem.
September 3, 2008
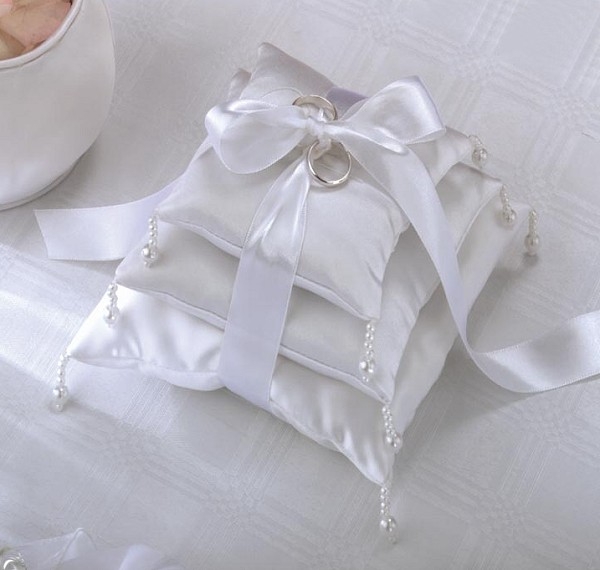
 Wedding ring pillows are traditionally decorative pillows that have the wedding rings placed delicately on them for their trip down the aisle. The young ring bearer usually walks the wedding ring pillow down the aisle. In the interest of not losing the rings, or having any sort of accident considering the young age of the ring bearer, having the rings tied to the pillow is a very good idea.
You will need:
PATTERN

CUTTING
Cut 2 of each pillow size in fabric.
ASSEMBLY
 On clear monofilament thread, thread 4 small beads, 1 large bead, and 1 small bead. Then return monofilament thread back through the large bead and small beads. Leave long thread ends. This is one bead fringe. Repeat and make 11 more.
- For each pillow, turn under ½” along one edge and press.
- Layer fabric in pairs, with right sides together and match up pressed edges. Open pressed edge and pin layers together in all 4 corners. (I used silk pins)
- Stitch around the perimeter of each pillow, beginning on the pressed edge and curve stitching around the corners. Leave a 2 ½” opening to allow for turning. Trim corners.
- Turn pillows right side out.
 Thread bead fringe onto a large hand needle. Attach beading to each corner of the pillows and knot monofilament thread from inside to secure.
- Fill the cavity of each pillow with fiber-fill. Pad corners first then fill body (fluff up the fiber-fill if necessary). Do not overstuff pillows but be generous. Slipstitch opening closed.
- Thread monofilament thread on large needle. Take a few tacking stitches in center of largest pillow and pass needle through center of medium-sized pillow and then the small pillow. Return needle through centers of small and medium pillows and loop a knot between the medium and large pillows. Hide loose thread end by burying into pillow.
- Tie the ribbon around the stack of pillows and finish with a square knot. Attach wedding rings to ribbon ends and tie in a bow.
Next Page »


 C-D = A-B.


