patterns

Today is the 100th post of the Weekend Designer and the last one for this blog. It seems like a good place to stop as I believe I have made my point that everyone is a designer and that making your own pattern “isn’t rocket science”. Weekend Designer has been a fun project as I have discovered the world of blogging and explored desktop publishing. My aim with the subject matter is to show how to execute those creative ideas for your wardrobe and home through pattern drafting. Some of the drafting techniques used were traditional flat pattern methods, drafting by height, transfer grids, simple block designs, and sometimes no pattern at all. While the examples cited are not complex, I have been able to show that making your own patterns is not a talent that you are born with nor a blessed gift, but simply a learned skill. It is like learning a new language. The more you practice it, the more fluent you become. Pattern drafting will allow you to make your creative ideas into reality.


Fabrics, trims, buttons, and embellishments are among our favourite resources for expressing our creativity in fashion design.  There is something particularly special and rewarding about designing and wearing your own creations or decorating your home interiors.  Garments speak a language; they are an extension of yourself, expressing personality, aspirations, moods, and style.  When you know you look great, it’s only natural to feel positive and confident about yourself. The same can be said of  our home decor.


You do not have to be an expert to be your own designer.  With simple pattern modifications and some common sense ( sometimes a bit of trial and error too), you can create your own  design details. When combined with the ideal fabrications you can realize your own creative visions.


You’ve probably discovered many sources of inspiration from the Weekend Designer.  Here are some design tips and advice to help you turn that inspiration into creativity.


  • Be Disciplined – Pattern-making can be hard work and takes concentration. A defined work-space and a preplanned time frame are often helpful. Try to plan creative time every day, or whatever time is available to your lifestyle. Planning a time frame in a space where you can concentrate will help slow down your ideas so you can actually be productive with them.  If you’re in a hurry or if the ideas come too fast, it’s difficult to convert them into a design.


  • Be Prepared – Pattern-making is a skill. However to make that skill work to its best advantage, you need the proper tools and supplies. Take precise and accurate measurements. It does not matter whether amounts are in imperial or metric but be consistent with whichever you choose. The applied math is basic but if you cannot convert fractions then use a calculator as an aid. Get a long straight ruler (yardstick) to draw lines, a set square to make 90° and 45° angles, a French curve to draw curved lines and a tracing wheel. You are only as good as your tools you use. Get a good sewing reference book. The more you know about sewing construction, the more you can expand on your pattern-making.


  • Set Goals – Channel your creativity by setting goals. Let your goals grow as you grow in your knowledge of pattern drafting. Perhaps your goal is to resolve a particular design challenge or to redesign a fashion detail and integrate it into your next design. Know that pattern drafting will eventually free you of “cookie-cutter” fashion and develop a personal made-to-measure style. One technique that I always use is to begin each project with a list of “what do I see”. This will set up your thinking as to how to proceed with your pattern-making.


  • Value Mistakes – Believe it or not, mistakes can be beneficial.  They cause us to search for a different and often better way.  They facilitate experimentation with new materials, techniques, or styles.  Mistakes or challenges are an important part of the design process because they provide unique opportunities for creativity. Always make a toile or muslin fitting to test your pattern before cutting into your fashion fabric. Don’t be disappointed if it does not ‘turn out ‘ on the first attempt as planned; that is what toiles are for. These mock-ups allow you to modify the end result, correct the pattern, and work out the sewing/assembly process.


  • Temporarily Let Go – When you have a creative block or cannot find a resolution to a design problem, there comes a time when it may be more productive to stop working on the pattern drafting. Let it go; do something else. While you have consciously stopped thinking about the problem, your mind is still working on it. Sometime we get too close to see the answer; however when we step back there is room for clarity.


  • Enjoy the Process – don’t forget the reason why you’re doing this.  Is this your hobby, your career, your creative release, your personal time for indulgence? Even if your concentration is on the end product, don’t forget to have fun with the process of pattern drafting.


Lastly, I would like to thank all the readers of Weekend Designer for their interest, comments, compliments, and encouragement. Many of you have set up links to this blog and made referrals to it in your sewing groups. Thank you for your support. Imagine my surprise and delight when I made the Top 100 Blogs on WordPress; it was all your doing.

Thank you again.


Wishing you many a creative weekend.


Don
 

arlene interiorsPhoto Credit: Arlene’s Interiors

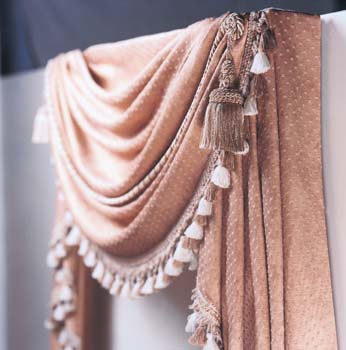
Swags are elegant treatments for tall, narrow windows yet easy-to-make. This window covering is pleated at the sides to create rounded folds and is used most often in formal home décor. Use them in tandem with cascades or jabots.

You will need:

  • Drapery fabric, 54” [137 cm] wide. *
  • Drapery lining, 54” [137 cm] wide. *
  • Twill tape, 1” [25 mm] wide.
  • Decorative trim (optional).
  • Pelmet mounting board**
  • Coordinating thread.
  • Staple gun.
  • Kraft paper.

* for yardage required, see Cutting Instructions below times the number of windows.

** Pelmet should be slightly wider than window frame.

abcMEASUREMENTS

Swag Width = the horizontal dimension of the mounting board or pole hardware. (A)

Swag Depth = the vertical drop of the swag, measured from the center of the board or pole line to the bottom of the swag. (B)

Swag Sweep = the bottom curve length of the swag from the board line, down to the longest point and up to the board line. (C)

Cascade Length = the vertical drop of the cascade from the board line down to the desired finished length. (D) Traditional proportions are equal to 3X the swag depth.

Cascade Width = 1/3 of swag width + mounting board width. (E)

Design Tip: To obtain the sweep measure, mount the pelmet board or pole hardware over the window. Drape a length of weighted cord from one end of the finished treatment to the other. Hold the cord on top of the hardware at each end at the point where the fabric will end. This will give you a finished curve length which includes the pelmet board allowance. Measure the length of the cord and that will be your sweep length.

PATTERN

swag draft

Swag Section

Draw a straight line on center of paper. Plot point A on line.

A-B = 2 X swag depth + 5″ [12.7 cm] (the featured sample swag depth is 18″ [45.7 cm] long.)

Square across from A and B.

A-C = ¼ of the finished swag width.

A-D = A-C.

B-E = ½ of the swag sweep

B-F = B-E.

Square up from E and F.

E-G = ½ of swag depth.  (Note: the angle of C-G will be greater than illustrated)

F-H = E-G.

I is located midway A and B.

Draw a square box with one of its sides touching on the centerline (A-B). Draw a diagonal line through the opposite corners of the box. This is the grainline.

Cascade Section

J-K = finished cascade length + 1” [25mm].

J-L = C-D.

Square down from L

L-M = A-I.

Join M to K.

Square across from K.

J-N = width of mounting board

Square down from N.

O is located at intersection of K and N.

The grainline is parallel to J-K.

Add seam allowances to pattern pieces.

Marking the Pleats:

The length of the pattern and the pleated sides combine to give the swag its character. The length of the pattern determines the fullness of the swag. The sides are pleated into folds which distribute the fullness and give the swag visual interest.

swag1_illus5Mark the center of the top and bottom edges of the swag pattern (A-B).
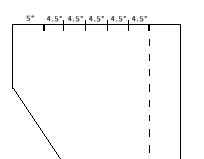
 

Fold the pattern along the center and mark the pleats as follows:

5″ from the top for first pleat. This will determine your “picture” size. (see design tip below)

4″ up from the bottom.

Divide the space between the first and last pleat into equal pleats of 4-6″.


All of the pleats between the first and last must be equal in size. Mirror  pleatsmarkings on opposite side and open pattern flat.


On the top edge of the cascade pattern, mark the first pleat as follows:

5” from inner edge of cascade tail (L).

Divide the space between the first pleat and the corner (J) into equal pleats of 4-6″.

lay

CUTTING (per window)

Swag – cut 1X self

Swag lining – cut 1X lining

Cascade – cut 4X self

Cover pelmet board* with self fabric.

Design Tip: The center of a finished swag is the “picture”. It showcases the motif of the fabric. The first fold on the swag acts as the picture frame. The top of the swag pattern should be aligned on the fabric surface to maximize the motif size in the swag.

For the cascades, you may wish to create a contrast edge by using a solid coloured lining, as the back side of the cascade will be visible.


ASSEMBLY

1. Turn under seam allowance on top edge of swag and press flat. Repeat step on swag lining.


2. With right sides facing together, align and match outer edges of swag and lining.

Baste decorative trim between self fabric and lining along bottom edge, if using.

Pin/baste and sew, leaving top edge open. Turn RIGHT SIDE OUT and press flat.

Edge-stitch the opening closed.


3. Turn under seam allowance on top edge of cascade pieces and press flat.


4. With right sides facing together, align and match 2 pairs of cascade tails. Pin/baste and sew, leaving top edge open. Turn RIGHT SIDE OUT and press flat. Edge-stitch the opening closed.


5. Transfer pleating markings to cloth of swag and pair of cascade tails.


MOUNTING


6. Use a pelmet board, preferably one that is covered in self fabric.  Mark the center of the board. Mark the center of the top edge of the swag. Set aside.


7. Staple the top edge of the cascade 1″ [25 mm] up on the top of the board, draping the long side of the cascade across the end of the pelmet board. Fold around the corner of the mounting board and pleat at the first fold. Staple point of the pleat along the edge on topside of the pelmet.


8. Continue pleating all of cascade tail to the end. Mirror the pleats on the left side exactly the same as the right, with the other cascade.


9. Staple the top edge of the swag 2″ [50 mm] up on the top of the board, aligning the center marks.


10. Pleat the first fold, right side and left side. Align point of the pleat along the edge of the top of the pattern. (This first fold sets the ‘picture’ on your swag). Staple top edge in place.


11. Continue pleating all but the last fold.


The distances between the pleats and the angle at which they fall off the board should be equal for all pleats. Pleat the left side exactly the same as the right. The ends of the swag will overlap the cascades.


12. Pleat the last fold. You will also have to take the end of it and pull it up onto the board to secure. This will cause the bottom edge of the swag to tuck neatly up.


13. Neaten the top edge of the treatment by covering the staples with twill tape.


Design Tip: Embellish the swag with decorative fringe, trims, banding, or tassels.


full_jackets_sanmar_03Featured: Club Jacket by Sanmar

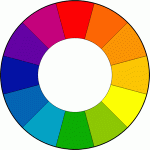
In the fashion world, colour-blocking is in. You might fret that you look ridiculous wearing a burnt-orange shirt and navy-blue pants, but you will find that designers are actually creating single-piece garments in literal blocks of stark colour contrasts. For the daring fashionista, choosing contrasting colours from opposite ends of the colour wheel can result in surprisingly appealing combinations.  Here are the rules to the art of colour-blocking:color-wheel-300

  • Three is the magic number
  • Keep colours in the same family
  • Be loud and proud
  • Keep it simple

Discover analogous, triadic, and split-complementary colour combinations.

You will need:

  • Up to 1 ½ yds. [1.4 m] of fashion fabric, colour A*, 45” [114 cm] wide.
  • Up to 1 ½ yds. [1.4 m] of fashion fabric, colour B*, 45” [114 cm] wide.
  • Up to  2  ½ yds. [ 2.3 m] of lining fabric, 45” [114 cm] wide
  • Approx. 2 yds. [1.8 m] of elastic, 1” [25mm] wide
  • ½ yd. [0.5 m] of fusible interfacing, 24” [61 cm] wide
  • 1 separating zipper **
  • Coordinating thread
  • Kraft paper

* see Cutting Instructions to determine the yardage required as it is dependent upon the colour-block styling. Feel free to use a third colour in your combination; the featured model uses two colours.


** zipper length = distance from top of collar to garment hem minus 1” [25mm].

Design Tip: Match colour of zipper to lightest fabric colour used in colour blocking

MEASUREMENTS

Chest – measure around the upper torso just below the arms

Waist – measure around the narrowest part of torso, just above the navel.

Seat – measure around fullest part of hip, about 9”[23 cm} below waist.

Back width – measure across the shoulder blades from armpit to armpit.

Shoulder – measure from neck to ball socket of shoulder.

Back waist length – measure vertically from nape of neck to natural waistline.

Armsyce depth – measure vertically from top of shoulder to nipple.

Neck – measure around base of neck.

Arm length – measure from end of shoulder to wrist.

Finished Length – measure vertically from nape of  neck to desired length.


PATTERN

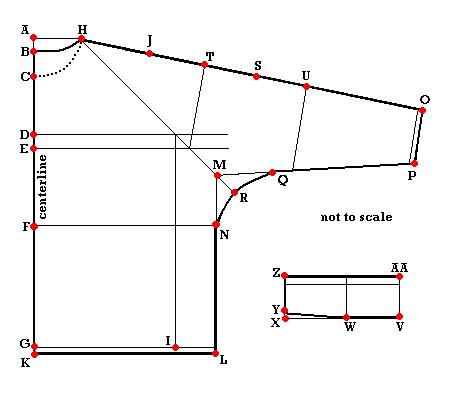
Easy fitting coats, jackets and smock shapes can be drafted from a simple grid which maps the basic control points of the body shape. The grid lines can be used for reference. Simple dramatic shapes can be achieved from this type of draft, like the club jacket from Sanmar. The grid is constructed to basic body measurements; substantial ease must be added for movement and styling. Once it is completed, the draft is aligned at the shoulder-sleeve seam and stylelines are drawn in and cut apart for colour-blocking. As the designer, you may create any shape of style lines desired and they may flow seamlessly from front to back. (Try to avoid any sharp angles and corners for ease of assembly.)

jacket draft

Body Grid

Draw 2 lines from A at a 90° angle.

A-B = ¾” [20mm]

A-C = 1/5 of neck measurement minus ⅛” [2 mm].

B-D = armsyce depth; square across.

D-E = 1” [25mm]; square across to mark chestline.

B-F = back waist length; square across.

F-G = 9” [23 cm]

A-H = 1/5 of neck measurement; draw in back neck curve from B to H, as shown.

Draw in front neck curve from C to H, as shown.

G-I = ¼ of chest measurement; square up to the armhole.

Draw a tangent line from H at a 17°angle from the line at point A.

H-J = shoulder measurement.

Style Adaptation

Mark point K on the centerline at the desired finished length + 1” [25mm] turn; square across.

K-L = ¼ of the seat measurement + ⅓ the distance of G-I for ease

Draw a construction line from H through the armhole (intersection of D and I) as shown.

Square up from L to locate M at the intersection of the lines.

Locate N at the waistline.

Extend the shoulder line from J; J-O = arm length + 1” [25mm] turn.

O-P squared from O = 12” [30.5 cm]; join P-M.

M-Q is the measurement M-N.

Draw a smooth underarm curve from N to Q; R is located at the intersection of lines, as shown.

Collar Section

Measure front and back necklines from draft. Compare amount with actual neck measurement. If necessary, increase neckline on draft so total is at least 1” greater than actual body measurement. (This amount may be greater than 1 inch if desired)

On a straight line, V-W = ½ of the back neck measurement.

W-X = ½ of the front neck measurement; square up.

X-Y = ⅜” [10mm].

X-Z = 4” [10 cm].

V-AA = 4” [10 cm]. (CB line)

Join Z and AA.

Fold on CB line and trace out mirror image of collar.

Add seam allowance.

Colour Blocking

S is midway between J and O.

Lay a set square on the sleeve line at S and draw a line at a 90°angle to touch on the line from E. Label this point, T.

S-U = distance of S-T.

Square a line from U to the underarm line.

contrast

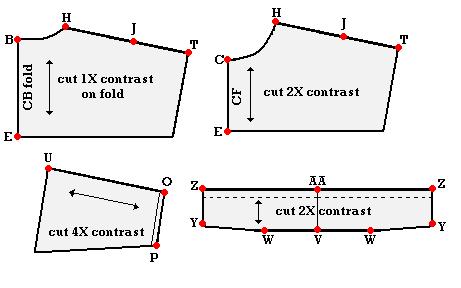
For the back yoke, trace out B-H-J-T-E-B.*

For the front yoke, trace out C-H-J-T-E-C.*

For the sleeve bottom, trace out U-O-P-U.*

* Add seam allowance and label CONTRAST.

self pcs

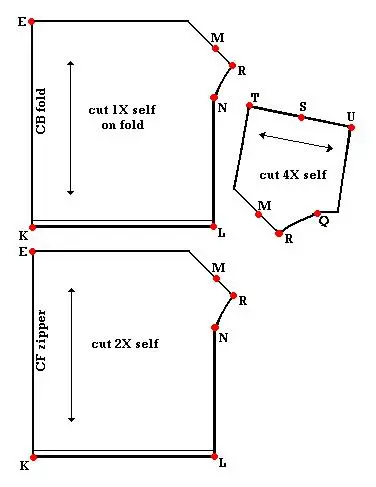
For the upper sleeve, trace out T-S-U-Q-R-M-T.**

For the front and back body, trace out E-M-R-N-L-K-G-F-E.**

** Add seam allowance and label, SELF.

Lining

For front lining, trace out C-H-M-R-N-L-K-G-F-E-D-C.***

For the back lining, trace out B-H-M-R-N-L-K-G-F-E-D-B. ***

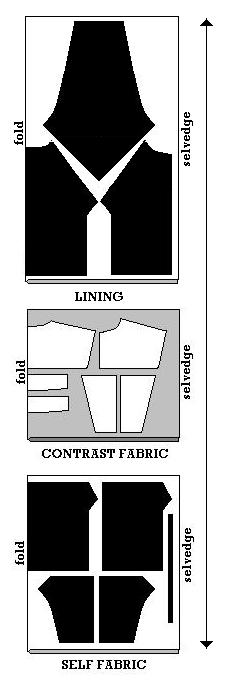
For the sleeve lining, place sleeve line (H to O) on foldline of paper and trace O-P-Q-R-M-H. *** jacket lay

*** Add seam allowance and label, LINING.

CUTTING

Fabric A (self)

Front Body – cut 2X self

Back body – cut 1X self on fold

Upper Sleeve – cut 4X self (reverse)

A 2” wide strip equal to length of collar.

Fabric B (contrast)

Front yoke – cut 2X contrast

Back Yoke – cut 1X on fold contrast

Sleeve bottom – cut 4X contrast (reverse)

Collar – cut 2X on fold contrast

Lining

Front – cut 2X lining

Back – cut 1X on fold lining

Sleeve – cut 2X lining

Interfacing

Collar – cut 2x fusible

Design Tip: Select 2 to 3 colours from the same kind of fabric for colour-blocking. If you are creating a bold outer-shell, keep the lining subdued; or if the shell is somber in colour, choose a bright lining.

ASSEMBLY

1. Iron fusible interfacing to wrong side of collar pieces following manufacturer’s directions.

For outer collar, stitch contrast strip 1” [25mm] from edge across top of collar with right sides facing together (RST). Flip trim FACE UP and trim any excess fabric if necessary.


2. For lining, sew sleeves to each side of back with RST.

Sew one front to each sleeve with RST.

With RST, attach untrimmed collar piece to neckline of lining.

Fold sleeves in half with RST and align and match underarm and side seams of body. Pin/baste and sew seams. Press seams open. Set aside.


3. For shell, sew sleeve bottoms to upper sleeves with RST for the front and back sections.

Sew sleeve halves to body with RST for the back and front sections.

Sew back yoke to back body section with RST, pivoting at the armhole seam.

Sew one front yoke to each front body section with RST, pivoting at the armhole seam.

With RST, align and match fronts to back at all seams on sleeve line. Pin/baste and sew shoulder and sleeve seam.

With RST, attach trimmed collar piece to neckline of shell.


4. Insert separating zipper to front edge from top of collar to within 1” [25mm] of hemline.

Fold sleeves in half with RST and align and match underarm and side seams of shell.

Pin/baste and sew seams. Press seams open.


5. To insert lining, place sleeves of shell into sleeves of lining with RST. Align and match outer edges of the garment. Pin/baste together. Stitch along the zippered edges and across top of collar. Trim corners of collar to reduce bulk. Turn garment RIGHT SIDE OUT. From between the shell and lining, attach the seam allowances of the collar and neckline together. (This can be machined or basted by hand.)

With garment FACE UP, topstitch along zipper edge and collar.


6. At the wrists and the hemline, turn in 1 ¼ ” [30mm] on the shell portion only and press. Align the edge of the lining along the creaseline. (This will allow for a bit of slack in the lining.) Turn under ¼” [6mm] on the shell fabric and stitch a 1” [25mm] casing for the elastic. Leave a small opening to thread the elastic through each casing.


elastic


7. To complete the jacket, draw elastic through casing at wrists and zigzag ends together. Stretch out elasticized cuff to distribute the elastic evenly and stitch up opening. “Stitch in the ditch” through the sleeve seams to prevent elastic from twisting in casing.


8. Draw elastic through casing at hemline. Tack each end of elastic at the end of the casing at the CF. Stretch out elasticized hem to distribute the elastic evenly and sew through the sideseams using the “stitch-in-the-ditch” method to prevent the elastic from twisting.

lifewithbirdbag_notcotFeatured: Turtle Tote by LIFEwithBIRD

An exercise in stylish functionality by Aussie line LIFEwithBIRD. A roomy, oversized canvas carryall, it can seamlessly go from work to after-hours party to weekend getaway, all without missing a beat. Here is a similar carpetbag version easy to draft and make up for your daytripping.

You will need:

  • 1 ¾ yds. [1.5m] canvas or upholstery fabric, 54” [137 cm] wide
  • 1 heavy-duty zipper, 18” [46 cm] long
  • 1 ½ yds. [1.4 m] heavy webbing, 2” [50 mm] wide
  • All-purpose thread
  • Cardboard
  • Kraft paper

DESIGN TIP: Match zipper colour with webbing strap colour.

DIMENISONS: approx. 20” X 10” X 15”   (51 cm X 25.5 cm X 38 cm)

PATTERN DRAFT

bag draft

Add ½” [12mm] seam allowances to all pattern pieces.

CUTTING

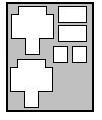
layCut 2 of each piece in fabric.

Cut 2 straps from webbing – 26” long

Cut a rectangle 20” X 10” in cardboard

ASSEMBLY

1. Prepare the base. With right sides together, stitch around the perimeter of the base layers, leaving one short end opening. Turn base right side out and press. Insert cardboard into base piece and slipstitch opening closed. Set aside.


2. Prepare patch pockets. Turn under 2” [50 mm] of top edge of pocket pieces and press. Hem turned edge. Turn under pocket side seam allowances and press flat. Set aside.


NOTE: A dome snap, Velcro® tab or zipper may be added to the patch pocket opening if desired. Do so at this time following manufacturer’s directions.


3. With right sides together (RST), align and match raw edges of bag at A and B. Stitch a 1” [25 mm] seam at A and B. Press seam allowance open.


4. zipperCenter zipper FACE down along opening in seam. Stitch zipper tape to seam allowances.

Turn bag FACE UP and topstitch on either side of seam and zipper.


5. With RST, align and match seams between A-C and B-D. Sew seam and press. Turn bag right side out and topstitch along both sides of the seam on the FACE side.


6. On FACE side, center a patch pocket over the  seam between the ● and edge-stitch along the pocket sides.


7. Attach ends of webbing strap at X at A and at B (on either side of zipper opening).

miterOpen zipper and turn out bag through opening. With RST, join A to A and sew across seam, ensuring the straps are caught in the seam. (Be careful not to twist the straps.)
Repeat on opposite side for B to B.


8. Join C-D together (RST) and press seam open. On FACE side, topstitch on either side of the seam.


9. Align and match C to C and D to D. Sew seams, ensuring you catch the bottom of the patch pocket in the stitching.

10. Turn bag right side out through zipper opening. Place self-lined cardboard base into bottom of bag for support.

satin-floral-skirt1 charlotte russeFeatured: Wrap Skirt by Charlotte Russe

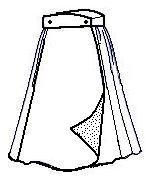
Cut for a gracious A-line sweep, this pretty printed lined skirt reverses to a solid colour for double the dressing options. Great for travel or everyday wear, this easy wrap style design, similar to this one from Charlotte Russe, is a simple drafting project with a very forgiving fit.

You will need:

  • Fashion fabric A *
  • Fashion fabric B *
  • Fusible interfacing
  • Coordinating thread
  • 4 buttons, 7/8” [21.5 mm] dia., line 34
  • Kraft paper

* amount required will depend upon skirt sweep and desired length.

Design Tip: Select a printed fashion fabric and choose the dominant or background colour in the surface pattern as the solid colour match for the contrast fashion fabric.

MEASUREMENTS

Waist – measure around narrower part of torso just above the navel.

Hip – measure around fullest part of the seat, about 9” [23cm] below waistline.

Finished Hem Length – measure vertically from waistline to desired length (see chart below)

PATTERN DRAFT

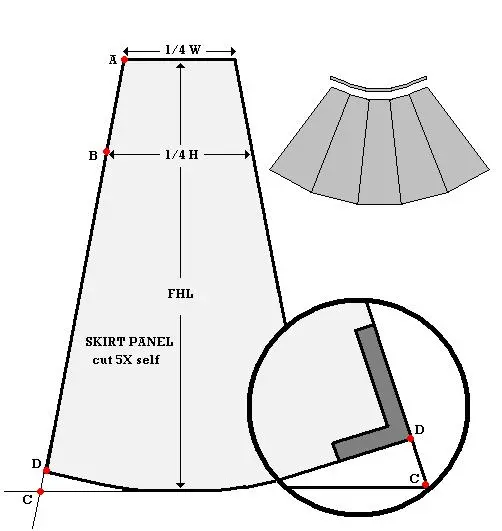
SKIRT DRAFTDraw a T shape with the vertical base equal to the Finished Hem Length (FHL) and the centered horizontal top equal to ¼ of the Waist measurement (W).
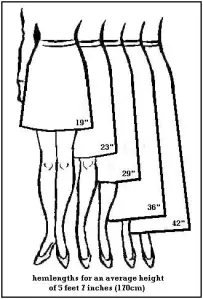
Measure vertically from the top of the T shape 9” [23cm] and square across. Plot ¼ of the Hip measurement (H) and center it on this line.

Draw a tangent line by joining A and B and extend it to the hemline at C on both sides of center, as illustrated.

On the tangent line, measure the Finished Hem Length from A to D. Place the set-square at D and square a line from this point, blending smoothly into the hem. Repeat on opposite side.

wb

For the waistband, trace top portion on skirt panel, matching sides at A and B, 5 times onto additional paper. Smooth the chevrons into a gentle curve. Draw a parallel line 1 ½” [4 cm] above the tracing. At each end, square a line upward from the tracing.

Add ½” [12mm] seam allowance to skirt panel pattern and the waistband pattern. Grainline is the centerline.

CUTTING

lengthsCut 5 panels for each fabric. **

Cut 2 waistbands in contrast fabric.

Cut 2 interfacings for waistband.

** Note: Select fabrics in compatible weights and fiber content to allow for simple maintenance care.

ASSEMBLY

  1. Iron fusible interfacing to wrong side of waistband pieces following manufacturer’s directions.
  2. Turn under the bottom edge seam allowance on one of the waistband pieces and press flat.
  3. With right side facing together, align and match raw edges of the waistband and pin/baste together. Stitch up the two short ends and the top edge of the waistband. Trim corners and grade seam allowance. Turn waistband right side out and press flat. Set aside.
  4. Pin/baste 2 pair of panels matching at A, B, and D with right sides facing together. Sew and press seams open.
  5. Align and match each pair on sides of remaining panel at A, B, and D and sew together. Press seams open. Set aside.
  6. Repeat STEP 4 and 5 for contrasting skirt panels.
  7. With right side facing together, layer the set of skirt panels and align outer edges. Pin/baste and sew the perimeter edges, leaving the top un-sewn. Trim corners and press seams open. Grade seam allowances to reduce bulk.
  8. Turn skirt right side out and press flat. Topstitch perimeter of skirt, if desired.
  9. Baste upper open edge together and match raw edge of waistband to top edge of skirt. Pin/baste and sew together.
  10. wrapskirtTurn all seam allowances to inside of waistband and align folded edge to machine-stitching on skirt waistline. Edge-stitch around perimeter of the waistband.
  11. Stitch a 1” [25 mm] buttonhole on each end of waistband. Position it ¾” [20mm] from the short end.
  12. Wrap the skirt around the waist to locate the placement of the buttons. At each location, sew a button on either side of the waistband (2 buttons anchored to one another) to make the skirt reversible.
  13. Measure the distance between the button locations to determine the location of the second set of buttonholes on the waistband. Stitch a 1″ [25mm] buttonhole.
008_01 foley & cox homeFeatured: Mitered Pillows by Foley & Cox HOME

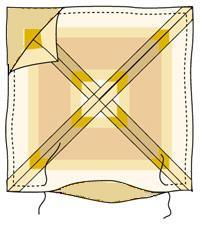
Clever use of the stripe from Foley & Cox HOME creates the illusion of mitered corners. With careful cutting and matching, a smart striped home décor fabric takes on a novel contemporary style when stitched into a mitered designer pillow. Select a favourite striped fabric and coordinate the colours with your home décor for this easy DIY project.

You will need: (for each pillow)

  • 54″ [137 cm]wide balanced stripe home decor fabric*
  • 1 loose fiber-filled knife-edge pillow form
  • matching all-purpose thread
  • kraft paper

* calculate required yardage by reviewing Cutting Instructions times the number of pillows desired.

PATTERN

draft

Measure the pillow form from seam to seam (length & width). Using a ruler and right-angled square, draw a SQUARE template following these dimensions. Divide the paper pattern into 4 equal sized triangles by drawing two straight lines from opposite corners, intersecting in the center.  Cut paper into 4 pieces along lines.  TRACE off onto additional paper, add a 1/2″ [12mm] seam allowance to all edges of each of the four triangles.

CUTTING

layThe paper triangle patterns have two sides of equal length.  Label the pattern with the letter X, at the center point, between these two equal sides. Label the corners on the unequal side with the letter O. With the points and corners of each triangle facing in the same direction, position the triangles on the striped fabric so each O-O line is parallel to and measures the same distance from a stripe. Mark and cut 8 identical triangles from fabric; four for pillow front and four for pillow back.008_03 foley&cox home

Design Note: To create the “cross” motif, align X facing in the same direction and position the triangles on the striped fabric so each O-O line is perpendicular to and centered on a stripe.

ASSEMBLY

1. With right sides of fabric facing, and raw edges even, pin and stitch together one short edge of two triangles, matching stripes.  Press seam open. Repeat for remaining 3 pair of triangles.


2. With right sides facing, and raw edges even, pin and stitch together two triangle assemblies matching stripes and center seams. The Xs of the individual triangles will now be in the center and the Os will make up the corners of the pillow.  Press seam open. Repeat for remaining pair creating a mitered pillow FRONT and mitered pillow BACK.


mitered3. With right sides of fabric facing, pin pillow front to pillow back along all edges.  Sew front to back using ½” [12mm] seam allowance and leaving a wide opening at the center of one edge. Clip corners and press seams open.  Turn mitered pillow cover to the right side through opening and press flat.


4. Insert pillow form into cover through opening.  Pin opening closed around form and using a hand needle and thread, slip-stitch opening closed.

Design Tip: Embellish the pillow edges with corded piping or a brushed fringe to change the pillow style  from contemporary to traditional if desired.

selmadressFeatured: Selma dress

In many cases, discover your fabric as inspiration and the theme for the piece begins there. There are so many design ideas you can do with patterned fashion fabric and a bit of elastic. Take for instance, the Selma dress with an elasticized bodice and striking rope trim makes for a nautical style and fun back by Christopher Deane. Come across your own themed fabric and try this dress draft for summer.

You will need:

  • approx. 2 ½ yds. [2.3m] of fashion fabric, 45″ [114 cm] wide (depends on desired length)
  • shirring elastic thread.
  • 4 yds. [3.6m] of cording, 1/2″ [12mm] diameter
  • Coordinating thread

MEASUREMENTS

X = bust measurement (measure just under the arms around the fullest part of the chest).

Finished length = measure vertically from the armpit to the desired hemline .

PATTERN

draft

This is a patternless design (simple block draft). Plot and cut block layout  directly onto the fabric according to your measurements as illustrated (seam allowance is included).

CUTTING

Cut 1 front, cut 1 back, cut 4 bra cups and cut 4 loop carriers (1-1/2” [4 cm] wide strips).

ASSEMBLY

1. Make 2 self-lined bra cups. Begin by layering 2 pieces, with right sides together. Stitch across narrow top edge using ½” seam allowance. From machine stitching, measure down ½” and sew down both sides of bra piece, using ½” seam allowance. Press seams open; then turn bra cup right side out. Press bra cups flat and topstitch across the top of each bra cup below the openings. Baste the raw edges together. Set aside.

2. shirWith FACE side up, shirr fabric panels using elastic thread in the bobbin. Begin 1” from top edge of panel and stitch across width of each panel. Do parallel rows of shirring about ½” apart (I used the presser foot width as a guide) and continue until you have a shirred length of fabric equal to 1/3 X.

For example: if the bust equals 36 inches , you would shirr 12-inch length from the top edge of the panel.

3. With right sides together, layer the fabric panels and align the shirred portions while matching the edges along the length. Pin or baste and stitch to create a tube, using ½” seam allowances. Press seams open.

Design Note: The fit of this style is not a snug one. The dress is designed to hang from the shoulder straps. You may get a closer fit by increasing the seam allowance at the side seams.

4. Hem the bottom edge of the tube with a narrow double rolled hem by turning under the bottom edge twice by ½” and press. Topstitch hemline.

5. On one panel front, find the center of the panel above the shirring and mark. Pin/baste one bra cup on either side of this mark, with right side facing. Sew across bottom edges of bra cups.

6. Make carriers 1/2″ X 3″ [12mm X 75mm]; you will need 4 of them. At the outer edges of the bra cups, fold a carrier  in half to form a loop and secure to either side of the garment. Divide the back portion between the two loop carriers into thirds. Place a loop carrier at each location and secure.

7. selma backSerge or pink the raw edge of the top edge. Turn top edge to inside and press. Topstitch in place.

8. Cut 2 lengths of cording. Thread cord in each bra casing and gather up excess fabric to create the gathers. Knot cording together to create halter straps and thread through loop carriers.

c2009_11_eyelet vest

Featured: Chulette

Simple eyelet vest with a “peek-a-boo” attitude.

Try styling it similar to this one from Chulette; fully lined with tan colour cotton fabric to add some contrast.

You will need:

  • 1 ¼ yds. [1.15 m] leno-cut fabric, 45” [114 cm] wide such as eyelet.
  • 1 ¼ yds. [1.15m] of matching lining, 45” [114 cm] wide such as broadcloth.
  • Coordinating thread
  • Kraft paper

MEASUREMENTS

Bust – measure around fullest part of chest, just under the armpit.

Waist – measure around narrowest part of torso, just above the navel.

Shoulder – measure shoulder length from ball socket to neckline.

Back width – measure across shoulder blades from armpit to armpit.

Backwaist length – measure vertically from nape of neck to waistline.

PATTERN

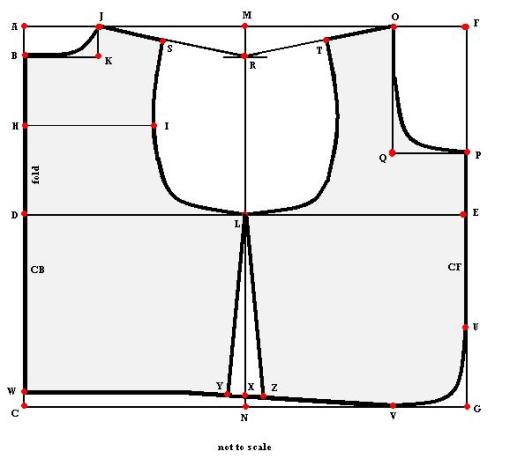
vest draft

Cut a length of kraft paper equal to your bust measurement + 3” [75mm].

Fold the paper in half across its widest point.

Plot point A on the foldline at the top of the paper.

A-B = 2” [50mm]

B-C = backwaist length

C-D = ½ of B-C less 1” [25mm]

Square across all points at 90°

D-E = ½ of bust measurement

Square up and down from E to locate F and G.

H = midpoint of A-D.

Square across from H.

H-I = ½ of back width minus 1” [25mm].

A-J = 3 ½” [90mm].

K is located where lines squared from B and J intersect.

Draw a shallow arc at K to join B to J as shown.

L is half of D-E.

Square up and down from L to locate M and N.

F-O = 3 ½” [90mm].

E-P = 3” [75mm].

Q is located where lines squatted from O and P intersect.

Draw a deep arc at Q to join O and P as shown.

M-R = J-K + ½” [12 mm].

Draw a straight line from J and O to R.

J-S = 2/3 of shoulder measurement.

O-T = 2/3 of shoulder measurement.

Join S-I-L with a smooth curve as shown.

Trace this curve on the front portion between L and T.

G-U = 3 ½” [90mm].

G-V = 3 ½” [90 mm].

Draw a smooth arc at G connect U and V as shown.

C-W = 1” [25mm].

Square a line across from W.

N-X = ½” [12 mm].

X-Y = 1” [25 mm].

X-Z = 1” [25 mm].

Join points W-Y and V-Z with a smooth line.

Join points Y and Z to L with a straight line.

Add seam allowances to perimeter of pattern pieces except armhole.

Cut out pattern with paper on the fold.

Grainlines are parallel to CB and CF of pattern.

CUTTING

vest layCut 2 bias strips 2 ½” wide [65mm] in lining fabric.

Cut front 2X self

Cut back 1X self

Cut front lining 2X lining

Cut back lining 1X lining.

ASSEMBLY

  1. With right sides together (RST), match up vest fronts to vest back and pin/baste side seams and shoulder seams. Stitch seams and press open.
  2. Repeat Step 1 for vest lining.
  3. With RST, align and match vest to lining around outer edges. Pin/baste in place. Stitch around the perimeter of the garment. Trim and grade seam allowance close to stitching. Turn vest right side out through armhole.
  4. Press seam flat around outer edge of vest. (Use a press cloth as not to mar fabric).
  5. Align and match up armhole opening. Baste both layers of fabric together.
  6. Bind each armhole with bias strip. To do this, fold the bias strip in half lengthwise (wrong sides together) and press foldline (use an up & down motion). Place the raw edges of the bias strip along the armhole on the face side of the vest. Stitch around the armhole using a 3/8” [1 cm] seam allowance. Turn under the short ends to neaten and complete.
  7. Fold the bias binding over the seam allowance in the armholes and align the folded edge to the machine-stitching. Slipstitch binding to lining.
22w369-LARGEFeatured: Imperial Dog Palace from Victoria Trading Co.

Creature comforts for the one who leaves no doubt who rules the roost.

You will need:

  • Approx. 1 yd. [0.9 m] of upholstery fabric, 54”[138 cm] wide
  • Approx. 1 yd [0.9 m] of ticking, 54” [138 cm] wide
  • 1 closed-end zipper, 26”[66cm] long
  • Coordinating thread
  • 1 ½ yds. [1.2m] to 2 yds. [1.8 m] upholstery felt (kapok), 24” [61cm] wide
  • Kraft paper

DIMENSIONS: Approximately 26” X 22” X 4″ [66 cm X 56cm X 10 cm]

PATTERN

bed draft

Seam allowance is included

CUTTING

Cut  1X in upholstery fabric and ticking.

ASSEMBLY

Note: Construction of the pet bed is the same for both the exterior cover and the padded cushion with the exception that the ticking will receive the kapok stuffing and the upholstery fabric with have an inserted zipper.

  1. On both short ends between X and O, turn under ½” [12mm] and press flat.
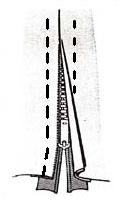
  2. zipperFor the exterior cover, center the zipper between X and O and align the foldline along the zipper teeth. Pin/baste zipper in place and topstitch fabric to zipper tape.
  3. Fold fabric with right sides together (RST), and repeat to other side of zipper. Note: If the zipper is shorter than folded edge, center zipper placement and stitch up seam at both ends of zipper.
  4. For kapok cushion, fold ticking with right sides together (RST). Stitch 1 ½” [40 mm] seam at X and repeat at O. Topstitch folded edges between X and O.
  5. With ticking RST, align and match side seams. Pin/baste and sew side seams using ½” [12mm] seam allowances. Press seam open.
  6. miterFold each notched corner and align and match the raw edges to form a miter. Pin/baste and sew seam at each corner.
  7. Turn the ticking right side out.
  8. Layer the upholstery felt in a high loft slightly larger in dimension to the ticking. Stuff the layers inside the cushion and slipstitch the opening closed.
  9. Repeat Steps 5 to 7 for the exterior cover. (Remember to open the zipper so you can turn the cover right side out.)
  10. Insert the kapok cushion into the exterior cover.

gore skirtLearn to make skirt patterns according to your measurements; and they’re guaranteed to fit! To give you an illustration of how easy it is to make a pattern, let’s make a 8-gore skirt like the model is wearing. For the example, we’ll use a waist measurement of 32 inches, hip 42 inches and skirt length of 24 inches. Remember, when you make the skirt for yourself you simply use your waist, hip, and skirt length measurements instead of these sample ones.

Let’s establish your height parameters.

draft1

Square across the paper to make a “T” shape. This will be the waistline.

Then measure down 8″ [20 cm] and draw a parallel line squaring from the centerline. This is the hipline.

Measuring from the waistline, draw a second parallel line equal to your desired skirt length and square from the waistline. This will be the hemline.

Now that you have your grid set up, it is time to use your body measurements to set the girth parameters.

Start by deciding how many gores you wish to create. Even numbers (4,6, 8, 10, etc.) will make your skirt symmetrical, but I like to use the “rule of 3s”. Odd numbers (5, 7, 9, 11, etc.) makes for a more interesting look. Either way, the number of panels used will create a gore skirt that will fit.

For the waistline, take your waist measurement divided by the number of panels desired.

For example, to create a 8-gore skirt to fit a 32″ [81.5 cm] waistline.

32″ divided by 8 = 4″[10 cm]

The hipline is normally 8″ [20 cm] below the waist, so at that point you’ll make a horizontal like equal to hip divided by number of panels desired + ¼” [6 mm].

Our sample hip measurement is 42″ [107 cm], so the horizontal line is 5 ¼ ” [13.5 cm] plus ¼” [ 6mm] = 5 ½” [14 cm].

With a straight yardstick, draw in the outside lines of the skirt, connecting the waist to hip to the hemline and draw in the bottom line.

At the top of the”T”, measure down ¼” [6 mm] and make the slight waistline curve.

The outside edges of the bottom are measured up ¼” [6 mm] each and the slight hemline curve drawn.draft2

Make your waistband to equal your waist measurement plus 1 ½” [40 mm], and the width is 2 ½” [65 mm] (your finished waistband will be 1 ¼” [32 mm] wide).

Remember you have not allowed for seams yet, so after making the skirt pattern, mark the 1/2″ seam allowance all around and add a 2″ hem. The seam allowance will be drawn around the skirt as well as the waistband.

Remember you will need to cut multiples of this pattern equal to the number of panels desired. Eg. cut 8 of the skirt pieces, since it is a 8-gore skirt.

The vertical center line of the pattern will be used as the “straight grain” line, when placing the pattern on the fabric.