July 2009
Monthly Archive
July 30, 2009
 Featured: Dry Max Hooded Vest
Chill in a unisex hoodie vest.
You will need:
- Sweat suit fleece *
- Rib binding *
- 1 separating zipper (equal to CF less 1” [25mm])
- Coordinating thread
- Kraft paper
* yardage will depend upon finished length.
The featured hoodie vest from Australian label Black and Blue is 28” long [71 cm].
MEASUREMENTS
Bust/Chest – measure around fullest part of upper torso, just under the arms.
Hip/Seat – measure around the fullest part of seat, 9” [23 cm] below waistline.
Back waist length – measure vertically from nape of neck to waistline.
Shoulder – measure from side of neck to socket joint of arm.
Finished Length – measure vertically from nape of neck to desired length.
PATTERN
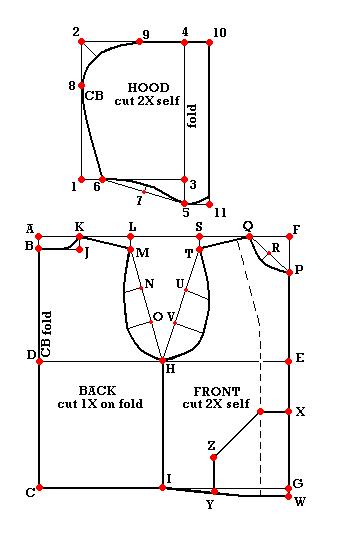
BACK SECTION
Square 2 lines from A at 90°.
A-B = 1” [25mm]
B-C = finished length + 1” [25mm]
B-D = ½ back waist length
Square across all points.
D-E = ½ bust or hip (whichever is greater) + 1” [25mm]
Square up and down from E to locate F and G.
D-H = 1/4 bust or hip (whichever is greater)
Square down from H to locate I.
B-J = 3 ⅜” [85 mm]
J-K = 1” [25mm]
Connect B to K with a shallow curve as shown.
K-L = shoulder length
L-M = 1 ⅜” [35mm]
Draw a construction line from M to H and divide it into 3 equal parts. Label points N and O.
Draw the back armhole with a smooth curve from M to H, passing through points 1 ⅜” [35mm] from N and 1 ½” [37mm] from O.
FRONT SECTION
F-P = 3 ½” [90mm]
F-Q = 3 ¼” [82mm]
Draw a construction line from P to Q and divide it into 2 equal parts. Label point R.
Draw the front neckline from P to Q passing through a point ¾” [20mm] from R.
Q-S = shoulder length
S-T = 1 ⅜” [35mm]
Draw a construction line from H to T and divide it into 3 equal parts. Label points U and V.
Draw the front armhole with a smooth curve from H to T, passing through points 2” [50mm] from U and 2 ¼” [57mm] from V.
G-W = ¾” [20mm]
Join I to W with a smooth curve. The corner at W is a 90°angle.
For the front facing, draw a line 3” [75mm] parallel to centerfront tapering to 1 ½” [37mm] at the shoulder-neck. Trace off the facing onto additional paper.
For the pocket, W-X = 10” [25.5 cm]
W-Y = 10” [25.5 cm]
Square up from Y; Y-Z = 5” [12.7 cm]
Draw a line from Z to intersection on facing point.
Trace off the pocket onto additional paper.
HOOD SECTION
Square 2 line from 1 at 90°.
1-2 = 13’ [33 cm]
1-3 = 10” [25.5 cm]
Square across from 2 and square up from 3 to locate 4 at the intersection.
3-5 = 3” [76 cm]
3-6 = front neckline mmt. + back neckline mmt. from body draft.
Draw a construction line from 5 to 6 and divide it into 2 equal parts. Label point 7.
Draw the neckline with a smooth curve between 5 and 6, passing through a point ½” [12mm] from point 7.
1-8 = 7 ¾” [19.8 cm]
2-9 = 6 ¼” [16 cm]
Join 8 to 9 with a curved line passing through a point 2 ¼” [57mm] from point 2.
For hood facing, 4-10 = 2” [5 cm]
5-11 = 2” [5 cm]
Join 10 to 11 and trace off neckline between 5 to 11.
Add seam allowances to all pattern pieces except hemline.
Grainlines are parallel to CF and CB.
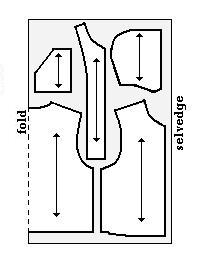 CUTTING
Back – cut 1X self on fold
Front – cut 2X self
Front Facing – cut 2X self
Hood – cut 2X self
Pocket – cut 2X self
Cut rib binding to fit.
Design Tip: Use a contrast colour for the hood and rib binding
ASSEMBLY
- Trim pocket opening with ribbed binding.
- With pockets up-side down and FACE DOWN on CF, stitch top of pocket to fronts.
- Flip pockets FACE UP and align with bottom edge of fronts. From the inside of the pocket, stitch short side from pocket opening to hem to the fronts. Baste the rest of the pocket to the fronts.
- With fronts FACE UP, stitch zipper (separated) face down to CF and 1” [25mm] from bottom edge.
- Align and match front facing to zippered edge with right sides facing together. Stitch facing to CF and 1” [25mm] from bottom edge. Trim bulk from bottom of facing at the hem and turn right side out.
- Attach fronts to back at shoulders. Stitch shoulder seam and press open.
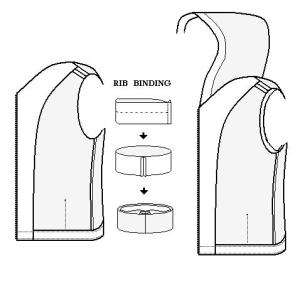 Trim armholes with ribbed binding.
- With right sides together (RST), match side seams and sew fronts to back. Press seam towards back. Trim seam allowance or overlock and topstitch on FACE SIDE along the seam on back section.
- Turn up hem 1” [25mm] and press. Open fold and re-fold raw edge to crease line. Fold up remainder of hem. Stitch down.
- On FACE SIDE, topstitch hem edge including the front facing.
- Align and match neck of front facing to neck of fronts. Secure front facing at the shoulder seam.
- With fronts FACE UP, topstitch CF along zipper.
- With RST, align and match top and CB of hood. Stitch center seam. Press to one side. Trim seam allowance or overlock and topstitch on FACE SIDE along hood’s center seam.
- Neaten facing edge of hood with a seam finish or overlock.
- With RST, align and pin/baste neckline of hood to body’s neckline. Wrap hood facing around the CF edge and back along neckline. Stitch hood to neckline. Trim and grade seam allowance.
- Flip hood facing FACE UP and turn facing to inside the hood. Edge-stitch open edge of hood facing to the hood.
- On FACE SIDE, topstitch along neckline seam.
July 26, 2009
 Featured: Missoni Hooded Scarves
For Fall ’09, Missoni is staying true to the label’s knitwear traditions and producing plenty of fabulous pieces including an abundance of hooded scarves. Design one up for yourself and make use of that fabulous knit remnant you have been saving for something special or go big as featured here.
You will need:
- ¾ yd. [0.7 m] of stable knit fashion fabric, 60” [152 cm] wide
- Matching thread
DIMENSIONS: approx. 30” long x 12” wide [76 cm x 30 cm]
PATTERN & CUTTING
This is a patternless design (a simple block draft). You can plot it directly onto your fabric but you will need to straighten the cut ends of your fabric before you are going to cut. The corners should be 90°. The rectangle should be about 60 inches long and 25 inches wide [152 cm x 63.5 cm]. Once that is done, you are ready to cut out the shape.
Fold the fabric into quarters both vertically and horizontally and align the raw edges (fig.1). At the “open” corner, measure 12” [30.5 cm] from the corner and mark location with a pin (■).
Draw an arc using a circular template (I used a large pie plate) with tailor’s chalk at the corner.
Cut through all 4 layers and remove the excess fabric.

ASSEMBLY
Open the fabric flat and refold it in the long direction with the right sides facing together.
Stitch the curved ends together between the ■ using a ¼” [6mm] seam allowance. (fig.2)
Open the fabric as a “tube” and refold it in the narrow direction with the right sides facing together. Align the sewn seam and match up the open raw edges. Clip the seam allowance at the ■, if necessary.
Stitch around the open edge of the loop using a ¼” [6 mm] seam allowance and leave a 6” [15 cm] opening to turn out. (fig.3) Turn the garment right side out and slip-stitch the opening closed.
July 25, 2009
 Featured: Wrap Top by NY&Company
This wrap top draft by NY&Company is a flattering style for all shapes and sizes. A deep V-neck combined with a fluid fabric is forgiving to all body types.
You will need:
- approx. 2 ¼ yds. [2m] of fashion fabric, 45” [115 cm] wide
- approx. ½ yd. [0.5 m] fusible interfacing
- coordinating thread
- kraft paper
MEASUREMENTS
Bust – measure around fullest part of chest, just below the arms.
Waist – measure narrowest part of torso, just above navel.
Shoulder – measure from neck to ball joint of arm.
Back waist length – measure vertically from nape of neck to waist.
Sleeve length – measure vertically from shoulder point to wrist.
Bicep – measure the fullest part of the upper arm.
PATTERN 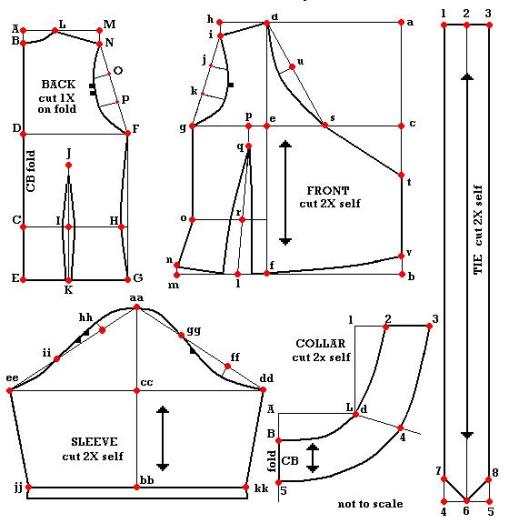 BACK SECTION
Square 2 lines from A at a 90° angle on the paper.
A-B = 1” [2.5cm]
B-C = back waist length
D = ½ of B-C
C-E = 6” [15.25 cm] Square all points across paper.
D-F = ¼ of bust + ¼” [0.6 cm]
Square down from F to locate G.
H is located on line square from C; H is ⅜” [1 cm] from line F-G.
Shape side seam from F to G, passing through point H as shown.
I is located midway C and H.
Square up and down from I to locate J and K.
I-J = 6” [15.25 cm] Draw a waist suppression dart from J to K; dart width at I = 1 ½” [3.75 cm] dart width at K = ½” [1.25 cm]
A-L = 3” [7.6 cm]
L-M = shoulder length
M-N = 1 ¼” [3.2 cm]
Join L to N.
Draw a construction line from N to F and divide it into 3 equal parts. Label points O and P.
Shape the back armhole from N to F, passing through points 1” [2.5 cm] from O and 1 ½” [3.75 cm] from P as shown.
Grainline is parallel to CB.
FRONT SECTION
Square 2 lines from (a) at a 90° angle on the paper.
a-b = A-E
a-c = A-D
Square all points across paper.
a-d = 9 ½” [24 cm]
Square down from (d) to locate (e) and (f).
c-g = ¼ of bust + 7” [17.75 cm]
d-h = shoulder length
h-i = 1 ⅜” [3.5 cm]
Join (d) to (i).
Draw a construction line from (i) to (g) and divide it into 3 equal parts. Ladel (j) and (k).
Shape the front armhole from (i) to (g) passing through points 1 ⅜” [3.5 cm] from (j) and 2” [5 cm] from (k) as shown.
f-l = 2 ¼” [5.7 cm]
i-m = 5 ¾” [14.7 cm]
m-n = 1” [2.5 cm]
Join (n) to (l).
Square down from (g).
g-o = C-D Join (n) to (o).
e-p = 1 ¼” [3.25 cm]
Square down from (p).
p-q = 2” [5 cm].
Join (l) and (q).
Square a line from (o) across to locate (r) at intersection.
Draw a waist suppression dart from (l) to (q); dart width at (r) = 1 ¾” [4.5 cm] and dart width at (l) = 2 ⅜” [6 cm] as shown.
c-s = 5 ¼” [13.2 cm] c-t = c-s Join (s) to (t).
Draw a construction line from (d) to (s) and divide it into 3 equal parts. Label the top third, (u).
Shape a smooth curve from (d) to (s) passing through a point 1 ⅜” [3.5 cm] from (u).
b-v = 1” [2.5 cm].
Shape a smooth curve from (f) to (v).
Grainline is parallel to line d-f.
SLEEVE SECTION
aa-bb = 1/2 of sleeve length – 2” [5 cm].
aa-cc = 5 ½” [14 cm]
cc-dd = ½ bicep + ⅜” [1 cm}
cc-ee = ½ bicep + ¾” [2 cm]
Draw a construction line from aa to dd and ee and divide each line into 3 equal parts. Label ff, gg, hh, and ii.
Shape the front sleeve cap with a smooth curve from aa to gg and continue to dd passing through a point ½” [1.25 cm] from ff, as shown.
Shape the back sleeve cap with a smooth curve from aa passing through at point ⅝” [1.6 cm] from hh to ii and continue with a shallow curve to ee, as shown.
bb-jj = ½ bicep
bb-kk = ½ bicep
Join dd to kk and ee to jj.
Draw a 1” [2.5 cm] turn up parallel to jj-kk.
Grainline is parallel to aa-bb.
COLLAR SECTION
Fold paper in half and place CB of back section on foldline.
Trace off back neckline and shoulder on to paper. Align front and back shoulders at L and trace off front neckline.
Square up from L. L-1 = A-L
Square across from 1 to locate 2.
2-3 = 3” [7.6 cm]
Draw 3-4-5 parallel to the neckline.
Grainline is parallel to centerback, B-5.
TIE SECTION
1-2 = 2” [5 cm]
2-3 = 2” [5 cm]
1-4 = 2 x waist
3-5 = 1-4
5-6 = 2-3
4-7 = 4-6
5-8 = 5-6
Join 6 to 7 and 8.
Grainline is parallel to line 2-6.
Note: Add ¾” [2 cm] seam allowance to perimeter of pattern pieces except for sleeve bottoms.
Add ⅜” [1 cm] seam allowance to tie pattern piece.
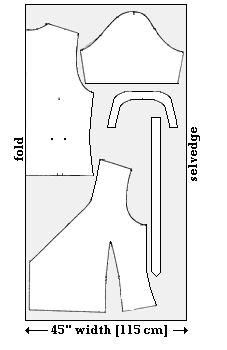 CUTTING
Back – cut 1X self on fold
Fronts – cut 2X self
Sleeves – cut 2X self
Collar – cut 2X self
Ties – cut 2X self
Collar Interfacing – cut 1X fusible on fold
ASSEMBLY
- Iron fusible interfacing to under-collar following manufacturer’s directions.
- Turn under neckline seam allowance on under-collar and press.
- With right sides facing together (RST), align under-collar to top-collar. Run stitch around collar perimeter leaving neckline open. Trim corners and grade seams. Turn right side out and press flat. Set aside.
- Fold tie lengthwise with RST and align raw edges; match up diagonal end. Stitch tie leaving blunt short end open. Trim and grade seam allowance. Turn right side out and press flat. Repeat for second tie. Set aside.
- Sew up waist suppression darts on back and fronts.
- With RST, match fronts to back at shoulder. Stitch shoulder seam and press open.
- Align and match top-collar to back neckline with collar FACE to wrong side of body and extend over shoulder seams.
- Sew collar to neckline of garment. Clip seam allowance on front edge where the collar connects. Turn in the seam allowance at the neck into the collar and align the folded edge of the under-collar to the machine-stitching. Slip-stitch bottom edge of under-collar to body.
- With RST, align and match sleeves into armholes. Sew sleeve caps to armholes.
- With RST, join fronts to back by aligning and matching side seams and sleeve seams. Stitch all in one motion from sleeve bottoms to hemline. On right front side only, leave a 2” [5 cm] slit opening at the waistline on the side seam.
- To finish the garment, turn in ⅜” [1cm] along the front neckline, then turn in ⅜” [1cm] once more. Topstitch in place (be careful not to stretch the neckline as you sew.)
- Do the same double-turned roll on the hemline.
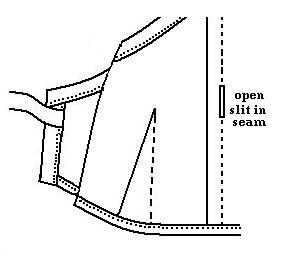 Turn under the vertical front edges of the garment ⅜” [1cm] towards the inside of the garment. Turn under again by ⅜” [1cm]. As you topstitch the turn down, attach a tie to each front just below the neckline edge by encasing the open end of the tie in the seaming. Once the topstitch is complete, fold the tie over the garment edge and secure in place with a second row of topstitching.
- Turn the sleeve bottoms up ½” [0.6 cm] and press; then turn up ½” [0.6cm] more and hem.
July 10, 2009
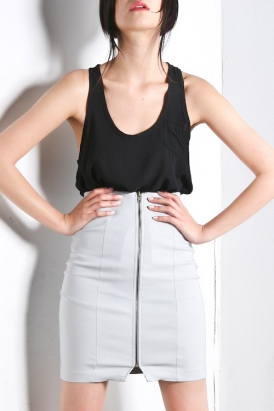 Featured: Purple Label Zip Skirt
Everybody’s getting into the rocker-chic zipper skirts.
You will need:
- 2-way stretch fashion fabric, 45” wide (spandex blend)
- 1 separating zipper (equal to desired skirt length less 1 inch [25mm])
- India stay tape, ¼” [6mm] wide (approx. the waist measurement + 6” [15 cm])
- Matching polyester thread
- Schmetz Stretch Needle®
- Kraft paper
MEASUREMENTS
Waist – measure around narrowest part of torso, just above the navel.
Hip – measure around fullest part of seat, about 9” [23 cm] below waistline.
Finished Hem Length – measure vertically from waist to desired skirt length.
The featured skirt from Purple Label is 19 inches long [48.5 cm]
PATTERN DRAFT
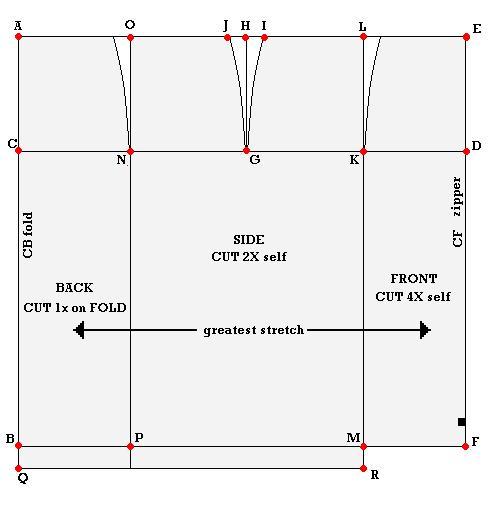
Draw 2 lines vertically and across on kraft paper at a 90° angle. Label point A.
A-B = skirt finished length
A-C = 9” [23 cm]
Square lines across all points.
C-D = ½ of hip measurement + ½ ” [6mm]
Square a line up and down from D to locate E and F.
C-G = ¼ of the hip measurement + 1” [25mm]
Square up to locate H.
I and J are 1” [25mm] on either side of H.
Join I and J to G to create a gently shaped dart, as shown.
K = midway G and D; square up and down to locate L and M.
C-N = D-K; square up and down to locate O and P.
B-Q = 1” [25mm]
M-R = 1” [25mm]
To shape waist, determine the difference between the hip and waist measurements.
Divide the difference by 4 and draw a gently shaped dart equal to this amount at L and O, with the dart facing the centerline.
NOTE: If the dart amount is greater than 1” [25mm], distribute the amount equally on either side of L and O.
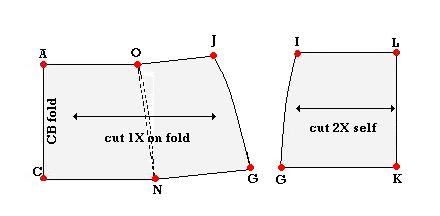 To draft the skirt facing, trace off A-O-J-G-N-C and I-L-K-G on additional paper down to the hipline.
Close dart on back piece by folding it out.
Trace out new shape and smooth a gentle curve at the chevrons.
Trace out I-L-K-G for the side front facing.
Add ½” [12mm] seam allowances to all pattern pieces except hemline.
Grainline is parallel to selvedges to allow for the greatest stretch to go around the girth.
CUTTING
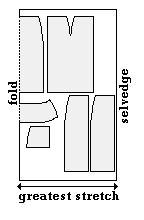 Determine the direction of greatest stretch of the fabric. It is usually the crosswise grain of the fabric eg. perpendicular to the selvedges.
Cut skirt front 4X self
Cut skirt side 2X self
Cut skirt back 1X on fold
Cut skirt back facing 1X on fold
Cut skirt side facing 2X self
ASSEMBLY
Sewing Tip: Use a stretch sewing machine needle for this project. Whenever sewing horizontal seams, find the “sweet spot” of the elasticity to allow for the stretch of the fabric.
1. Sew up side darts.
2. Insert separating zipper onto CF edges from top edge to ■.
Design Tip: For skirt hems below the knee, try a 2-way slider on the zipper for easy walking.
3. Sew one side panel to each skirt front.
4. Sew skirt back to side panels.
5. With skirt body FACE up, edge-stitch all vertical seams (have seam allowance directed toward the “side seam”)
For skirt facing:
6. Sew side front facings to each side of back facing.
7. Sew remaining 2 skirt fronts to each of the side front facings.
8. With skirt facing FACE up, edge-stitch all vertical seams (have seam allowance directed towards the centers).
Finishing the skirt:
9. With right side facing together, align and match top edge of skirt facing to skirt body.
10. 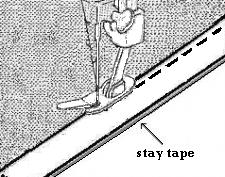 Cut the stay tape equal to the body measurement where you like to wear your skirts. (approximately 2″ [50mm] below waistline)
11. Pin/baste stay tape in place and sew top edge of skirt along the stay tape.
12. Align and match front facing to skirt body along zipper edge. Sew CF seams and hemline. Turn skirt right side out. Pin/baste un-sewn facing edge to seam allowance of seam nearest to the CF zipper. Sew together. Separate zipper and topstitch CF along zipper.
13. Turn up hem 1” [25mm] and double top-stitch hem in place.
14. Secure the lower edge of the skirt facing to the skirt body by tacking together the seam allowances at the vertical seams only.
July 9, 2009
 Featured: Turtle Tote by LIFEwithBIRD
An exercise in stylish functionality by Aussie line LIFEwithBIRD. A roomy, oversized canvas carryall, it can seamlessly go from work to after-hours party to weekend getaway, all without missing a beat. Here is a similar carpetbag version easy to draft and make up for your daytripping.
You will need:
- 1 ¾ yds. [1.5m] canvas or upholstery fabric, 54” [137 cm] wide
- 1 heavy-duty zipper, 18” [46 cm] long
- 1 ½ yds. [1.4 m] heavy webbing, 2” [50 mm] wide
- All-purpose thread
- Cardboard
- Kraft paper
DESIGN TIP: Match zipper colour with webbing strap colour.
DIMENISONS: approx. 20” X 10” X 15” (51 cm X 25.5 cm X 38 cm)
PATTERN DRAFT

Add ½” [12mm] seam allowances to all pattern pieces.
CUTTING
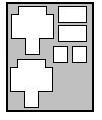 Cut 2 of each piece in fabric.
Cut 2 straps from webbing – 26” long
Cut a rectangle 20” X 10” in cardboard
ASSEMBLY
1. Prepare the base. With right sides together, stitch around the perimeter of the base layers, leaving one short end opening. Turn base right side out and press. Insert cardboard into base piece and slipstitch opening closed. Set aside.
2. Prepare patch pockets. Turn under 2” [50 mm] of top edge of pocket pieces and press. Hem turned edge. Turn under pocket side seam allowances and press flat. Set aside.
NOTE: A dome snap, Velcro® tab or zipper may be added to the patch pocket opening if desired. Do so at this time following manufacturer’s directions.
3. With right sides together (RST), align and match raw edges of bag at A and B. Stitch a 1” [25 mm] seam at A and B. Press seam allowance open.
4. 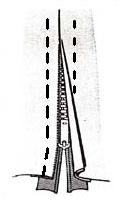 Center zipper FACE down along opening in seam. Stitch zipper tape to seam allowances.
Turn bag FACE UP and topstitch on either side of seam and zipper.
5. With RST, align and match seams between A-C and B-D. Sew seam and press. Turn bag right side out and topstitch along both sides of the seam on the FACE side.
6. On FACE side, center a patch pocket over the seam between the ● and edge-stitch along the pocket sides.
7. Attach ends of webbing strap at X at A and at B (on either side of zipper opening).
 Open zipper and turn out bag through opening. With RST, join A to A and sew across seam, ensuring the straps are caught in the seam. (Be careful not to twist the straps.)
Repeat on opposite side for B to B.
8. Join C-D together (RST) and press seam open. On FACE side, topstitch on either side of the seam.
9. Align and match C to C and D to D. Sew seams, ensuring you catch the bottom of the patch pocket in the stitching.
10. Turn bag right side out through zipper opening. Place self-lined cardboard base into bottom of bag for support.
July 6, 2009
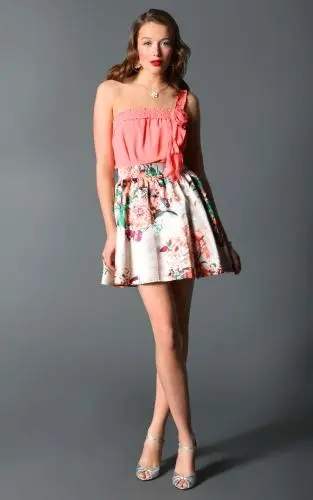 Featured: Wrap Skirt by Charlotte Russe
Cut for a gracious A-line sweep, this pretty printed lined skirt reverses to a solid colour for double the dressing options. Great for travel or everyday wear, this easy wrap style design, similar to this one from Charlotte Russe, is a simple drafting project with a very forgiving fit.
You will need:
- Fashion fabric A *
- Fashion fabric B *
- Fusible interfacing
- Coordinating thread
- 4 buttons, 7/8” [21.5 mm] dia., line 34
- Kraft paper
* amount required will depend upon skirt sweep and desired length.
Design Tip: Select a printed fashion fabric and choose the dominant or background colour in the surface pattern as the solid colour match for the contrast fashion fabric.
MEASUREMENTS
Waist – measure around narrower part of torso just above the navel.
Hip – measure around fullest part of the seat, about 9” [23cm] below waistline.
Finished Hem Length – measure vertically from waistline to desired length (see chart below)
PATTERN DRAFT
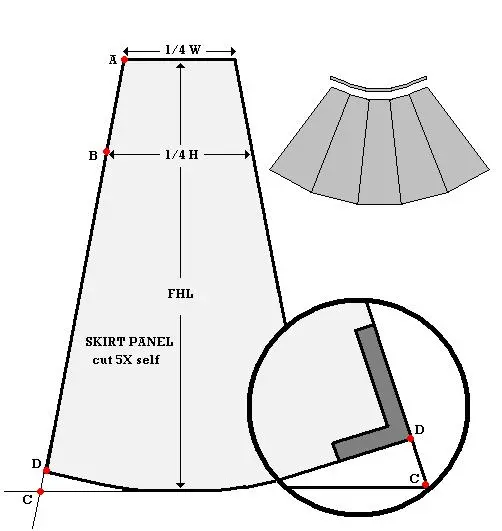 Draw a T shape with the vertical base equal to the Finished Hem Length (FHL) and the centered horizontal top equal to ¼ of the Waist measurement (W).
Measure vertically from the top of the T shape 9” [23cm] and square across. Plot ¼ of the Hip measurement (H) and center it on this line.
Draw a tangent line by joining A and B and extend it to the hemline at C on both sides of center, as illustrated.
On the tangent line, measure the Finished Hem Length from A to D. Place the set-square at D and square a line from this point, blending smoothly into the hem. Repeat on opposite side.

For the waistband, trace top portion on skirt panel, matching sides at A and B, 5 times onto additional paper. Smooth the chevrons into a gentle curve. Draw a parallel line 1 ½” [4 cm] above the tracing. At each end, square a line upward from the tracing.
Add ½” [12mm] seam allowance to skirt panel pattern and the waistband pattern. Grainline is the centerline.
CUTTING
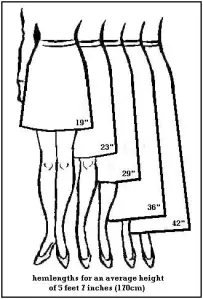 Cut 5 panels for each fabric. **
Cut 2 waistbands in contrast fabric.
Cut 2 interfacings for waistband.
** Note: Select fabrics in compatible weights and fiber content to allow for simple maintenance care.
ASSEMBLY
- Iron fusible interfacing to wrong side of waistband pieces following manufacturer’s directions.
- Turn under the bottom edge seam allowance on one of the waistband pieces and press flat.
- With right side facing together, align and match raw edges of the waistband and pin/baste together. Stitch up the two short ends and the top edge of the waistband. Trim corners and grade seam allowance. Turn waistband right side out and press flat. Set aside.
- Pin/baste 2 pair of panels matching at A, B, and D with right sides facing together. Sew and press seams open.
- Align and match each pair on sides of remaining panel at A, B, and D and sew together. Press seams open. Set aside.
- Repeat STEP 4 and 5 for contrasting skirt panels.
- With right side facing together, layer the set of skirt panels and align outer edges. Pin/baste and sew the perimeter edges, leaving the top un-sewn. Trim corners and press seams open. Grade seam allowances to reduce bulk.
- Turn skirt right side out and press flat. Topstitch perimeter of skirt, if desired.
- Baste upper open edge together and match raw edge of waistband to top edge of skirt. Pin/baste and sew together.
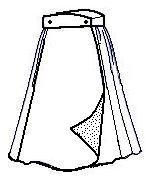 Turn all seam allowances to inside of waistband and align folded edge to machine-stitching on skirt waistline. Edge-stitch around perimeter of the waistband.
- Stitch a 1” [25 mm] buttonhole on each end of waistband. Position it ¾” [20mm] from the short end.
- Wrap the skirt around the waist to locate the placement of the buttons. At each location, sew a button on either side of the waistband (2 buttons anchored to one another) to make the skirt reversible.
- Measure the distance between the button locations to determine the location of the second set of buttonholes on the waistband. Stitch a 1″ [25mm] buttonhole.
 Featured: Dry Max Hooded Vest
 CUTTING
 Trim armholes with ribbed binding.
 Featured: Missoni Hooded Scarves
 Featured: Wrap Top by NY&Company
 BACK SECTION
 CUTTING
  Turn under the vertical front edges of the garment ⅜” [1cm] towards the inside of the garment. Turn under again by ⅜” [1cm]. As you topstitch the turn down, attach a tie to each front just below the neckline edge by encasing the open end of the tie in the seaming. Once the topstitch is complete, fold the tie over the garment edge and secure in place with a second row of topstitching.
 Featured: Purple Label Zip Skirt
 To draft the skirt facing, trace off A-O-J-G-N-C and I-L-K-G on additional paper down to the hipline.
 Cut the stay tape equal to the body measurement where you like to wear your skirts. (approximately 2″ [50mm] below waistline)
 Featured: Turtle Tote by LIFEwithBIRD
 Cut 2 of each piece in fabric.
 Center zipper FACE down along opening in seam. Stitch zipper tape to seam allowances.
 Open zipper and turn out bag through opening. With RST, join A to A and sew across seam, ensuring the straps are caught in the seam. (Be careful not to twist the straps.)
 Featured: Wrap Skirt by Charlotte Russe
 Draw a T shape with the vertical base equal to the Finished Hem Length (FHL) and the centered horizontal top equal to ¼ of the Waist measurement (W).
 Cut 5 panels for each fabric. **
 Turn all seam allowances to inside of waistband and align folded edge to machine-stitching on skirt waistline. Edge-stitch around perimeter of the waistband.