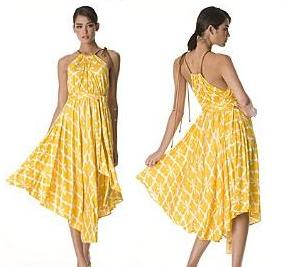
Featured: Vest from Chulo Pony

There’s something a bit redneck/hillbilly and then there also a sort of British Hunting Party aura too. One thing’s certain, buffalo plaid is going to take a front seat on all sorts of garments this fall! Buffalo plaid flooded the Ralph Lauren New York runway and that of Vancouver’s Chulo Pony during Fashion Week. This is an easy-fit boxy vest that is easy to sew.

MEASUREMENTS

Bust – measure just under the arms around the fullest part of chest.

Waist – measure around narrowest part of torso.

High Hip – measure 6 inches [15.5 cm] below waist around the hips.

Back-waist length – measure from nape of neck to waist level

Shoulder length – measure shoulder from ball socket to side of neck.

Armhole depth – measure from nape of neck to under arm level.

Back width – measure from armhole to armhole across shoulder blades.

Neck – measure around base of neck.
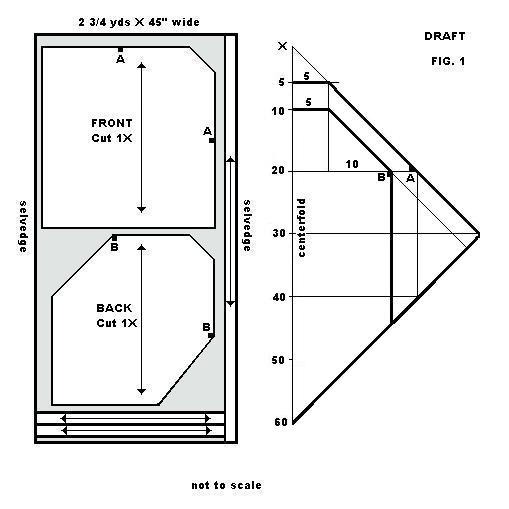
PATTERN DRAFT

Square down from 0; square halfway across the block.

0-1 = 5/8″ [1.5 cm]

1-2 = armhole depth plus 1″ [2.5 cm]; square across.

2-3 = half bust plus 3″ [7.5 cm]. Square up and down; mark this line the CF line.

3-4 = 0-2 (add 1/8″ [0.3 cm] for every size above size 14 [bust=36″])

Square across from 4.

1-5 = back waist length; square across to 6.

5-7 = waist to hem (6″ [15.5 cm] + 2″ [5 cm] hem allowance = 8″ [20.5 cm])

Vest Back

0-9 = 1/5 of neck size minus 1/8′ [0.3 cm]; draw in back neck curve 1-9.

1-10 = 1/5 of armhole depth minus 3/8″ [1 cm]; square halfway across draft.

9-11 = shoulder length plus 3/8″ [1 cm]. Draw back shoulder line to touch the line from 10.

2-12 = half of the back width plus 3/8″ [1 cm] ease; square up to 13.

12 – 14 = half the measurement of 12-13.

Vest Front

4-15 = 1/5 of neck size minus ¼” [0.7 cm].

4-16 =  1/5 of neck plus 5/8″ [1.5 cm]; draw in front neck curve 15-16.

17-16 = 2″ [5 cm]. Square down to locate 20. This is the front closure extension.

18-3 = half chest plus 5/8″ [1.5 cm]; square up.

19-18 = half the measurement 3-16 minus ¾” [2 cm].

21-11 = ¼” [0.75 cm]; square out 6″ [15 cm] to 22.

23-15 Draw a tangent line from 15, shoulder length plus ¼ ” [0.75 cm] to touch line from 21-22.

24-18 = midway between 12 and 18; square down to point 25 on waistline and point 26 on hemline.

At side seam, measure out ½ ” [1.25 cm] on either side of point 25 and shape with a smooth curve for waist suppression.

Draw armhole as shown on draft touching points 11, 14, 24, 19, and 23.

Vest Collar

27-15 = 0-9; square up from 27.

28-27 = 5/8″ [1.5 cm].

29-28 = 20″ [51 cm]. This is the collar depth.

30-15 = 28-29.

Draw the outer edge of collar parallel to line 15-28, passing through point 30 and gently tapering the curve to point 17.

Vest Collar Facing

Measure 2″ [5 cm] from 15 on shoulderline.

Measure from 8 the length of 8-20.

Join these 2 point as shown with dotted line.

Trace off the front edge, collar, shoulder, dotted line, hem and CF line to create the facing piece.

Grainlines are parallel to CB and CF lines.

A hem allowance is 2″ [5 cm] turn under. Seam allowances are 3/8″ [1 cm}.

Sash

A-B = 9″ [23 cm].

A-C = 2 times waist measurement plus ¾” [2 cm].

C-D = A-B.

B-D = A-C.

E = half of A-B

F = half of C-D

Join E and F to create foldline of sash.
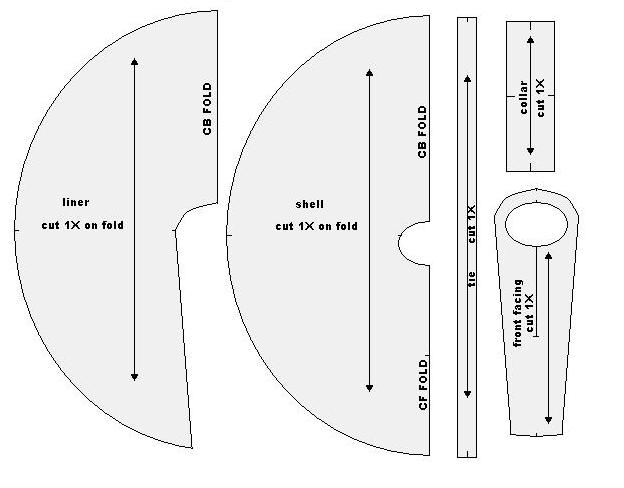
CUTTING

Vest Front – cut 2X self

Vest Back – cut 1X on fold; cut 1X lining on fold

Vest Collar Facing – cut 2X self; cut 2X interfacing

Sash – cut 1X self

Front Lining – cut 2X lining (NOTE: add ¾” [2 cm] to front edge of this piece for seam allowance.)

ASSEMBLY

  1. Fold sash piece with right sides together and stitch along the raw edges leaving a 5″ [13 cm] opening to turn out. Grade corners and turn right side out. Slipstitch opening closed and press edges. Topstitch around perimeter of sash.
  2. Iron fusible interfacing onto back of collar facing pieces, following manufacturer’s directions.
  3. With right sides together (RST), pin/baste collar facing to front lining. Sew seam and press seam allowance towards lining.
  4. Staystitch shoulder-neck point (#15) on collar facing to reinforce corner. Clip seam allowance to the stitching at a 45° angle.
  5. With RST, pin/baste lining fronts to lining back at sideseams and shoulders. Sew seams and press open.
  6. With RST, pin /baste CB seam of collar facing together. Sew seam and press open. Then pin/baste the collar to the back neckline and sew between the two clips. Press seam open.
  7. Staystitch shoulder-neck point (#15) on vest fronts to reinforce corner. Clip seam allowance to the stitching at a 45° angle.
  8. With RST, pin/baste vest fronts to vest back at sideseams and shoulders. Sew seams and press open.
  9. With RST, pin /baste CB seam of under-collar together. Sew seam and press open.
  10. With RST, pin /baste CB seam of collar together. Sew seam and press open. Then pin/baste the collar to the back neckline and sew between the two clips. Press seam open.
  11. Place the lined portion with the vest right sides together, aligning them up along the edges. Pin/baste the two halves of the vest together.
  12. Stitch the vests along the front and collar, and around the armholes. Do a parallel row of stitching 1/8″ [0.25 cm] on armholes and trim seam allowances away. Grade seams and trim corners.
  13. Stitch along the lower edge of the vest front facing only, 2″ [5cm] and trim away the excess material. Leave the lower edge of the lining unstitched.
  14. Turn the vest right side out. Use a bone turner to gently push out the edges of the vest and make sure it’s fully right side out. Entering from the bottom, match up the seam allowances of the back neckline and collar and baste together.
  15. Turn the bottom edge 2″ [5 cm] to the inside of the vest, so that the hemline is even with the rest of the facing. Press the folded edges. Turn the bottom edge of the lining and lay on top of the hem just shy of the fold. Baste the two layers together.
  16. Topstitch along the outside edges of the vest and the armholes, 1/4 inch [0.5 cm] from the edge. Make sure the lower edge of the back of the vest gets sewn closed in this seam.
  17. Add dome snaps or Velcro® tabs to front closure of the vest, if desired.


Featured: Ruffle bag by Rianrae (India Rose Textiles)

A beautiful drawstring totebag made of soft cotton with a cascade of ruffles.

You will need:

  • Fashion fabric, 45″ wide equal to 3.5 times your bag circumference measurement (W).
  • Coordinating thread

PATTERN

This draft is an exercise in proportion. It is based on two measurements:

X = ruffle depth + 1″

W =  circumference around the bag + 1″ (or 2 X finished width + ½”)

CUTTING

Ruffle strips – cut 6X self

Bag – cut 1X self

Drawstring casing – cut 1 ½”strip equal to W, cut 1X self

Draw cord – cut 1 ¼” strip equal to 2 x W, cut 1X self

ASSEMBLY

  1. Take 2 of the ruffle strips and with right sides together (RST), fold each strip in half lengthwise. Pin/baste and sew using ½” seam allowance.
  2. Turn each piece right side out and press flat. Edge stitch perimeter of each strap.
  3. On remaining 4 ruffles strips, match up short ends together and join with a narrow French seam to create a “tube” on each strip. Hem top and bottom edges of each tube with a narrow double rolled hem. Then, sew a gathering stitch ½” below the top edge to gather the ruffle.
  4. On bag piece, hand-baste 4 rows of running stitches according to dimensions shown in illustration. Once completed, fold the bag piece in half lengthwise with RST and match up side seam. Pin/baste and sew seam using ½” seam allowance. Press seam open. Turn bag right side out.
  5. Beginning at the lowest running stitch, pin gathered ruffle to bag aligning the gathers on top of the running stitch line. Match ruffle seam with bag’s side seam. Distribute gathers evenly around the body of the bag. Turn bag wrong side out and machine stitch through the gathers on the ruffle. Remove running stitches.
  6. Repeat this step with each tier of ruffles on each subsequent row of running stitches. Each ruffle will overlap the last one.
  7. On wrong side of bag opening, centre each handle strap on half of the bag width without twisting the strap. Pin and baste upside down to top edge of bag.
  8. Take the drawcord casing strip and turn under the short ends ½” and press. Edgestitch along the short ends. Then, turn under ½” along one long edge. Press.
  9. Start at the midpoint between one of the handle loops, pin/baste raw edges together with right side of casing facing wrong side of bag opening. Butt the two short ends together. Sew around top of bag and encase strap ends using a ½” seam allowance. Grade seam.
  10. Turn bag right side out and fold over casing strip to the outside of the bag along the seam. Press casing flat. Baste  casing strip along the face of the bag. Keeping bag straps free, topstitch along bottom and top edges of casing.
  11. Take drawcord strip and with wrong side together, fold in half lengthwise and press.
  12. Open fold and fold raw edges to center. Press again.
  13. Turning in short ends to the inside, refold strip and edgestitch around the perimeter to create a drawcord tie. Thread tie through casing.
  14. To complete the bag, turn bag wrong side out and flatten from side seam. Match up bottom raw edges and pin/baste. (Do not catch ruffles in seam.) Stitch across bottom. Press seam open.
  15. At bottom corner, line up side seam on top of bottom seam to create a right angle with the fabric. Stitch across the point as shown. This seam will equal X (or 1/2X on either side of center seam). Repeat on opposite corner. Turn bag right side out.

Featured: Layered 3-tier skirt by ASOS

A three tiered/layered skirt that is flirty and so sexy.

You will need:

  • 2 yds of Fashion fabric, 45″ wide
  • 1/4 yds. of Fusible interfacing, 45″ wide
  • 1 closed skirt zipper, 5″ long
  • 2 sets of hook & eyes, size 0
  • Coordinating thread
  • Kraft paper
  • String
  • Push pin
  • Tracing wheel
  • Tape measure

PATTERN

skirt-draft1

Measure your waist and use R from chart to draw an arc from intersecting right angle. (90°)

For each tier, add 5 inch intervals to R. eg. R + 5″; R + 10″; R + 15″

To create the arc, use string and pencil as a compass and measure the string length equal to the tier lengths above. Attach string to push pin anchored at intersection (●). Holding string taut, draw arc from horizontal line to vertical line. Repeat with new lengths for each tier.

Trace off each layer separately on paper and add ½” hem and seam allowances.

For waistband, measure a line equal to your waist plus 1 ½”. Draw a parallel line 3″ next to it and join the ends of both lines. Add ½” seam allowance to perimeter.

Grainlines are parallel to horizontal lines of draft on all pieces.

CUTTING

Cut each tier 2x self in fashion fabric. *

Cut waistband 1X self in fashion fabric.

Cut waist interfacing 1X fusible in Pellon®

ASSEMBLY

  1. Iron fusible interfacing to wrong side of waistband piece, following manufacturer’s directions.
  2. Turn under ½” along one long edge and press.
  3. Stay-stitch waistline on each tier piece from side seam to center. Neaten raw edges of side seams with a seam finish.
  4. Layer tiers in pairs with right sides together. Pin/baste side seams, leaving 5 ½” open at waist on left-hand side. Sew seams and press open.
  5. On each tier, hem bottom with a ¼” double rolled hem. Press.
  6. Layer tiers one on top of one another (right sides out) and match up waistline and side seams. Baste together.
  7. Apply zipper on left-hand side, from waistline to bottom of top tier, using center slot application.
  8. With right side of waistband to wrong side of skirt, pin waistband piece to skirt’s waistline, extending waistband 1 ½” beyond zipper on back portion. Also allow for ½” seam allowance on each end of waistband piece. Baste waistband in place following stay-stitching. Sew waist seam.
  9. Press under seam allowances on each end of waistband and fold waistband in half, aligning pressed edge with machine stitching. Pin/baste. Edge-stitch around perimeter of waistband.
  10. Handstitch hook and eye sets to extension of waistband.

* If you wish a crinoline for this skirt (like that one featured on the model), use the third layer pattern piece and cut it 1-inch longer. Cut 2X in netting. Join side seams using a French seam technique and leave 5″ slit opening on left-hand side at waist. Overcast or bind waistline of crinoline. Sew a narrow “india” tape to the waist and leave 12-15 inches “loose” ties on either side of the slit opening.


Jammin’ jammers for the budding beach bum.

You will need:

  • 1-5/8 yds. of fashion fabric, 45″ wide
  • 1-1/4 yds. of waistband elastic, 1 ½ ” wide
  • 1-1/2 yds. of cable cord, 1″ thickness
  • 1 VelcroTM tab
  • Coordinating thread

PATTERN

Measure hip about 9″ below the natural waistline and around the fullest part of the seat. Finished length is approximately 22″ (knee length).

CUTTING

Cut 2X self on straight grain of fabric. Save crotch cut-out for pocket.

ASSEMBLY

  1. Take one piece of crotch cut-out and turn under top edge 2″. Press. Centre hook side of VelcroTM tab (just below the foldline)  with pocket right side up. Stitch around the tab. Turn top edge 2″ again.  Press.  Topstitch facing of pocket below the tab.
  2. Turn under ½” seam allowance around perimeter of pocket rounding the “corners”. Press. (NOTE: The pocket opening should measure at least 5″ minimum for functional use.)
  3. Place pocket on placement line (black dots) on back of right-hand side piece. Align the loop side of the VelcroTM tab with the pocket tab. Stitch loop tab in place to pant. Match up hook to loop and fasten together. Pin/baste edges of pocket to pant. Topstitch pocket edges.
  4. Layer fabric with right sides together, and stitch crotch seam using ½” seam allowance.
  5. Match front side seam with back side seam on each leg, with right sides together. Pin/baste seam. Stitch side seam and press open.
  6. At waist, turn under ½” and press. Turn under 2″ to create a casing. Topstitch along top and bottom of inside edge of the turn.
  7. Cut waistband elastic equal to your waist measurement less 3″.
  8. Carefully remove stitches at CF between the 2 topstitching lines on the casing (see red dots) to create an opening. Draw elastic through casing without twisting elastic.
  9. To join elastic, butt ends of elastic over a piece of fabric cut twice the width of the elastic. Wrap elastic with fabric scrap. Zigzag-stitch the ends of elastic to fabric scrap. This method eliminates bulk in elastic and works to prevent frayed ends from protruding.
  10. Thread cable cording through casing on top of elastic. Knot cord ends.
  11. Hem leg bottoms with a ½” double rolled hem.


Featured: Square Tufted Box Pillows by Restoration Hardware

Young or old, few ever outgrow the love of laying on the floor while visiting or watching television. What you need are some big comfy floor pillows that you can use for those times when the gang is over at your house and there is no room on the couch. If the pillows are big enough (24 to 36 inches) they can also be seat cushions around a big coffee table for the overflow from the dining room. If you can’t quite envision these in your house, how about making a stacking set of these giant pillows to give to a student or a young couple in a new apartment. They never have enough seating. Cover the cushions with an upholstery fabric and pipe the edges for a real professional look.

Dimensions:

Small Square Cushion: 18″ sq.

Medium Square Cushion: 24″ sq.

Large Square Cushion: 30″ sq.

You will need:

  • Approx. 17 yds. of cable cord, ½” thickness
  • Approx. 4 ½ yds. of brushed cotton, 54″ wide colour A
  • Approx. 3 ½ yds. of brushed cotton, 54″ wide colour B
  • 2 yds. of hook & loop fastener, ½” wide
  • Coordinating thread
  • 1 covered button kit, 1″ diameter (6 buttons), optional
  • Heavy-duty thread (optional)
  • 2 yds. of polyester batting, 60″ wide
  • Polyethylene Foam, 4″ thickness/30″ wide x 72″ long
  • Upholstery spray adhesive

PATTERN

MAKING A BOX CUSHION:

CUTTING

To prepare the welt, cut 2 pieces of fabric each measuring, the length of the cushion (X) plus 8″ by the required depth less 1″, adding ½” to all edges for seams.

Cut 1 piece of fabric measuring, the width of the cushion (X) times 3 less 8″ by the required depth, adding ½” to all edges for seams. Make sure to cut the depth from down the length of the fabric.

Cut the top and bottom cushion pieces to the required size, (X by X), adding ½” to all sides for the seam allowances. If patterned fabric is used, make sure to centre any design on the fabric.

Cut bias strips of contrasting fabric 1 ½” wide to make the piping. Make enough length to go around the perimeter of each cushion plus 5″, twice.

Cut foam to size. (X by X)

ASSEMBLY

Spray each foam pad with spray adhesive and wrap in batting on all sides.

Cover 2 button blanks with contrasting fabric for each cushion.

Join enough bias strips for the required length and wide enough to cover the cable cord plus the seam allowance. Lay the cord in the centre, on the wrong side of the bias strip.

Fold the bias strip over the cord matching the raw edges. Stitch the 2 sides of the bias strip together along the length. Use a zipper foot or cording foot on the sewing machine to ensure that the stitches are close to the cord.

On the 2 smaller welt side pieces, turn under ¼” and then 5/8″ along one long edge, making sure that any design or nap on the fabric is the right way up on all the pieces. Press. Open the fold and center the hook side of the fastener tape on one piece and the loop side of the other, leaving 4-1/2″ free on each end. Stitch fastener tape in place. Re-fold edge and sew length of turned edge.

Lap hook and loop together to create a width of 5″ when combining the 2 welt side pieces. Sew across the ends to secure.

Join the welt pieces together to form a ring, making sure that any design or nap on the fabric is the right way up on all the pieces.

Pin the ends of the strips, right sides together, and stitch, ½” in from the raw edges, using a flat seam. Press the seams open.

Place the contrasting piping around the outer edge of the bottom cushion piece, right sides together and matching the raw edges. Align the seams on the welt to the corners of the cushion piece so that the piping gently curves around at the corners (clip cording seam allowance if necessary). Starting and finishing at the back of the cushion and joining the ends of the piping cord to neaten. Baste in place, 1/2″ in from the raw edges. Sew in place using a zipper foot.

Stitch the welt to the bottom cushion piece.

Attach the piping cord to the perimeter of the top cushion piece. Starting and finishing at the back of the cushion and joining the ends of the piping cord to neaten. Pin the top section to the top edge of the welt, ½” in from the raw edges and matching the corners. Stitch in place using a zipper foot on the sewing machine so that the stitches are close to the piping cord. Turn right side out through the opening.

Insert the covered foam pad into the cushion and close the lapover on the opening.

If using, attach a covered button to one end of heavy-duty thread and anchor through center of cushion. Draw thread throuh foam pad and out other side of cushion. Attach a second covered button and return thread through center. Tighten up slightly to tuft pillow and pass thread through first button. Knot thread.

Featured: Urban Wrap by Disappearing Creek Ranch

Step into a world where sculpture and the human form combine; where the lines of fashion and art blur and merge as one. This beautifully sculpted “urban wrap” vest from the Disappearing Creek Ranch company, comes with asymmetrical fronts that hug the body in all the right places and its uneven edges ‘confuse’ the eye, altering perception, and camouflaging figure faults we may think we have, all the while adding style and sophistication. Choose the double-faced fashion fabric that’s most comfortable and flattering for your body type, and know that with the generous lap over, fit can easily be adjusted.

You will need:

  • 1 yd. of felted wool, 54″ wide
  • Coordinating thread
  • Stick pin
  • Roll of kraft paper
  • Tracing wheel

MEASUREMENTS

Chest – measure just under the arms around the fullest part of the bust.

Backwaist length – measure from nape of neck to waistline.

Back width – measure from armhole to armhole across the shoulder blades.

PATTERN

Fold the kraft paper in half. The foldline will be the centreback.

Mark a point on the foldline and label it 1.

2 from 1 = backwaist length + 5″

3 from 1 = ½ backwaist length – 1 ½”

Square lines from 1, 2, and 3 across the paper.

4 from 3 = ½ the chest measurement + 2 ½”

Square a line up and down from 4.

Points 5 and 6 are located at the intersections of lines 1 and 2.

7 from 1 = ¾ backwaist length + 1½”

Square a line from 7 across the paper.

8 is located at the intersecting lines.

9 from 8 = 4″

Square line down from 9 to locate 10 and 11.

12 from 1 = ½ back width + 4″

Square a line down from 12 to locate 13 and 14 at the intersecting lines.

15 from 12 = distance from 12 to 14.

Join 14 and 15 with a straight line and locate 16, 2 inches from 14.

Draw a shallow curve from 12 passing through 16 and onto line 3.

17 from 5 = 4″

Draw a straight tangent line from 6 passing through 17.

Square a line from the tangent line radiating from point 13. Smooth point 13

with a blended curve.

Trace out lines 7-8-6-1 for the right-hand side of the collar.

Trace out lines 3-16-12-6-17-13-2 (blue lines) for the right-hand side of the vest.

The left-hand side of the vest is outlined in red.

Cut out lines 1-12 16-3.

Unfold the paper and rule off the tracing with a straightedge.

Cut out the vest and collar separately.

Grainlines run parallel to centerback.

Seam allowance is included in the patterndraft.

CUTTING

Due to the fabric surface being seen from both sides, a double-faced felted wool is suggested. *

Vest body – cut 1X self

Collar – cut 1X self

ASSEMBLY

  1. Staystitch the upper back and armscye of the vest about a ½” from the edge. Turn edge under to inside and baste down. Steam the rolled seam to relax it. Topstitch along rolled edge. Remove basting.
  2. Take the vest body (right side up) and the collar (wrong side up) and lay them side-by-side, along the neckline. Overlap the neck seams (1/2″) so the actual seam lines sit one on top of the other across the top of the garment.  The seam allowance from the collar should be hanging over into the body (the collar piece is on top) and the vest seam allowance should be towards the collar.  If you stitch down the seam line through both layers, you will have a seam allowance pointing toward the collar on one side of the garment, and a seam allowance pointing toward the body on the other side. Turn under the raw edge of one seam allowance and topstitch in place.  Repeat on the second seam allowance. This is a lapped seam technique.
  3. Staystitch the hemline about a ½” from the edge. Turn edge under to inside and baste down. Steam the rolled edge to relax and shape the curved edge. Topstitch along rolled edge. Remove basting.
  4. On the front edges from the neckline downward to hem, roll a double-roll edging along the fronts and slipstitch to hold in place.
  5. On outer edge of collar, turn under 1″ and topstitch in place. Trim close to stitching.

Hold vest close with a stick pin.

* Based on your selection of your fashion fabric, you may need to choose a more appropriate seam finish. Fabrics like felted wool do not fray. Ideally, a fine satin overlock would be appropriate if the fabric frays.

An exotic twist on the classic wrap dress, this deliciously flattering style is designed for drapey, fluid fabrics like silky jersey, luscious rayon or lightweight cottons. The dress has a below-knee length half-circle wrap skirt, and features a gathered neckband on a halter tie. This great wrap-around is sure to become a staple of your wardrobe – it’s your go-to style for dressy daywear or a low-key evening outfit on the town.  The dress is easy to make, requiring only two pattern pieces, and no fitting is required.

You will need:

  • 2 ¾ yds. of fashion fabric, 45″ wide
  • Coordinating thread
  • 60″ drawcord
  • Kraft paper

PATTERN

Begin by taking a square sheet of paper and folding one corner to its opposite corner at 45 degrees.

On the folded edge, mark a point X. (see fig. 1)

FRONT WRAP

From X measure 10-inch intervals to a maximum of 60 inches.

Square a line across the paper at each point.

Divide the distance between X and 10″ mark is half. Square across.

On this line, measure 5″.

At the 20″ mark, measure 1/4 of hip measurement. Label this point A.

At the 30″ mark, measure 30″.

Join X to this point with a straight line passing through A.

Join the 60″ mark to this last point at the 30″ interval.

BACK WRAP

On the 10″ mark, measure 5″. Square down to the 20″ interval.

From this intersection, measure 10″. Label this point B.

Join the point at the 10″ interval to point B.

Square down from point B to the bottom line.

Cut the line at the 5″ interval.

Open the draft and trace onto a new sheet of paper. This is the FRONT.

Re-fold the draft and cut out the solid heavy line beginning at the 10″ interval. This is the BACK.

CUTTING (see diagram for cutting marker)

Cut front 1X

Cut back 1X

Cut along selvedge fabric strip for front ties. Cut in half (2 ties).

Cut along width of remaining fabric, 2 fabric strips for back ties.

Fabric tie strips = 3″ wide.

ASSEMBLY

On all edges press under 1/4″.

Turn all edges 1/2″ except for tops and stitch down. Miter at corners.

Along each top edge, turn under 1″ and stitch to create a casing.

Press under 1/4″ along the long edges of the fabric strips and one short edge.

Fold strip in half lengthwise with wrong sides together. Stitch along open edge. Press. Stitch along folded edge.

At notch A and B sew on a waist tie.

WEARING THE WRAP.

Insert drawcord through back casing and front casing to gather neckline. Tie over one shoulder and adjust the slack of the cord based on where the waist ties are positioned on the body.

Wrap back around body and tie in front.

Wrap front over back and crisscross tie straps around waist and draw fullness in close to body. Tie ends with a bow.

The waterproof rain cape is excellent for touring or commuting; in just a couple of seconds, you can slip it on over whatever you’re wearing, and you are protected from the rain. This model from Echo at Bloomingdales has a waist tie, ¾ zipper front, and high collar. This rain cape is generously sized, for maximum coverage and is reversible. Its four-piece design and construction give it very nice shaping and minimizes seams at the same time.

You need

  • 1 18″ reversible nylon closed zipper
  • 2.5 yds. of shell fabric, 60″ wide
  • 1.5 yds. of liner fabric, 60″ wide
  • Coordinating thread
  • 1 roll of kraft paper or pattern-making papper
  • 1 tracing wheel

PATTERN

On a sheet of kraft paper, draw a straight line about 2″ from the edge along the length.

In the middle of this line, mark point 1.

2 from 1 = 29″

3 from 1 = 29″

4 from 1 = 29″

Connect points 2, 3, 4 with an arc radiating from 1 as shown.

5 from 1 = 1 ½”

6 from 1 = 3 ½”

7 from 1 = 4 ”

Connect points 5 and 7 with a shallow curve. This is the back neckline.

Join points 6 and 7 with a deep curve as shown. This is the front neckline.

8 is located midway between point 6 and 3. This is the zipper opening.

Square down from 7 and across from 8 to locate point 9.

10 from 5 = 1 ½”

11 from 7 = 1 ½”

Connect 10 to 11 with a curved line parallel to line 5-7.

Draw a tangent line from 11 passing through point 9 and continue to locate 12 at the intersection.

With a tracing wheel, trace out onto a new sheet of paper the following from this draft:

For the shell: trace points 6-7-5-2-4-12-3-8-6.

For the liner: trace points 10-2-4-12-9-11-10.

For the front facing: trace points 10-11-9-12-3-8-6-7-5-10 on folded edge of paper.

For the collar, draw a rectangle 9″ x 25″ *

For the tie, draw an oblong strip 5″ x 60″

*Note: The neckline on the draft may be measured to verify collar dimensions. For the demonstration, the neckline equaled 24″ around plus a ½” seam allowance.

ASSEMBLY

Cut out 1 each of the shell and liner sections on the fold of the fabric along the straight grain. (I used waterproof marilite nylon for the shell and a printed polar fleece for the liner).

Cut out 1 tie, 1 collar, and 1 front facing in the shell fabric.

With right sides together, pin and baste front facing section to liner section, matching notches at CB, shoulders, and hemline. Stitch seam. Press seam to one side towards liner portion. On face side of liner, topstitch along this seam.

Reinforce the front centerline with stay-stitch along the zipper placement line. (Make this the zipper length plus ½” for seam allowance and ½” wide for a ¼” turn). Repeat on shell section.

On the front facing, cut down center of stay-stitching ending with a triangular clip into each corner. With right sides together, pin and baste collar to neckline of liner and stitch seam. (You may have to clip seam allowance to flatten seam).

Pin and baste zipper into the opening from collar fold notch to bottom of stay-stitching. Insert zipper using a zipper foot attachment.

With right sides together, pin and baste liner section to shell section, matching notches at CF, CB, and sides (point 4). Stitch around perimeter using a ½” seam allowance. Clip notches into the curved seam allowance to flatten. Turn right out through neck opening. Press edges. Topstitch edge.

Cut down center of stay-stitching on shell layer, ending with a triangular clip into each corner. Pin and baste shell fabric to zipper tape.

Turn under seam allowance of collar along the neckline and short ends and press. Pin folded edge of collar to zipper tape and overlap the neck seam of the liner portion. Baste into place. Complete insertion of zipper by topstitching around the zipper opening and sewing the collar to the neckline.

On the liner side where the facing is joined to the liner, make a pair of 2-inch ‘buttonholes’ for the tie openings. Align the tie openings with the zipper bottom at the facing seam. (Make certain the layers of fabric are flat before you make the “buttonholes” at point 9).

To make the tie, press under ½” on both short ends. Fold the fabric strip in half lengthwise, with right side together, and stitch seam using a ½” seam allowance. Turn strip right side out. Press flat. Topstitch around perimeter of the tie. Insert through tie openings on poncho.

A duffle tote is an ideal type of luggage that no traveler should be without. The duffel bag is one of the most versatile and functional forms of luggage. It can be used as a carry-on for plane trips, and can also serve as the perfect overnight or weekend bag. Duffel bags can be made in a variety of styles, designs, colours and fabrics. Therefore, anyone from a business traveler, to a camper, or everyday vacationer, will find use for a duffle tote bag.

You need:

  • 1 heavy-duty closed plastic zipper
  • 2 D-rings, 7/8″ wide
  • 3 or more yards of polyester web strapping, 1″ wide
  • 1 yard of canvas/upholstery weight fabric, 54″ wide
  • Coordinating thread
  • Tape Measure

PATTERN

The size of your duffel tote bag is based on the circumference of a circle. The larger the circle, the larger the bag. Look for a circular object to use as a template or use a compass. (I traced around a large pie plate).

Next, measure the circumference of the circle pattern using the edge of the tape measure. eg. a 9″ pie plate has a circumference of 28 ¼”.

Add 1″ to the circumference measurement. This is the bag height or X. (see diagram)

Now, to determine the width of the duffle, choose your desired zipper length. The longer the zipper, the wider the bag. (I chose a 22″ large-toothed plastic zipper). Measure the zipper tape, end to end, with the tape measure. This is the bag width.

Draw out a rectangle pattern (height x width).

Fold rectangle pattern in half and then each half again to quarter. Open the pattern flat.

Mark out strap placement lines on the foldlines closest to the ends. Allow 3-4″ free from top and bottom edges of rectangle pattern. (see diagram)

Cut the rectangle piece 1 time and the circular end pieces 2 times from your fabric on the straight grain.

ASSEMBLY

  1. Turn the top and bottom edges of the rectangle piece to the wrong side by ½” and press.
  2. Using the pattern as a guide, chalk the placement lines for the strapping on the fabric.
  3. Place the webbing over the placement lines and pin in place. Begin in the center of the center of the placement line and allow for the desired strap looping (I used 3 yds. of webbing and matched the colour to the colour of my zipper) then continue down the opposite end and allow the same amount as before for the strapping loop and finish where you started. You may overlap the ends together or “melt” the shorts end with a match to seal to prevent fraying of the webbing.
  4. Following the dotted lines on the diagram, topstitch the webbing to the fabric as shown. To reinforce the bottoms of the strap loop, sew an X through the webbing at each of the 4 points.
  5. Using a zipper foot, place one of the folded edges on top of the zipper tape with the zipper and face side of the fabric up. Topstitch in place.
  6. Then, place right sides of the fabric together and on the opposite folded edge, open the fold and stitch to the opposite side of the zipper. Open the zipper and face side up, topstitch the folded edge to the zipper. Close the zipper and stitch across the open end. You will have a “tube” shape.
  7. Cut 2 pieces of webbing 1″ long. Wrap each piece through a D-ring. Stitch each D-ring tab to the ends of the zipper tape with the D-ring facing the center of the tube.
  8. Divide the tube ends in quarters, beginning at the zipper position. Divide each circle into quarters.
  9. Open the zipper halfway. Pin the circle ends to each end of the tube following the quarter marks. Using a 3/8″ seam allowance, stitch in place. (You may have to clip the straight edge to sew into the curved edge to release any buckling of the fabric). Check for any uneven stitching then do a second row of stitching on top of the first to reinforce the seam. Turn the bag right side out through the zipper.

You can make a shoulder strap to attach to the D-rings if you desire.

gore skirtLearn to make skirt patterns according to your measurements; and they’re guaranteed to fit! To give you an illustration of how easy it is to make a pattern, let’s make a 8-gore skirt like the model is wearing. For the example, we’ll use a waist measurement of 32 inches, hip 42 inches and skirt length of 24 inches. Remember, when you make the skirt for yourself you simply use your waist, hip, and skirt length measurements instead of these sample ones.

Let’s establish your height parameters.

draft1

Square across the paper to make a “T” shape. This will be the waistline.

Then measure down 8″ [20 cm] and draw a parallel line squaring from the centerline. This is the hipline.

Measuring from the waistline, draw a second parallel line equal to your desired skirt length and square from the waistline. This will be the hemline.

Now that you have your grid set up, it is time to use your body measurements to set the girth parameters.

Start by deciding how many gores you wish to create. Even numbers (4,6, 8, 10, etc.) will make your skirt symmetrical, but I like to use the “rule of 3s”. Odd numbers (5, 7, 9, 11, etc.) makes for a more interesting look. Either way, the number of panels used will create a gore skirt that will fit.

For the waistline, take your waist measurement divided by the number of panels desired.

For example, to create a 8-gore skirt to fit a 32″ [81.5 cm] waistline.

32″ divided by 8 = 4″[10 cm]

The hipline is normally 8″ [20 cm] below the waist, so at that point you’ll make a horizontal like equal to hip divided by number of panels desired + ¼” [6 mm].

Our sample hip measurement is 42″ [107 cm], so the horizontal line is 5 ¼ ” [13.5 cm] plus ¼” [ 6mm] = 5 ½” [14 cm].

With a straight yardstick, draw in the outside lines of the skirt, connecting the waist to hip to the hemline and draw in the bottom line.

At the top of the”T”, measure down ¼” [6 mm] and make the slight waistline curve.

The outside edges of the bottom are measured up ¼” [6 mm] each and the slight hemline curve drawn.draft2

Make your waistband to equal your waist measurement plus 1 ½” [40 mm], and the width is 2 ½” [65 mm] (your finished waistband will be 1 ¼” [32 mm] wide).

Remember you have not allowed for seams yet, so after making the skirt pattern, mark the 1/2″ seam allowance all around and add a 2″ hem. The seam allowance will be drawn around the skirt as well as the waistband.

Remember you will need to cut multiples of this pattern equal to the number of panels desired. Eg. cut 8 of the skirt pieces, since it is a 8-gore skirt.

The vertical center line of the pattern will be used as the “straight grain” line, when placing the pattern on the fabric.