 Suede is a natural Aniline leather that has been surface brushed or buffed on the grain side of the leather creating a nap and leaving a texture similar to velvet (softest of all leathers to the touch). Usually suede has a natural finish, but may have a light protective coat and a transparent leather dye for colour. This process increases the leathers surface exposure making it extremely absorbent. Water drops will darken the leather but it returns to its original colour after drying.
Irresistible in butter-soft suede is this chic Italian bag from Sundance. It deftly adapts to bulky or bitty loads with ease. Zen-like styling (no zips, pockets or snaps) make this easy and versatile carryall for virtually everything.
You will need:
- 1 – 4 oz. [1/16″ thick] Suede split hide, 16 square ft.
- 1 spool of cotton or nylon thread
- 1 leather machine needle
- Kraft paper
- 1 rotary cutter with pinking blade
- 1 roll of double-side mounting tape, 1/4″ wide
PATTERN
Transfer pattern onto graph paper. Each square equals 1/2 inch.
Copy onto a folded piece of kraft paper so you have the entire pattern for easy 1-ply cutting of the leather.
Dimensions: Approx. 11″H x 9-1/2″W.
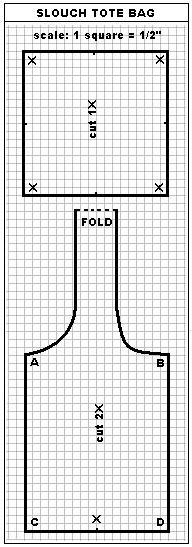
CUTTING
Check skin for any tears and blemishes on the face of the suede. Chalk around them to avoid them when cutting.
Chalk out pattern on skin and cut out using pinking blade of a rotary cutter. Use a cutting mat to protect cutting surface. Cut base 1X and sides 2X. (Raw edges will not fray).
ASSEMBLY
Tape one seam [AC] with mounting tape of each side section of the tote.
On one side section, with right sides together, remove the backing on the tape and align with opposite end of section [AC] to form a bag loop. Stitch ¼” seam allowance along AC. With a bone turner, crease the seam open. Fold the seam allowance to one side and edgestitch along seam on the face through all the layer. (I use a Teflon ® presser foot to reduce drag).
Repeat the above directions for the other section.
Join each side with right sides together from B to D with mounting tape. Stitch ¼” seam allowance. Now you will have 2 handles. 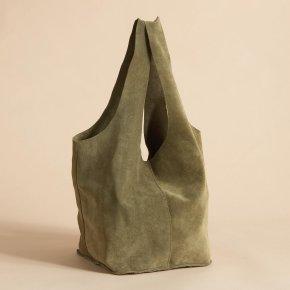
At each X mark on the side section, snip a ¼” slit.
Tape the perimeter of the base on the wrong side with mounting tape. Place the X notch of the side sections at each corner of the base. (The slit will create a square corner). Remove backing one strip at a time and join with wrong sides together. Machine-stitch from D around the bottom, pivoting at X and continue around the base of the tote.

August 27, 2008 at 2:40 pm
I really love this one! I will try this!
August 27, 2008 at 8:48 pm
Cool! Thanks for this tutorial & pattern! Just one minor thing: the handles of the Sundance bag have straight edges so, if you want to duplicate that bag, you need to cut those edges with a regular (not pinking) blade. Your blog is terrific.
August 27, 2008 at 8:55 pm
Thx for the kind words.
You may certainly use a straight cutting blade if you wish on your project. Have fun sewing!
April 5, 2009 at 5:56 pm
just came across your website, this bag instantly caught my eye. i think i’ll pick up some suede and make this for my girlfriend in the next few days (yes i’m a guy that sews!)
April 5, 2009 at 7:51 pm
lucky girlfriend i’d say
April 24, 2009 at 6:11 pm
Say, I think the instructions call for four of the bag piece, not “2X” as indicated in the pattern? I don’t see how to make two handle loops with just two pieces and not four!
In any case, amazing stuff you have on here. Looking through these makes me want to add to my stash of fabrics for not-yet-started projects!! 🙂
April 24, 2009 at 6:12 pm
Oops, never mind! It’s cut on a fold!
May 7, 2009 at 10:40 am
[…] Tasche 78 […]
May 28, 2009 at 9:30 pm
Love it. I am going to try this using some African Wax Print. Thanks for all your stuff 🙂
July 15, 2009 at 3:51 pm
I made this with faux leather and I’ve had so many compliments on the bag! Thank you for posting the pattern!
July 15, 2009 at 7:16 pm
I’m delighted that you tried the pattern-making, Terri.
August 23, 2009 at 4:25 pm
Great. It looks just perfect and I need to try it. Thanks for sharing. heike
September 14, 2009 at 12:58 pm
Id love to try this but where can I buy Aniline leather? Something tells me JoAnn’s doesn’t have it :-p
September 14, 2009 at 1:15 pm
Hi Maggie… you may use any type of soft suede leather (Aniline is the process) but you may be correct about finding a supply. Try a leather supply retailer though you may be able to find ultrasuede (synthetic suede) at JoAnn’s.
WD
November 3, 2009 at 8:09 am
Thank you for this pattern. I made one for my sister’s birthday, it’s beautiful.
November 3, 2009 at 5:07 pm
Lucky sister!
March 17, 2010 at 10:42 am
dear
I really like your designs. sometimes its difficult with the messures. I’m used to work with cm 🙂
Thank you
March 17, 2010 at 8:05 pm
Thx Mouna… the grid will work in imperial or metric… use 25mm squares for your grid and you should have no problem.
July 28, 2010 at 3:45 pm
Thanks so much for making this pattern available. I made one in linen, lined it and have used it every day this summer. I plan to make another for the fall. I am hoping I can find some suede, otherwise I will have to stash dive.
Michele
February 20, 2012 at 3:22 am
[…] wkdesigner.wordpress.com via Sneha on […]
March 5, 2012 at 9:30 pm
[…] https://wkdesigner.wordpress.com/2008/08/27/soho-slouch-tote-2/ (this one is specifically for suede, a little more complicated, would take a lot of fabric, but so cute!) […]
March 14, 2012 at 4:17 pm
[…] go to dress/top but I think the lack of uniform colour might look odd. Thinking about making this tote instead or maybe a fold over clutch. Perhaps both. Still getting used to bright colours. I am going […]
July 1, 2012 at 2:00 am
[…] SOHO SLOUCH TOTE […]
March 7, 2013 at 7:02 pm
[…] Get the Pattern & Tutorial […]
May 1, 2013 at 12:02 pm
[…] Soho Slouch Tote by WK Designer: […]
June 1, 2013 at 11:53 am
[…] Soho Slouch Tote – Weekend Designer Free Messenger Bag Pattern – EmmiGrace and Me […]
July 28, 2013 at 8:31 am
[…] Credits French Connection & Weekend Designer. […]
January 8, 2014 at 10:54 pm
[…] Soho Slouch Tote – Weekend Designer Free Messenger Bag Pattern – EmmiGrace and Me […]
August 13, 2014 at 6:46 pm
[…] SOHO SLOUCH TOTE […]