August 2008
Monthly Archive
August 20, 2008
 Thin or wide, bright, basic or bejeweled, a belt is an easy way to add polish to any outfit. Here’s how to update your look with the season’s most stylish belt.
Cinch Belts are the perfect way to introduce a chic pop of colour, texture or ‘bling’ to any outfit; this waist-wringing item is one of few accessories that can take any outfit up a notch, from fine to fantastic. Cinching a wide belt around the smallest part of your torso – your natural waist – emphasizes and slims this very feminine zone while accentuating sexy curves. Thick belts create the most dramatic, waist-narrowing looks since they brace your body in a corset-like fashion.
Featured: Cinch Belt by Cynthia Rowley
If you want to stand out, get creative and fashion yourself a belt out of leather and suede can be a real joy as they are the oldest and most luxurious of all natural materials. Selecting cowhide, pigskin or lambskin for your leather project will help you to create a fashion accessory that you will cherish for years to come!
You with need:
- Leather or suede hide
- Covered buckle kit
- Leather machine needle
- Rubber cement
- Topstitching thread
- Metal straightedge ruler
- X-acto knife or rotary cutter
- Awl
- Rubber mallet
COVERED BUCKLE FORM

Cut leather 2 times the width of buckle. Fig.1
Trace outline of the topside blank from the buckle kit in the center of leather (wrong side up).
On inner parts of buckle, slash through each center and diagonally into corners at each end. Fig.2
On the wrong side of leather, spread a thin layer of rubber cement.
Allow to become tacky.
Repeat glue-ing directions on face of buckle form.
Center the buckle form face down onto the leather. Smooth the leather.
Fold in edges of leather inside the buckle form with fingers – outer edges with thumb. Carefully trim away any bulk with pointed tips of scissors.
Take backing plate (the smaller piece from the kit) and insert in top portion, pressing well in to secure the leather inside. Fig.3
MAKING THE BELT
1. Choose leather and a buckle kit for your belt.
2. Cut your belt from the leather. The belt should be 1 foot longer than the waist measurement and equal in width to the interior width of the chosen buckle plus 1 1/4″.

Cut the leather using a sharp X-acto knife or rotary cutter and a metal straightedge to do this. DO NOT USE SCISSORS. (I like to use a cutting mat to do the cutting as well).
For the model sample shown,
- Approx. length: S=36″, M=38″, L=40″, from inside edge of buckle to tip.
- Approx. width: 2 1/2″.
- Approx. dimensions: buckle 2 1/4″W x 3 1/2″H.
3. Decide what shape you want the free belt-end to take. You can make it pointed, rounded, square – whatever shape you like. (The model has a squared end). Mark the belt-end and use an X-acto knife to cut it to the desired shape. (Curved shapes may be carefully cut with scissors).
4. Fold the uncut end of the belt back so that a crease is made 1 1/2 inches from the belt end. Using a metal straightedge and an awl, lightly score this line on the back of the leather.
5. Repeat along the perimeter of the belt and score 3/8″ within the edge. Turn in the edge and lightly crease.
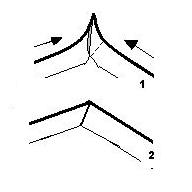
 6. Since leather will not fray, use rubber cement to finish the edges. Daub a thin layer of rubber cement ½” wide along the perimeter (wrong side only) and allow the glue to become tacky. Then, carefully fold turning edges and working from the buckle end to the corners. Work the folding in both directions to miter the excess into the corners. Trim the “ears” away. (See diagram). Gently tap along the edges with the rubber mallet.
7. Topstitch the perimeter of the belt ¼” from the edge. (Use a new leather needle in your sewing machine. Try a walking presser foot or Teflon presser foot to prevent drag. Loosen your tension and increase the stitch length for better results).
8. Insert the buckle end through the slot of the buckle so that the buckle is correctly positioned. Fold the uncut belt end back so that the bucket is face up and lined up with the scored line. Machine stitch the end using double topstitching to secure.
August 19, 2008
 Jockey shorts are a no-no but boxers are a capital YES. No longer relegated to the underwear department, boxer shorts are everywhere. Teens wear them with T-shirts, men and women wear them for sleep shorts and athletes wear them for playing basketball. Boxers are easy to make, requiring only one pattern piece, and no fitting. So ditch those tighty-whities and embrace a new style of colourful drawers today!
You will need:
- 1 yd. [1 ¼] of cotton fabric (45″wide) for waist 24″-36″ [37″-45″] *
- 1 ½” wide sew through sport elastic, buy waist measurement minus 3 inches.
- Coordinating cotton thread
- Kraft paper
* Buy 1/2 yd. more when sewing directional prints, matching a pattern repeat, or making legs longer than 3 ½”.
MEASUREMENTS
Waist – measure around the waistline at navel level
Hip – measure around fullest part of hipline 9″ below waistline
Rise – while sitting measure side of body from waistline to top of seat.
PATTERN

Draw a straight line across top of kraft paper. Label point 1 as shown.
2 from 1 = half the hip measurement + 4″
3 is squared from 2 = rise measurement + ½”
4 is squared from 1 = rise measurement + ½”
5 from 1 = quarter of the hip measurement + 2″
6 is squares from 5 = rise measurement + 9″
7 from 3 = 2 ½”
8 is squared from 7 = 8 ½”
9 from 4 = 3 ½”
10 is squared from 9 = 8 ½”
Join points 8 – 6 – 10.
Point 11 is located midway between 9 and 10.
Using a set square, locate point 12 by drawing a 90° angle 1″ below line 8 – 10 joining points 6 and 11 as shown.
13 from 2 = 1 ½”
14 from 3 = 1½”
Join 13 and 14 to create the fly front on the centrefront (CF) line.
15 from 8 = distance of 11 – 12.
Join 4 – 11 with a smooth shallow curve as shown using a French curve.
Join 14 – 15 with a smooth deep curve as shown using a French curve.
Draw a grainline from point 5 to 6. Label the CF and the CB.
CUTTING INSTRUCTIONS: Cut 2X
ASSEMBLY
1. Once the fabric pieces are cut out, thread mark the center front line (dash line on diagram) on the left and right sides for reference in making the fly. Pin boxer fronts right sides together and baste.
2. Sew lower part of front crotch curve, using a 1/2″ seam allowance from inner leg to 1/2″ above fly-front extension. Clip crotch curve right under fly extension, clipping seam allowance to within 1/4″ of crotch curve stitching.
3. Place shorts on the table with the right sides of the fabric facing you. Decide which side of the shorts you prefer the fly front to lap. (Men’s shorts lap left over right, but if you are making them for women then no fly is need. Trim away the fly extension). Mark lap over side with “O” and lap under side with “X” on some low-tack masking tape and place on each appropriate front piece.
4. On “X” side, fold under 1/4″ on fly extension. Fold again so that the first fold lines up with center-front marking. Sew 1/8″ from fold.
5. On “O” side, fold in fly extension to the wrong side along center-front line. Fold again so that raw edge is enclosed and lap-over side has three thicknesses and the folded edge lies along center-front line. Stitch lap-over side of the fly into place along inside edge of fly extension. This stitching will show on right side of shorts.
6. Position fly onto its placement line and press. Topstitch horizontally across the bottom edge of the fly and across top edge of fly 2″ away from the waistline edge.
7. With right sides together, sew backs to fronts at inner-leg seam. Finish seam with flat fell or overlocked seam. Turn one leg right side out. Insert this leg into the wrong side out leg. Pin remaining crotch curve together. Sew back crotch curve, continuing stitching from front crotch curve. Clip curves and finish seam.
8. Boxers are now ready for the elastic casing at waist. Press down raw edge 1/4″ along entire edge of waistline. To form casing, fold the width of the elastic plus 1/4″ to wrong side of boxers. Topstitch casing closed, leaving a 3″ opening at shorts back to insert elastic.
9. Start out by cutting the elastic your waist measurement minus 3″ or use a pair that you own as your guide to how tight to pull in the elastic. Insert elastic into casing. Try on shorts to determine how snug you would like them to fit. (If the boxers are for sleeping, elastic should be looser. Teenagers like to wear them a little lower than the waist so longer elastic is preferable).
10. To join elastic, butt ends of elastic over a piece of fabric cut twice the width of the elastic. Wrap elastic with fabric scrap. Zigzag-stitch the ends of elastic to fabric scrap. This method eliminates bulk in elastic and works to prevent frayed ends from protruding. Close opening in casing.
11. To hem shorts, press under raw edge of legs under 1/2″. Fold again so that raw edge of fabric is enclosed. Pin and baste. Topstitch hem into place.
August 18, 2008
 WIDE-BRIMMED SUMMER HAT
You will need:
- Kraft paper
- glue or scotch tape
- tape measure
- compass
- approx. 1 yd. of Pellon ® fleece interfacing, 45″ wide
- approx. 1 1/2 yds. of bottom-weight or upholstery fashion fabric, 54″-60″ wide
- approx. 1/2 yd. of lining fabric, 45″ wide
- approx. 3/4 yd. of grosgrain ribbon, 2″ wide
- coordinating thread
MEASUREMENTS
Begin by measuring the circumference of your head. Wrap the tape measure around the back of the head, over the ears, and high up on the forehead. For most people, this will be approximately 22 ½ inches. Add 1” to your head measurement. This is the head fitting measurement (This number may vary due to hairstyles as well. Most people will pull back the hair or put it in an up-do to wear the hat properly.)
Next, you need to determine the radius (R) you will use to create a circle.
Use the formula, C = 2 п R, where п = 3.14
Eg. 23.5 = 2 x 3.14 x R
R = 23.5 divided by 6.28
R = 3.75
For a head fitting measurement of 23 ½”, you need a radius of 3 ¾”.
PATTERN
CROWN

Draw a rectangle equal to the head fitting measurement X the radius amount.
Divide the rectangle into 8 equal parts.
Slash each line from the top of the rectangle to almost the bottom edge.
Overlap each section left of center by ½” at the top to nil at the bottom and glue down.
Repeat for each section right of center.
Trace this new shape onto a new sheet of paper and blend the curved topline smooth.
Add ½” seam allowance around the perimeter. Label the 2 short ends, centerback (CB) and the centerline, centerfront (CF).
Draw a grainline 45 degrees to the center line. This is the side section of the crown.
Measure the new curved seam that you have created. Record this measurement.
Using the formula again, determine R for the top of the crown.
If you measure the circumference of the top section, it should equal the curved seam measurement of the side section.
(Adjustment Tip: Increasing or decreasing the circle by 1/8” all around will change the circumference by approximately ½”).
Use a compass and draw a circle using the amount for the radius (R).
Divide the circle into quarters. At the top and bottom of the circle extend out ½”. At the sides of the circle, reduce inwards by ½”. Join these points with a smooth arc blending into each point to create an oval. Re-check the circumference of the oval. It should still equal that of the new curved seam on the side section.
Add ½” seam allowance to the circumference and draw a straight grainline from CF to CB. This is the crown top.
BRIM
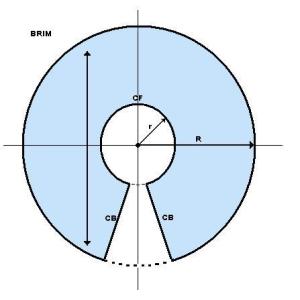
Fold a large piece of paper in half, then half again; open out flat.
Draw the 2 intersecting lines. Place a point in the center of the intersection.
Using a compass, draw a circle with a radius (r) based on the head fitting measurement plus 1”.
From the same point, draw a second circle with a radius (R) equal to 3 times r.
This is the brim width. (You may increase the width of the outer edge if you desire).
The inner circle must equal the head fitting measurement. Starting at the top of the circle, measure half the head measurement to the left of center and repeat on the right of center. Mark a point at each interval. Square out from this point to the outer edges. Label these edges, CB. This is the interfacing pattern.
Trace this brim shape onto a new sheet of paper. Add ½” seam allowance all around the brim pattern. Draw a straight grainline parallel to the centerline. This is the upper and lower brim patterns.
CUTTING
Cut the crown side 1X; lining 1X (on bias grain)
Cut the crown top 1X; lining 1X (on straight grain)
Cut the crown side interface 1X (on bias grain)
Cut the brim 2X (on straight grain)
Cut the brim interfacing 1X (on straight grain)
Cut 1 strip of self bias 2” wide; length to equal outer edge of brim + 2” (on bias grain)
ASSEMBLY
On each brim piece, pin and baste CB seam with right side together. Stitch seam using a ½” seam allowance and press open.
On the brim interface piece (Pellon ®), butt the two CB edges together and zigzag stitch it together.
Sandwich the interfacing between the two brim pieces with face sides up, lining up the CB seams. Baste together.
Do rows of topstitching parallel to the outer edge, ½” apart, starting from the inner edge. (I use the width of the presser foot as a spacer.) The more stitching you put, the stiffer the brim.
Bind the outer edge of the brim with the bias cut strip of self-fabric, beginning from the CB seam, folding in ½” to bind, and then turning under the end to encase the starting point. Press edge flat.
Baste the side interface to the wrong side of the side section.
With right sides together, pin and baste the CB seam. Stitch seam using a ½” seam allowance and press open. Grade seam allowances.
Divide top edge of crown side and the crown top into quarters. Match up these points, pin and basting with right sides together. Machine stitch the side section to the top of the crown, using a ½” seam allowance. Trim and grade the upper seam allowance and interfacing only.
Repeat the same procedure for the hat lining.
With wrong sides together, place lining into crown, aligning with CB seam and baste seam allowances together. Turn right side out.
Now, insert crown into center hole of brim. Match up CB seams and pin and baste crown to brim. Machine stitch using a ½” seam allowance. (Clip seam allowance if there is any buckling).
Sew in grosgrain ribbon as a “sweatband”. This should equal the head fitting measurement less the inch. Lay the ribbon on top of the seam allowance and edge stitch along the ribbon edge. Overlap at CB. Trim the seam allowance with pinking shears. Turn the ribbon up into the crown to conceal the raw edge of the seam allowance and tack to CB seam with hand stitching.
August 11, 2008
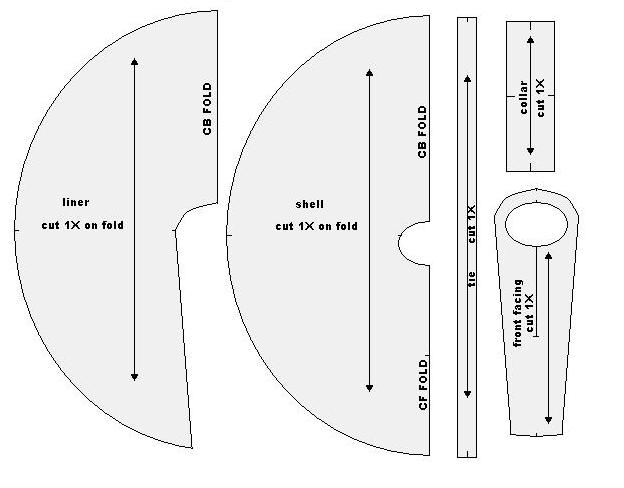
 The waterproof rain cape is excellent for touring or commuting; in just a couple of seconds, you can slip it on over whatever you’re wearing, and you are protected from the rain. This model from Echo at Bloomingdales has a waist tie, ¾ zipper front, and high collar. This rain cape is generously sized, for maximum coverage and is reversible. Its four-piece design and construction give it very nice shaping and minimizes seams at the same time.

You need
- 1 18″ reversible nylon closed zipper
- 2.5 yds. of shell fabric, 60″ wide
- 1.5 yds. of liner fabric, 60″ wide
- Coordinating thread
- 1 roll of kraft paper or pattern-making papper
- 1 tracing wheel
PATTERN
On a sheet of kraft paper, draw a straight line about 2″ from the edge along the length.
In the middle of this line, mark point 1.
 2 from 1 = 29″
3 from 1 = 29″
4 from 1 = 29″
Connect points 2, 3, 4 with an arc radiating from 1 as shown.
5 from 1 = 1 ½”
6 from 1 = 3 ½”
7 from 1 = 4 ”
Connect points 5 and 7 with a shallow curve. This is the back neckline.
Join points 6 and 7 with a deep curve as shown. This is the front neckline.
8 is located midway between point 6 and 3. This is the zipper opening.
Square down from 7 and across from 8 to locate point 9.
10 from 5 = 1 ½”
11 from 7 = 1 ½”
Connect 10 to 11 with a curved line parallel to line 5-7.
Draw a tangent line from 11 passing through point 9 and continue to locate 12 at the intersection.
With a tracing wheel, trace out onto a new sheet of paper the following from this draft:
For the shell: trace points 6-7-5-2-4-12-3-8-6.
For the liner: trace points 10-2-4-12-9-11-10.
For the front facing: trace points 10-11-9-12-3-8-6-7-5-10 on folded edge of paper.
For the collar, draw a rectangle 9″ x 25″ *
For the tie, draw an oblong strip 5″ x 60″

*Note: The neckline on the draft may be measured to verify collar dimensions. For the demonstration, the neckline equaled 24″ around plus a ½” seam allowance.
ASSEMBLY
Cut out 1 each of the shell and liner sections on the fold of the fabric along the straight grain. (I used waterproof marilite nylon for the shell and a printed polar fleece for the liner).
Cut out 1 tie, 1 collar, and 1 front facing in the shell fabric.
With right sides together, pin and baste front facing section to liner section, matching notches at CB, shoulders, and hemline. Stitch seam. Press seam to one side towards liner portion. On face side of liner, topstitch along this seam.
 Reinforce the front centerline with stay-stitch along the zipper placement line. (Make this the zipper length plus ½” for seam allowance and ½” wide for a ¼” turn). Repeat on shell section.
On the front facing, cut down center of stay-stitching ending with a triangular clip into each corner. With right sides together, pin and baste collar to neckline of liner and stitch seam. (You may have to clip seam allowance to flatten seam).
Pin and baste zipper into the opening from collar fold notch to bottom of stay-stitching. Insert zipper using a zipper foot attachment.
With right sides together, pin and baste liner section to shell section, matching notches at CF, CB, and sides (point 4). Stitch around perimeter using a ½” seam allowance. Clip notches into the curved seam allowance to flatten. Turn right out through neck opening. Press edges. Topstitch edge.
Cut down center of stay-stitching on shell layer, ending with a triangular clip into each corner. Pin and baste shell fabric to zipper tape.
Turn under seam allowance of collar along the neckline and short ends and press. Pin folded edge of collar to zipper tape and overlap the neck seam of the liner portion. Baste into place. Complete insertion of zipper by topstitching around the zipper opening and sewing the collar to the neckline.
On the liner side where the facing is joined to the liner, make a pair of 2-inch ‘buttonholes’ for the tie openings. Align the tie openings with the zipper bottom at the facing seam. (Make certain the layers of fabric are flat before you make the “buttonholes” at point 9).
To make the tie, press under ½” on both short ends. Fold the fabric strip in half lengthwise, with right side together, and stitch seam using a ½” seam allowance. Turn strip right side out. Press flat. Topstitch around perimeter of the tie. Insert through tie openings on poncho.
August 9, 2008
 These long and loose bottoms score high on the comfort index. The fabrics are fluid and the prints are fun, which means they are less for curling up on the sofa than for spending a weekend afternoon in style. Think silk, linen, rayon, or cotton…something lightweight and drapy. Balance them with a body-fitting top or stay faithful to the bedtime look with a big and beautiful sweater.
Featured: Blue-green silk pajama pants from Dries Van Noten
The cut and fabrication of these loungers is novice level and fits many shapes and sizes. It’s an easy “no-pattern” afternoon project.
You need:
- 1 ½ yds. of fashion fabric, 44-45″ wide
- Coordinating thread
- 1 pkg. of 1″ wide waistband elastic or 60″ drawcord
- Tailor’s chalk
- Tape measure
PATTERN
No real pattern is required but if you wish to make several pants you can make a paper template.
Recommended to control the fullness at the gathered waist is elastic or a drawsting. The waist can accommodate 30″ to 52″ approximately.
For the cut, measure your finished pant length. (waist to heel). Add 1″ for cuff hem allowance and 1 ½ ” for waist casing to this measurement. Record it.
Straighten the cut edges of your fashion fabric and square across the width.
Measure along the selvedge the pant length measurement and square a line across the width with tailor’s chalk
Divide the section equally in half parallel to the selvedge with a chalk line. These are the left and right leg sections.
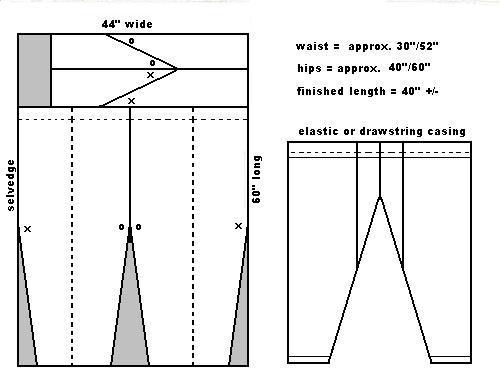
On each leg section, measure in approx. 2-4″ from the lines. This may vary based on how fitted a bottom cuff you want (must be able to get your foot through however). Then, measure along the length and find the midpoint. Chalk a notch. (X and O on diagram). Join Xs and Os to bottom points at hem with a straight edge using chalk.
Take this “midpoint” measurement and plot it along the waistline. Add 13″ for the rise. Square up on remaining fabric parallel to selvedge and mark with chalk. This is the gusset section.
Divide the gusset section in half by squaring across the fabric width.
Measure across top and bottom the distance equal to half the leg distance from waistline to X. Plot it and mark with chalk. Repeat but measure the dividing line from the opposite end. Join the notches with a straight edge. (see diagram).
Cut on the chalk lines. You will have a left leg side, a right leg side, and 2 pairs of gussets.
ASSEMBLY
Finish raw edges with desired seam finish. (I used pinking shears).
With right sides together, pin and baste a gusset to each center portion of the legs. (Match Xs and Os). Stitch seam and press open.
With right sides together, fold each leg section in half lengthwise and pin and paste inseam from crotch to hem. Stitch inseam and press seam open.
Turn one leg section right side out and place it down the other leg section. Match up CF and CB at waist and align inseams. Pin and baste gussets together and stitch crotch seam. Press open. Turn pants right side out.
Turn under 1/2″ at waistline and press. Turn under 1″ all round and machine stitch down to create a casing. Open a slit in the front crotch seam at the waist to insert an elastic or drawcord. (make elastic equal to your waist measurement less 2″ if using).
Hem bottoms of legs using a 1″ hem allowance.
August 6, 2008
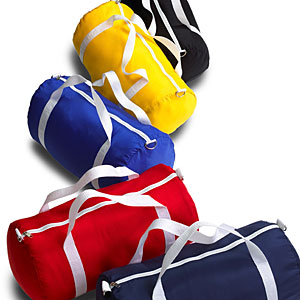
 A duffle tote is an ideal type of luggage that no traveler should be without. The duffel bag is one of the most versatile and functional forms of luggage. It can be used as a carry-on for plane trips, and can also serve as the perfect overnight or weekend bag. Duffel bags can be made in a variety of styles, designs, colours and fabrics. Therefore, anyone from a business traveler, to a camper, or everyday vacationer, will find use for a duffle tote bag.
You need:
- 1 heavy-duty closed plastic zipper
- 2 D-rings, 7/8″ wide
- 3 or more yards of polyester web strapping, 1″ wide
- 1 yard of canvas/upholstery weight fabric, 54″ wide
- Coordinating thread
- Tape Measure
PATTERN
The size of your duffel tote bag is based on the circumference of a circle. The larger the circle, the larger the bag. Look for a circular object to use as a template or use a compass. (I traced around a large pie plate).
Next, measure the circumference of the circle pattern using the edge of the tape measure. eg. a 9″ pie plate has a circumference of 28 ¼”.
Add 1″ to the circumference measurement. This is the bag height or X. (see diagram)
Now, to determine the width of the duffle, choose your desired zipper length. The longer the zipper, the wider the bag. (I chose a 22″ large-toothed plastic zipper). Measure the zipper tape, end to end, with the tape measure. This is the bag width.
Draw out a rectangle pattern (height x width).
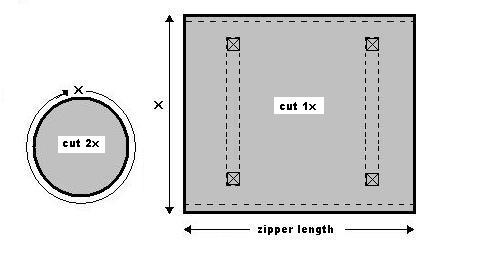
Fold rectangle pattern in half and then each half again to quarter. Open the pattern flat.
Mark out strap placement lines on the foldlines closest to the ends. Allow 3-4″ free from top and bottom edges of rectangle pattern. (see diagram)
Cut the rectangle piece 1 time and the circular end pieces 2 times from your fabric on the straight grain.
ASSEMBLY
- Turn the top and bottom edges of the rectangle piece to the wrong side by ½” and press.
- Using the pattern as a guide, chalk the placement lines for the strapping on the fabric.
- Place the webbing over the placement lines and pin in place. Begin in the center of the center of the placement line and allow for the desired strap looping (I used 3 yds. of webbing and matched the colour to the colour of my zipper) then continue down the opposite end and allow the same amount as before for the strapping loop and finish where you started. You may overlap the ends together or “melt” the shorts end with a match to seal to prevent fraying of the webbing.
- Following the dotted lines on the diagram, topstitch the webbing to the fabric as shown. To reinforce the bottoms of the strap loop, sew an X through the webbing at each of the 4 points.
- Using a zipper foot, place one of the folded edges on top of the zipper tape with the zipper and face side of the fabric up. Topstitch in place.
- Then, place right sides of the fabric together and on the opposite folded edge, open the fold and stitch to the opposite side of the zipper. Open the zipper and face side up, topstitch the folded edge to the zipper. Close the zipper and stitch across the open end. You will have a “tube” shape.
- Cut 2 pieces of webbing 1″ long. Wrap each piece through a D-ring. Stitch each D-ring tab to the ends of the zipper tape with the D-ring facing the center of the tube.
- Divide the tube ends in quarters, beginning at the zipper position. Divide each circle into quarters.
- Open the zipper halfway. Pin the circle ends to each end of the tube following the quarter marks. Using a 3/8″ seam allowance, stitch in place. (You may have to clip the straight edge to sew into the curved edge to release any buckling of the fabric). Check for any uneven stitching then do a second row of stitching on top of the first to reinforce the seam. Turn the bag right side out through the zipper.
You can make a shoulder strap to attach to the D-rings if you desire.
August 4, 2008
 Shirred sundresses with spaghetti straps are a fun wardrobe item. Whether you’re hanging out by the pool or just chilling on a summer day, this dress keeps you looking sweet and fresh all day long. The border print detail on the fashion model (ASOS Dresses) adds to the shirred bust panel with thin ribbon tie shoulder straps. This is a quick little dress that is easy to whip up in a day without a pattern and looks flattering on most body shapes.
You need:
- Shirring elastic thread
- Coordinating thread
- 2 yds of cotton fabric (border print is optional), 44-45″ wide
1. For the fabric cut, measure the bust and double the measurement and this will be the width of fabric you will need.
Measure from very top of crease of underarm down to where you want the finished length to hit. (I usually prefer the knee or little higher). Add 1 inch to measurement. This will be the length of fabric you will need.

For example, for a size 10/12 and a dress length of 22 inches, the bust is 32 inches.
So fabric needed is approximately 64 x 23 inches for the dress.
From the excess fabric, cut a strip of fabric 1 ½” x 60″ for the ribbon ties.
2. To make it easy, I would find a border print that would work widthwise (44-45 in) as opposed to the usual lengthwise. Cut the length of fabric to this measurement. You are going to do this parallel to the selvedge to make effective use of the border (railroaded pattern).

On the other hand, for directional cutting on the straight of grain, cut 2 pieces of fabric (bust mmt. x finished length + 1″). This dress will have 2 side seams instead of 1 centerback seam.
3. Finish the raw seam edges of the length as desired. (I used pinking shears). Hem the top of the dress using a ¼” double rolled hem finish.
4. Begin shirring about 3/8″ under the hem stitch line. Continue shirring about 20 to 22 more rows down. Space the shirring about ½” or width of your presser foot parallel to your last row of shirring. Make sure to hand-wind the elastic thread onto a bobbin and use regular thread on the top, loosen your tension slightly and do some backstitching to tack the shirring so it doesn’t come unsewn.
5. With right sides together, match the raw edges of the back seam and sew it closed. Press seam flat. (I usually do some topstitching to both sides of the seam so it reinforces the seam).
6. Press the fabric strip in half lengthwise with wrong sides together. Open the fold and align each long edge to the foldline and press. Refold the strip and edge-stitch along perimeter of the strip to create the ties. Cut equally into 2 or 4 pieces as desired for ribbon shoulder straps.
7. Try the dress on and mark the placement of the ribbon ties. Sew in place. (When you sew the ribbon ties, I like to sew them on the hemline of the top of the dress and I tack them so they are secure).
8. Hem the bottom of the dress using a ½” hem finish.
« Previous Page
 Thin or wide, bright, basic or bejeweled, a belt is an easy way to add polish to any outfit. Here’s how to update your look with the season’s most stylish belt.
 6. Since leather will not fray, use rubber cement to finish the edges. Daub a thin layer of rubber cement ½” wide along the perimeter (wrong side only) and allow the glue to become tacky. Then, carefully fold turning edges and working from the buckle end to the corners. Work the folding in both directions to miter the excess into the corners. Trim the “ears” away. (See diagram). Gently tap along the edges with the rubber mallet.