January 2009
Monthly Archive
January 31, 2009
 Featured: Rouge Passion Capelet by Giambattista Valli for Moncler.
The famed puffy ski coats from Italy’s Moncler has teamed up with Giambattista Valli for the Moncler Gamme Rouge Collection. The beautifully sculpted pieces flaunt huge collars with twisted closures. Why not hit the ski slopes wearing a capelet puffer?
You will need:
- Approx. 60″ [152cm] of Marilite® waterproof nylon, 60″ [153cm] wide
- Approx. 24″ [61cm] of hi-loft terylene batting, 60″ [153cm] wide
- Coordinating polyester thread
- 4 sets of covered dome snaps, ½” [12 mm] dia.
- Kraft paper
- Tissue paper
MEASUREMENTS
This pattern is drafted by height. The body proportion is made up of 8 heads.
Your height divided by 8.
Shoulder width = distance from shoulder point to shoulder point across the back.
PATTERN

BODY:
Make a perfect square equal to ½ of the shoulder width measurement.
 Use a set-square to draw a 90 degree angle on the Kraft paper.
Set up a grid using the square as shown: A,B,C
Point O is 4″ from top right corner on square C.
Point Z is midpoint of right side on square C.
Join points O and Z with a curved line as shown in draft.
Point ■ is midpoint of upper square B.
Point X is located at left top corner of square C.
Points ■ (red) are located 2″ [5cm] from point X.
Fold new sheet of kraft paper into quarters.
Place left bottom corner of square A on folded corner of paper.
Trace out solid line outline of squares A-B-C.
This is the back and sleeve portion of the capelet.
Fold a second sheet of kraft paper in half width-wise.
Place bottom of square C on fold of paper.
Trace out solid line outline of square C.
This is the front piece of the capelet.
NOTE: Add seam allowance around perimeter of pattern pieces. (thick solid line)
Cut out pattern pieces while paper is still folded.
COLLAR:
Use a set-square to draw a 90 degree angle on the Kraft paper.
Set up a grid using the square as shown:
1st row: A,B,C,D
2nd row: E,F,G,H
Find the vertical midpoint of squares D and H. Join with a straight line.
Point + is midpoint of upper square C and lower square G
Add seam allowance to perimeter and cut out pattern piece. This is the collar.
Draw a rectangle 24″ x 2″ [61cm x 5cm]. This is the neck band.
Draw a rectangle 15″ x 5″ [38cm x 12.5cm]. Divide into 3 equal parts. These are carriers.
Add seam allowance to perimeter of neckband and carriers. Cut out pattern pieces.
CUTTING
Capelet Back and Sleeves – cut 1X self
Capelet Fronts – cut 2X self
Capelet Neckband – cut 2X self
Capelet Collar – cut 1X self
Carriers – cut 3X self
 Back and Sleeve Insulation – cut 1X batting
Front Insulation – cut 2X batting
Neckband Insulation – cut 1X batting
Collar Insulation – cut 1X batting
ASSEMBLY
- For each carrier piece, fold in half lengthwise with right sides together (RST).
- Pin/baste long raw edges. Stitch seam and press open. Turn right side out and press flat.
- For each front piece, place one carrier at point Z face up. Fold fronts in half width-wise with RST.
- Pin/baste front edge and side seam. Sew seams, ensuring the carrier is caught in the seam, and press seams open.
- For back and sleeve portion, fold in half width-wise with RST.
- Pin upper edge and pin/baste under-sleeve arm edge on both ends. Sew seams and press seams open.
- Attach one front armhole to armhole on back portion with RST. Pin/baste armhole seam in a “U” shape. Sew armhole seam. Clip seam allowance if necessary.
- On back portion, fold self fabric at point X with RST, and pin/baste from X to red point. Sew seam and press open. Repeat on opposite end.
- Insert batting into each body piece. Baste insulation to seam allowance of armholes on the front portions and upper edges of all self pieces. Topstitch through all layers on back portion vertically at CB and vertical sides of square B to contain the insulation. (see tip below)
- Align one piece of the neckband to the upper edge of the body at the CB and at the CF with RST. Match the upper edge of the front piece and shoulder with the neckband and allow for seam allowance at the front edges. Pleat out any excess on the sleeve portion. Gather the upper back edge evenly into the neckband. Pin/baste into place. Layer the second neckband piece on the inside of the body to sandwich the 3 layers together. Pin/baste in place. Machine-stitch the neckband to the body. Sew up short ends of the neckband. Press seams and trim if necessary. Turn right side out.
- Insert batting into neckband and baste upper edge closed.
- For collar piece, staystitch at pint +. Fold collar lengthwise in half and pin/baste from point + to end of collar and across short end. Sew seam; press and grade seam.
- On opposite short end, gather edge to remaining carrier. Fold carrier to form a loop and attach midway in seam. Gather collar onto it. Fold collar lengthwise with RST. Sew gathered end. Grade and trim seam allowance if necessary. Turn right side out.
- Insert batting into collar and baste to seam allowance. Pin/baste collar to neckband between the + . Sew collar seam. Turn seam allowance into the collar and slipstitch the open side to the neckband.
- To complete the capelet, handstitch 4 sets of dome snaps evenly-shaped to front edge closure and attach short end of carrier under the armhole by turning under the open end and sewing to the back of the capelet to create a sleeve.
TIP: To sew batting with fabric, place the batting side, face down on tissue paper and machine-stitch with the self fabric on top of the batting. Tear away the tissue paper from the seam afterwards.
January 21, 2009
 Featured: Oscar de la Renta Caftan
Oscar de la Renta shows us how to relax with this 2009 caftan style. The sheer striped silk print is so feminine and the flat braid trim makes this style ultra luxe. Can you just imagine lounging around in this? (You’ll definitely want to sew one up as no pattern is required.) This is a classic piece that belongs in any collection of beautiful, fine clothing.
You will need:
- Fashion fabric, 45″ [114cm] wide
- Flat braid trim, 2″ [5cm] wide
- Coordinating thread
- 12 half-ball buttons, line 20 [12.5 mm dia.]
MEASUREMENTS
Measure from the nape of your neck down to the desired length: purchase twice this amount of 45″ [114cm] wide fashion fabric and four and a half times this amount of 2″ [50mm] wide flat braid trim .
CUTTING
Cut the fabric into two equal lengths.
Reduce the width of both pieces to 35″ [89cm].
From the excess cut-away material, cut two rectangles, each measuring 10″ wide x 40″ long [25.5cm x 102cm]. Set these aside to be used for the sleeves.
NECKLINE
Choose one length of fabric to be the front of the caftan. Spread it out on the tabletop, face side up, and fold in half lengthwise. Mark and cut the front neck opening as follows:
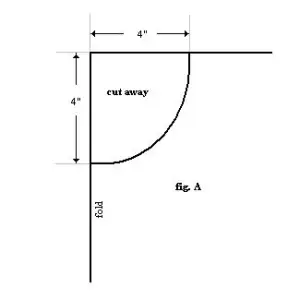 From the foldline at the center top edge of the fabric:
Measure down 4″ [10cm] and mark with a pin.
Along the top edge, place a pin 4″ [10 cm] from the foldline.
Arc a curve using a compass from the top of the foldline between the 2 pins.
Cut out the neck opening. Refer to diagram A.
Cut along the foldine of the front piece in two halves (centerfront seam).
 Choose the other panel of fabric to be the back of the caftan. Spread it out on the tabletop, face side up, and fold in half lengthwise. Mark and cut the back neck opening as follows:
From the foldline at the center top edge of the fabric:
Measure down 1 ½” [4 cm] and mark with a pin.
Along the top edge, place a pin 4″ [10cm] from the foldline.
From this pin, measure down 1 ½” [4cm].
Shape the back neck and cut out the neck opening. Refer to diagram B.
ASSEMBLY
On the two front portions of the caftan, turn ½” [12.5mm] seam allowance along the centerfront edges and press flat. Open the folded edge.
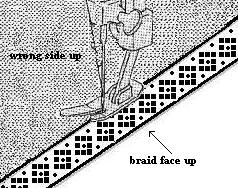 Align the edge of the flat braid to the foldline of the seam allowance. The trim should be on top of the seam allowance with wrong sides together. Edge-stitch the braid to the centerfront edge.
Repeat (as mirrored image) to the opposite front piece of the caftan.
Layer both front pieces with right sides together and matching the braid trim. Align the trim at the center front.
Measure down from the neck edge 8″ [20cm] and mark with a pin. This will create a keyhole neckline.
Measure up from the hem edge 18″ [46cm] and mark with a pin. This will create a center slit.
With wrong sides together, stitch the centerfront seam of the front panels between the two pins. (Note: Do not catch the trim in the stitched seam.)
With the front piece FACE UP, gently press the centerfront seam open by placing the braid trim flat. On the open edge of the trim, edgestitch the braid to the caftan fronts.
With wrong sides together, pin/baste back piece to front piece at shoulders. Sew shoulder seams. Press seams open.
Take the two sleeve rectangles and pin braid trim to one long edge in the same manner that was used for the centerfront edge , aligning trim with seam allowance. (There will be some excess at the top and bottom). Edge-stitch braid to fabric to create the wrists.
With right sides together, fold each rectangle in half width-wise and mark midpoint location with a pin.
With right sides together, pin/baste each sleeve rectangle to the body, matching the pin to the shoulder seam. Sew sleeves to body.
Measure the neck opening of the caftan (do not include seam allowance). Cut a length of braid trim equal to this measurement plus 1 inch [25mm].
Turn short ends of trim under ½” [12.5mm] and press flat. Fold trim in half lengthwise. Bind the raw neckline with the trim. Pin/baste in place. Topstitch along edge of braid from CF to CF.
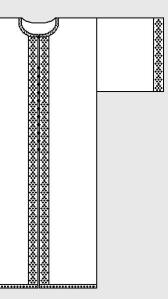 To complete the caftan:
Place the front of the caftan together with the back, right sides together. Pin/baste the side seams and underarm seams together. Trim any excess of the trim, if necessary.
Stitch the sides. Press seams open.
Hem the bottom by binding hemline with braid trim in the same manner used for the neckline.
Sew a thread loop and button at the neckline at the centerfront.
Sew a button at the base of the keyhole opening and another at the top of the center slit.
Evenly space the rest of the buttons along the centerfront seam and sew in place.
January 17, 2009
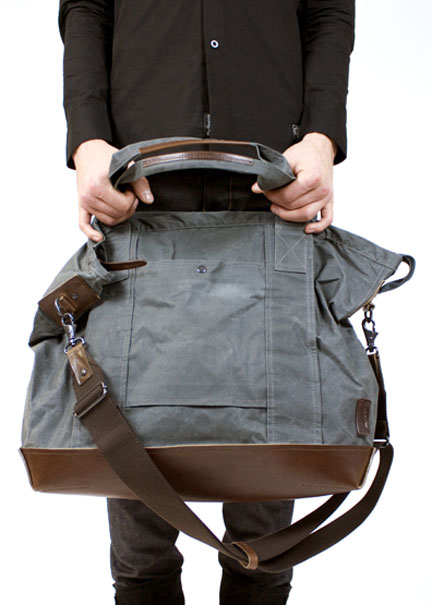 Featured: Lex Trip Bag
So this weekend will have you jetting off to the coast for sun & surf? For a weekend excursion you need a quick trip bag. Forget the luggage (too bulky); you need a versatile tote made specifically to carry all your belongings from wallet to swimtrunks for a quick weekend getaway. Here is a fun choice in a cotton waxcloth outer with leatherette base and trim, perfect for the do-it-yourselfer, similar to the Lex Trip Bag from PROPERTY OF.
Dimensions: approximately 18″ x 8 x 17″ [45cm x 20.5cm x 43cm].
You will need:
- 6 pop rivets
- 1 metal slider, 2″ dia [50mm]
- 2 latch hooks, 1″dia [25mm]
- 2 d-rings, 1″dia [25mm]
- 1 square ring, 2″ dia [50mm]
- 2 dome snap set, 5/8″ dia [15mm]
- 1 heavy metal zipper, 25″ [64cm] long *
- 1-2/3 yds. [1.5m] of nylon webbing, 2″ [50mm] wide
- heavy-duty thread
- 1 yd. [0.9 m] of upholstery weight fabric, 54″ [137 cm] wide
- 1/3 yd [0.25 m] of polyurethane leatherette, 39″ [100 cm] wide
PATTERN
1 square = 1 inch [2.5 cm]
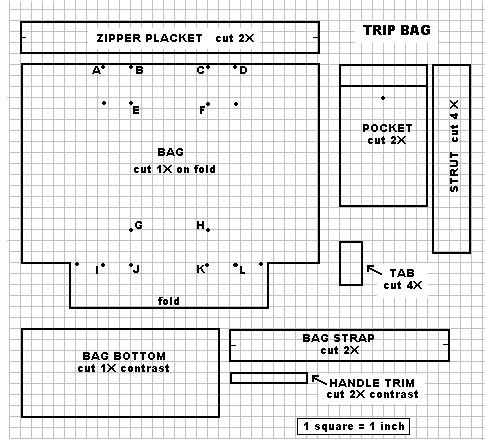 CUTTING
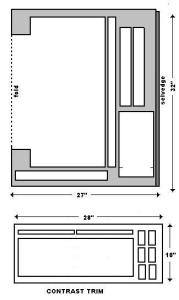 Bag – cut 1X on fold
Pocket– cut 2X
Struts – cut 4X
Handles – cut 2X
Handle trim – cut 2X contrast
Bag Bottom – cut 1X contrast
Tab – cut 6X contrast
DESIGN TIP: Use a permanent marker in the leather colour to carefully “dye” the edges of the leather pieces if you get a white edge after cutting it.
ASSEMBLY
- To make D-ring tabs, wrap tab piece around D-ring and stitch close to d-ring. Open ends of tab flat.
- To make latch hook tabs, wrap tab piece onto latch hook and stitch close to ring.
- To make Shoulder strap, cut a length of webbing 6″ long and another, 30″ long.
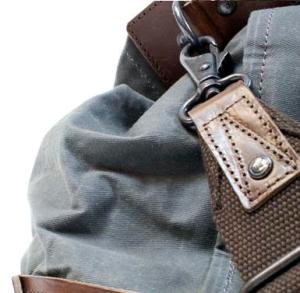 On the 6″ piece, wrap one cut end of the webbing with a latch hook tab and X-stitch in place. Secure tab with a pop rivet. On the opposite end, slip a square ring onto webbing and turn end back on itself and X-stitch it closed.
- On the 30″ piece, wrap one cut end of the webbing with a latch hook tab and X-stitch in place. Secure tab with a pop rivet.
- Slip a slider on to the webbing. On the opposite end, slip the strap through the square ring on the shorter piece and back on itself through the slider.
- Stitch across the end of the webbing and secure with a pop rivet.
- On pocket piece, turn the top edge under 2″ and stitch down.
- Apply the top portion of the snap kit to the pocket following manufacturer’s directions.
- Place pocket up-side down at points G,H and stitch bottom edge to body using 1/2″ seam allowance.
- Fold the pocket upward and mark contact point of snap on body portion.
- Apply bottom portion of snap kit to the body.
- Turn under long edges of struts 1/2″ and press flat.
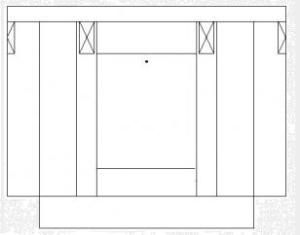 Place a pair of struts at points A,B,I,J and C,D,K,L on the body portion with pocket sides under the strut pieces.
- Topstitch struts in place.
- Repeat the above proceduces for the opposite side of the bag.
- Center contrasting bag bottom piece onto bag and overlap strut ends. Topstitch in place.
- On bag straps, turn under 1/2″ on both short ends. Press flat.
- With right sides together, fold the strap piece in half lengthwise and stitch along the length using 1/2″ seam allowance. Press seam open. Turn strap piece right side out. Press flat. Topstitch perimeter of bag straps.
- Fold the strap in half lengthwise and center a contrast handle trim along the open side of the strap. Wrap the trim around the “doubled” handle edge. Topstitch in place.
- Repeat this for the other bag strap.
- Align the ends of each strap level with the top of the pocket and sew an X-stitch to points A-B and C-D. (Note: ensure you allow for 1/2″ seam allowance at top of bag.)
- With right side together, align and match up the side seams of the bag. Stitch seam using 1/2″ seam allowance. Press seam open.
 Fold across the bottom, centering the side seam in the middle and stitch across the open end using 1/2″ seam allowance.
- On the top edge of the bag, position the zipper FACE UP inside the bag on the wrong side of the fabric. Center it. Pin and baste in place. Unzip the zipper.
- With right side together, sew the pair of zipper plackets together across the short ends using 1/2″ seam allowance. Press seams open. Turn right side out.
- On one long edge of placket, turn under 1/2″ and press flat.
- With right side of placket to wrong side of body, pin/baste raw edge of placket over the zipper opening. Stitch around circumference of opening using 1/2″ seam allowance and ensure that you are securing the zipper tape in the seam.
- Fold over placket face up to right side of bag and align the folded edge with the machine-stitching. Topstitch in place.
- At top of each side seam, below the placket, center the D-ring tabs and apply with topstitching.
* Design Tip: Purchase the metal toothed zipper in the same metal colour/finish as the metal luggage hardware.
January 12, 2009
The Wrap skirt pattern tutorial has been removed by the request of the designer. To view this design, check
http://assemblage.typepad.com/assemblage/2008/08/antique-kimono-ribbon-wrap-skirt.html
January 3, 2009

Featured: Adrienne Landau fur boa
A cute fashion must-have for the cold! Soft-as-silk faux fox fur, luxuriously crafted into a neck boa a-la Prada, to wear whatever the outfit or occasion. An ultra feminine way to keep warm and look chic. Match it with your favourite outerwear or knitwear to create a new look or make several in different colours!
Dimensions : 21” long x 4” wide.
You will need:
- ¼ yd. [23 cm] faux fox fur
- 1 yd. [90 cm] satin ribbon, 1 ½” [40 mm] wide
- ¼ yd. [23 cm] lamb’s wool
- 3 yds. [2.75 m] twill tape, ½” [12.5 mm] wide
- Coordinating nylon thread
- Glover needle #5
- X-acto knife or safety razor
PATTERN

Note: There is no seam allowances required.
CUTTING
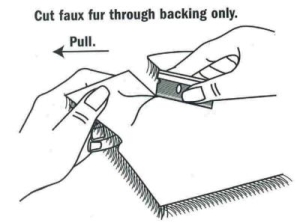 Fur – cut 1X self * in faux fur
Ties – cut 2X in ribbon – 18” [46 cm] long
Interlining – cut 1X in lamb’s wool
* do NOT cut fur with scissors
ASSEMBLY
On the fur backing, tape the edges with twill tape. Use a herringbone pattern and taking long stitches, baste the twill tape to the back of the fur. (1)
 With the fur face up, tape the edges with the twill tape a second time. This time “push” all the hairs beneath the tape and overcast a whipstitch along the edge of the twill tape and fur catching the first taping on the underside. Keep your hand-stitches small and even. (2)
Lay the lamb’s wool on the back of the fur. Baste it to the backing through the center of the piece with long stitches. Baste the lamb’s wool around the perimeter of the fur piece. Trim away any excess lamb’s wool.
Turn the twill tape on the fur face to the back side to overlap the lamb’s wool and baste around the perimeter through all the layers. (3)
At each end of fur piece (see ●), securely attach a ribbon tie.
 Fold the fur piece in half lengthwise and butt taped edges together. Use a ladder stitch to complete the neck boa. With the hair side of the fur facing upwards, bring the needle from the back to the front at the top of the opening (a), one stitch width from the edge. On the right side of the opening, insert the needle between the fur and the taped edge (b-c), between the first and second stitches. Pass the needle under the opening and on the opposite side (c-d), insert the needle between the fur and the taped edge (d-e) , between the first and second stitches. Continue working side to side (e-f), pulling the thread to close the opening every four stitches (g). On completion, slip the needle through the last loop to knot and bury the thread inside the boa to hide the end.
Use a comb to fluff out the fur along the seam.
January 1, 2009

Featured: DKNY Pencil Skirt
Both sexy and classy, the pencil skirt creates a flattering silhouette on every woman, no matter what size. Pair it with an all-business top for work, then slip into a pair of sleek stilettos to glam things up at night. The elastic waistline allows for an adjustable fit and may be worn with a purchased belt. This version of the pencil skirt is fully-lined.
You will need:
- 1 yd. [0.9 m] of fashion fabric, 45″ [115cm] wide
- 1 yd. [0.9 m] of lining, 45″ [115cm] wide
- 1 yd. [0.9 m] of elastic, 1 ½” [40 mm] wide
- Coordinating thread
- Bodkin
PATTERN

This is a simple block pattern. It may be measured and cut directly on the fabric. Seam allowance is included.
CUTTING
Skirt shell (A+5 x B+5) – cut 1X self
Skirt lining (A x B) – cut 1X lining
Waistband elastic – waist measurement less 6″ [15.25 cm]
Note: Cut all fabrics on the straight grain.
ASSEMBLY
 Mark the center of each fabric piece.
- On the bottom corners of the fashion fabric, measure up 1″ [2.5 cm] and across 1″ [ 2.5 cm]. Join these 2 points with a straight line and cut the corner away.
- Fold this 45° angled line in half with right sides of the fabric together. Pin/baste and sew each corner, using a ½” [1.25 cm] seam allowance, to create a miter in each corner.
- With right sides together (RST), align and match the lining and fashion fabric along the length on both side edges, from the inside corner of the miter to the top edge. NOTE: Remember to allow ½” [1.25 cm] seam allowance on the hem on the lining portion.
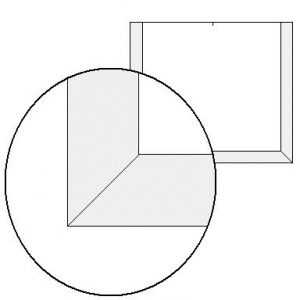 Pin/baste and sew each seam using ½” [1.25 cm] seam allowance. Press the seam allowances towards the lining. Turn this piece right side out.
- Align and match up the centers of each fabric and pin the layers at the top edge. Allow the fashion fabric to turn at the ends and press flat along the fold edges from the top to the mitered corners. Turn the skirt wrong side out.
- Align and match the lining and hem allowance of the fashion fabric along the bottom edge. Pin/baste and sew the bottom edge using ½” [1.25 cm] seam allowance. Press the seam allowance up towards the lining. Turn the skirt right side out.
 Lay out the skirt with the hem away from you and the fashion fabric face up. Fold the fabric along its length so that the 2 sides meet at the center. Measure from the mitered corners 6″ [15.25 cm] and mark the location with a pin. This will be an open slit.
- Working from the open end at the waist, align and match the foldlines from the pin to the top edge. Sew the 2 foldlines together to create the skirt from the inside of the layers.
- Along the top edge, turn under all layers ½” [1.25 cm] to the inside of the skirt and press flat.
- Turn under 1 ¾” [4.5 cm] to create the casing for the elastic waist. Pin/baste the casing through all layers. Press flat.
 Topstitch 1/8″ [0.25 cm] along the fold of the top edge of the skirt.
- Topstitch 1/8″ [0.25 cm] along the bottom edge of the casing, leaving a 2″ [5 cm] opening at the back seam.
- Cut the waistband elastic to your waist measurement less 6″ [15.25 cm] or wrap around the waist and adjust to a proper fit. Using a bodkin, thread the waistband elastic through the casing and secure the ends together. Be certain not to twist the elastic as you do so. Slipstitch the opening in the casing and complete the topstitching on the skirt.
 Featured: Rouge Passion Capelet by Giambattista Valli for Moncler.
 Use a set-square to draw a 90 degree angle on the Kraft paper.
 Back and Sleeve Insulation – cut 1X batting
 Featured: Oscar de la Renta Caftan
 From the foldline at the center top edge of the fabric:
 Choose the other panel of fabric to be the back of the caftan. Spread it out on the tabletop, face side up, and fold in half lengthwise. Mark and cut the back neck opening as follows:
 Align the edge of the flat braid to the foldline of the seam allowance. The trim should be on top of the seam allowance with wrong sides together.
  To complete the caftan:
 Featured: Lex Trip Bag
 Bag – cut 1X on fold
 On the 6″ piece, wrap one cut end of the webbing with a latch hook tab and X-stitch in place. Secure tab with a pop rivet. On the opposite end, slip a square ring onto webbing and turn end back on itself and X-stitch it closed.
 Place a pair of struts at points A,B,I,J and C,D,K,L on the body portion with pocket sides under the strut pieces.
 Fold across the bottom, centering the side seam in the middle and stitch across the open end using 1/2″ seam allowance.

 Fur – cut 1X self * in faux fur
 With the fur face up, tape the edges with the twill tape a second time. This time “push” all the hairs beneath the tape and overcast a whipstitch along the edge of the twill tape and fur catching the first taping on the underside. Keep your hand-stitches small and even. (2)
 Fold the fur piece in half lengthwise and butt taped edges together. Use a

 Mark the center of each fabric piece.
 Pin/baste and sew each seam using ½” [1.25 cm] seam allowance. Press the seam allowances towards the lining. Turn this piece right side out.
 Lay out the skirt with the hem away from you and the fashion fabric face up. Fold the fabric along its length so that the 2 sides meet at the center. Measure from the mitered corners 6″ [15.25 cm] and mark the location with a pin. This will be an open slit.
 Topstitch 1/8″ [0.25 cm] along the fold of the top edge of the skirt.