sundress2Featured: Simplicity

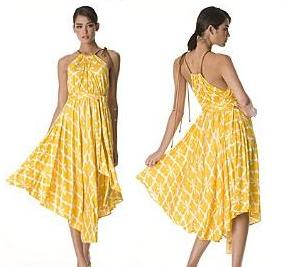
The button-front “chemise” sundress— the quintessential of summer attire – is easy to wear, unrestrictive and yet not without that “sophisticated look”. This summer, you’ll find the sundresses  will be both elegant and appealing. And I am sure that because of its easy patterndraft, this lovely addition to your summer wardrobe will inspire you with your favourite fashion fabric.

You will need:

  • 1 ½ yds. [1.5 m] of Fashion fabric, 60” [150 cm]wide
  • 1 ¼ yds. [1.2 m] of Fusible interfacing 24” [60 cm] wide
  • 12 buttons, 7/8” [22 mm] dia., line 34
  • Coordinating thread
  • Kraft paper

MEASUREMENTS

Bust – measure around fullest part of chest, just under the arms.

Hips –  measure around fullest part of seat, about 8” [20 cm] below waistline.

Back waist length – measure distance from nape of neck to waistline
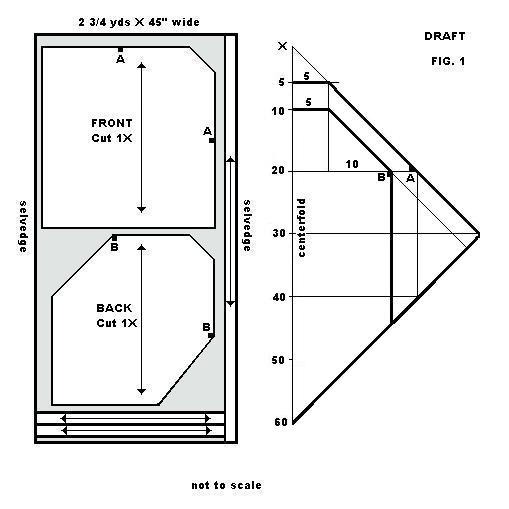
PATTERN

sundress draft

A-B = back waist length

B-C = 2 times back waist length (or desired finished length**)

B-D = 4” [10cm]

Square across all points.

D-E = 1/2 of hip or bust measurement (whichever is the greater)

Square up and down from E to locate G, H.

I = half distance of A to B.

Square across to locate J.

I-K = 2” [5cm]; square across to locate L.

J-M = 3” [7.5 cm]

N = half distance of I to J.

Square down from N to locate O, P, and R.

N-Q = 1” [2.5 cm];  I-S = 1” [2.5 cm];  join M to Q.

T = half distance of B to P.

Square up and down from T to locate U and V.

L-W = 3” [7.5 cm]

H-X = 3” [7.5 cm]

Join W and X with a straight line.

Measure 1” [2.5 cm] on either side of P. Shape sideseam by joining Q and R with a smooth curve passing through the points on either side of P.

Measure ½” [12 mm] either side of T. Make a shaping dart by joining U and V with a smooth curve passing through the points on either side of T. (optional)
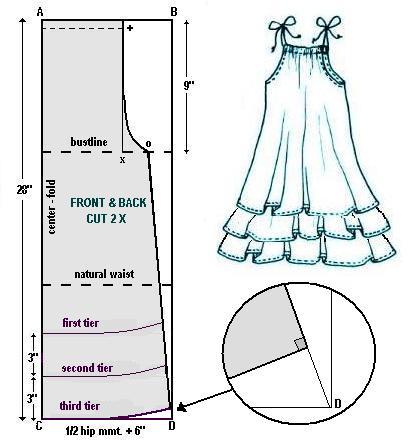
PINTUCKS

Trace out A-G-K-L.

Add ½” [12mm] at K and L. Join new points with a straight line.

Divide rectangle horizontally with 1 ½” [4 cm] intervals (3 in total) to create the pintucks.

Each pintuck is ½” [12 mm] wide with 1” [25 mm] spacing. (see diagram)

pintuck

Trace out on fold S-Q-R-O-C for the dress back.

Trace out J-N-O-R-Q-M for the dress front.

Trace out L-W-X-N for the front placket.

Trace out on fold K-L-J-I for the dress facing.

Add ½” [12 mm] seam allowances to all pattern pieces.

Add 1 ¼” [ 32 mm] hem allowance to dress back and fronts.

**Design Note: This patterndraft can be shorten to waistline for a smart summer camisole.

CUTTING

sundress layCut BACK 1X self on fold

Cut FRONTS 2X self

Cut FACING 1X self on fold; 1X interfacing on fold

Cut PLACKET 2X self; 2X interfacing.

Cut PINTUCKS 1X self on fold

Cut 2 SHOULDER STRAPS =  16” long X 1” wide

[40 cm x 2.5 cm]

ASSEMBLY

  1. Make 2 shoulder straps ¼” [6mm] wide.
  2. Iron fusible interfacing to wrong side of dress facing and both placket pieces, following manufacturer’s directions.
  3. Make the pintuck border. Beginning at the top edge, turn under 1 ½” [4cm] and press. Stitch ½” [12 mm] parallel to folded edge. From stitching, turn under 1” [25mm] and press. Stitch ½” [12mm] parallel to pressed edge. From stitching, turn under 1” [25 mm] and press. Set aside.
  4. Stitch the suppression darts on the back piece. (optional)
  5. Stitch fronts to back along side seams. Press seam open.
  6. Align and match bottom edge of pintuck border to top edge of dress. Pin/baste with right sides facing together. Machine stitch. Grade seam allowance and press upward.
  7. From face side, baste along seamline (while tucking in the seam allowance) to complete last pintuck. From last pressed fold, stitch ½” [12 mm] parallel to seamline.
  8. Press all pintucks downward on the face side of the dress.
  9. Set shoulder straps in place on front and back. Baste to top edge of border.
  10. Align and match dress facing to top edge of dress ensuring the straps are caught in the seam. Pin/baste in place. Machine stitch the seam. Grade seam allowance and press to one side. Understitch facing. Finish bottom of facing by turning under ¼” [6 mm] then topstitching. Turn facing to inside of dress.
  11. With right side of placket to wrong side of dress fronts, pin/baste placket to each front (allowing for seam allowance at top and hem). Stitch seam and press to one side.
  12. On opposite side of placket, turn under seam allowance and press flat. Fold the short ends of the placket back on itself and stitch across top and bottom. Trim corners, then  turn plackets right side out. Align the pressed edge to the row of machine stitching and topstitch closed.
  13. On the right front placket, divide the length equally for 12 1-inch [2.5 cm] vertical buttonholes spaced 3 inches [7.5 cm] apart from the top. Position the first buttonhole 1″ [2.5cm] from the top of the dress front opening.
  14. On the left front placket, sew on the buttons.
sundress12Courtesy: Vogue

A flirty flouncer has that button-to-hem flippancy and shows lots of sun-kissed shoulder.

A very easy sundress draft to get you in that tantalizing “island-in-the-sun” attitude.

You will need:

  • Approx. 2 – 2 ¼ yds [1.8 – 2m] of fashion fabric, 45″ [114 cm] wide
  • 2.5 yds. [2.3 m] of pre-cut interfacing, 1″ [2.5 cm] wide
  • 1 pkg. of single fold bias tape, ½” [12.5 mm] wide
  • 1 yd of elastic, 3/8″ [10 mm] wide
  • 8 buttons, line 20; ½” [12.5 mm] diameter
  • Coordinating thread
  • Kraft paper

MEASUREMENTS

Bust = measure around the fullest part of chest just under the arms.

Hip = measure around the fullest part of the seat about 9″ [23 cm] below the natural waist.

Back waist length = distance from nape of neck to natural waistline.

PATTERN

draft2This pattern is drafted by height.

Make a SQUARE template with length and width equal to your Back Waist Length.

On the kraft paper, square lines from X at 90 degrees.

The line squared down from X is the length. It equals the centerline. (dress length)

Along the length line of the paper, set up A-B-C as shown.

Across the width line of the paper, set up C-D-E-F as shown.

1. On square A, divide the length into 3 equal parts.

Add 1 inch [25 mm] at the first division by marking a parallel line above the division line.

Subtract the difference between your hips and bust measurements on this new line, opposite the centerline.

Join this point to the bottom corner of square B with a straight line.

Cut pattern  piece A-B out.*

This is the pattern piece for the front and back of the dress.

2. Save remaining piece of square A for O.*

This is the pattern piece for the shoulder straps.

3. Parallel to the centerline, draft K piece from X and make it 2 inches [50 mm] wide.

Cut pattern piece K out.*

This is the pattern piece for the front button placket.

4. Along the top edge of C-D-E-F, add 1 inch [25 mm] by marking a parallel line above the squares.

Along the bottom edge of C-D-E-F, add ½ inch [12.5 mm] by marking a parallel line below the squares.

Label centerline on square C.

Cut out pattern  piece C-D-E-F.*

This is the pattern piece for the flounce of the dress.

* Note: Add seam allowances to pattern pieces.

Grainline is parallel to centerline.

CUTTING

dresslay2Dress Back – cut 1X self on fold

Dress Fronts – cut 1X self on fold

Button Placket – cut 2X self

Shoulder Straps – cut 2X self

Flounce – cut 2X self

Interfacing – cut 2 strips equal to dress length

ASSEMBLY

  1. For the shoulder straps, fold each O piece lengthwise with right sides together (RST).
  2. Stitch along the long edge. Press seam open.
  3. Stitch across one short end. Grade and clip corners. Turn strap right side out. Press flat.
  4. Make 2 shoulder straps. Set aside.
  5. For flounce, cut one of the two fabric pieces in half. Align and match each short piece to either side of the long piece with RST at the short ends. Pin/baste and sew the seams. Press seams open. Finish  the raw seam edge (I used pinking shears).
  6. Hem the bottom edge of the flounce by turning under ¼” [0.7 mm] and then ¼” [0.7mm] again. Press turnings. Machine stitch in place.
  7. Then, turn upper edge down 1 inch [25 mm] to make a heading for the flounce, and baste. Gather fabric along the basting. Set aside.
  8. For the dress fronts, cut one folded fabric piece in half. Align and match each front piece to either side of the back piece with RST at the side seams. Pin/baste and sew the seams. Press seams open. Finish  the raw seam edge (I used pinking shears).
  9. bias-tapeTurn upper edge of dress down 1 inch to make a gathered ruffle, and baste. Apply the bias fold tape on top of the raw edge of the turned dress edge. At this time, place one shoulder strap under the top edge of the bias fold tape and locate it in the middle of the front pieces. Make a casing for the elastic by stitching on both sides of the tape’s edge, ensuring you catch the raw end of the shoulder straps.
  10. ruffleOn the bottom of the dress, apply the flounce to the bottom edge. Gather along the lower edge of the heading and distribute the gathers evenly. Pin/baste flounce in place. Stitch on top of the first stitching to secure the gathers to the dress.
  11. Wrap elastic over the bosom and stretch to a comfortable fit. Cut elastic to that length. Thread elastic through casing to shirr the top and secure at each end with stitching.
  12. Fold each button placket piece (K) in half lengthwise with wrong side together. Press fold. Open each placket piece and baste the interfacing strips to one half by aligning with foldline.
  13. Pin/baste each placket piece to the front edge of the dress from the top edge down to the hem of the flounce with right sides of the placket facing the wrong side of the dress. (Note: Remember to allow for seam allowances at top and bottom edges). Stitch plackets to dress.
  14. On opposite side of placket, turn under seam allowances and press. Then turn under the seam allowances on the short ends. Press. Align and match the turned edges of the placket to the stitched seam of the front edge to encase the raw edges and topstitch the plackets to the dress.
  15. Divide the right hand side placket into 8 equally spaced vertical buttonholes. Make buttonholes.
  16. On the left hand side placket, hand-sew 8 buttons to align with buttonholes.
  17. Try dress on and drape dress straps over shoulder and pin to fit. Hand stitch ends of straps securely to inside of dress on bias tape.


Sometimes dresses are so gorgeous they can be intimidating to imagine making it yourself but just take a calm look. Their beauty is in the fabric and in the most simple way all you need to do is add a little basic sewing skill.

Featured: Empire waist dress with a ruched bodice and off-the-shoulder ruffled neckline and long sleeves with elasticized cuffs created by Notte by Marchesa

In many cases, your use of fabric as inspiration and the theme for the piece begins there. There are so many things you can do with luxurious fabric and a bit of elastic … who knows, you may become a famous dress designer one day!

You will need:

  • 2 yds. of fashion fabric, 60″ wide
  • 3 yds. of shirring elastic. 3/8″ wide
  • 2 ¼ yds. of single fold bias tape, 1/2″ wide
  • Coordinating thread

PATTERN

Cut block layout according to your measurements as illustrated. Cut 1 front, cut 1 back, and 2 sleeves cut on the fold. For the bust measurement, measure just under the arms around the fullest part of the chest. For the finished length, measure from the armpit to the desired length (above the knee in this case).

ASSEMBLY

  1. With right sides together, layer the fabric squares and match the edges along the length. Pin or baste and stitch to create a tube, using ½” seam allowances. Press seams open.
  2. Repeat for each sleeve piece. You now have 1 large tube of fabric for the body and 2 smaller tubes for the sleeves.
  3. On the sleeves, turn under the bottom edge by ¼” and press. Make a ½” casing by turning under ½” hem and stitching along the pressed edge, leaving a 3″ opening for the insertion of the elastic.
  4. Cut 2 lengths of elastic equal to the distance around your closed fist. Thread the elastic through the casing and sew ends securely together. Slipstitch opening closed.
  5. Turn the top edge of the sleeves under by ¼” and press. Turn again by 1 ½” and press.
  6. Stitch the turning along the bottom edge, leaving a 3″ opening. Parallel to this stitching, sew a second row of stitching ½” apart. This will create a casing for the elastic.
  7. Cut 2 lengths of elastic equal to the bicep measurement. Thread the elastic through the casings and secure the ends together. Machine-stitch the opening on the casing closed.
  8. On the body, turn under the bottom edge twice by ½” and press. Topstitch hemline.
  9. On the body, turn under the top edge by 1 ¼” and press. This will be the ruffle.
  10. Place the bias tape along the ruffle overlapping the raw edge by ¼”. Pin/baste the bias tape around the top edge and fold back the short ends and butt together at one of the side seams. Stitch the edges of the bias tape.
  11. From the bias tape, measure a parallel distance of  7-8″. Place a second row of bias tape on the body and stitch tape as in the prior step.
  12. Cut 2 lengths of elastic equal to the bust measurement. Thread elastic in each casing and gather up excess to create the ruching. Sew elastic ends together. Slipstitch ends of bias tape closed.
  13. Match up each underarm seam of the sleeves with the sideseams at the ruffle edge. Tack together.

An exotic twist on the classic wrap dress, this deliciously flattering style is designed for drapey, fluid fabrics like silky jersey, luscious rayon or lightweight cottons. The dress has a below-knee length half-circle wrap skirt, and features a gathered neckband on a halter tie. This great wrap-around is sure to become a staple of your wardrobe – it’s your go-to style for dressy daywear or a low-key evening outfit on the town.  The dress is easy to make, requiring only two pattern pieces, and no fitting is required.

You will need:

  • 2 ¾ yds. of fashion fabric, 45″ wide
  • Coordinating thread
  • 60″ drawcord
  • Kraft paper

PATTERN

Begin by taking a square sheet of paper and folding one corner to its opposite corner at 45 degrees.

On the folded edge, mark a point X. (see fig. 1)

FRONT WRAP

From X measure 10-inch intervals to a maximum of 60 inches.

Square a line across the paper at each point.

Divide the distance between X and 10″ mark is half. Square across.

On this line, measure 5″.

At the 20″ mark, measure 1/4 of hip measurement. Label this point A.

At the 30″ mark, measure 30″.

Join X to this point with a straight line passing through A.

Join the 60″ mark to this last point at the 30″ interval.

BACK WRAP

On the 10″ mark, measure 5″. Square down to the 20″ interval.

From this intersection, measure 10″. Label this point B.

Join the point at the 10″ interval to point B.

Square down from point B to the bottom line.

Cut the line at the 5″ interval.

Open the draft and trace onto a new sheet of paper. This is the FRONT.

Re-fold the draft and cut out the solid heavy line beginning at the 10″ interval. This is the BACK.

CUTTING (see diagram for cutting marker)

Cut front 1X

Cut back 1X

Cut along selvedge fabric strip for front ties. Cut in half (2 ties).

Cut along width of remaining fabric, 2 fabric strips for back ties.

Fabric tie strips = 3″ wide.

ASSEMBLY

On all edges press under 1/4″.

Turn all edges 1/2″ except for tops and stitch down. Miter at corners.

Along each top edge, turn under 1″ and stitch to create a casing.

Press under 1/4″ along the long edges of the fabric strips and one short edge.

Fold strip in half lengthwise with wrong sides together. Stitch along open edge. Press. Stitch along folded edge.

At notch A and B sew on a waist tie.

WEARING THE WRAP.

Insert drawcord through back casing and front casing to gather neckline. Tie over one shoulder and adjust the slack of the cord based on where the waist ties are positioned on the body.

Wrap back around body and tie in front.

Wrap front over back and crisscross tie straps around waist and draw fullness in close to body. Tie ends with a bow.

Shirred sundresses with spaghetti straps are a fun wardrobe item. Whether you’re hanging out by the pool or just chilling on a summer day, this dress keeps you looking sweet and fresh all day long. The border print detail on the fashion model (ASOS Dresses) adds to the shirred bust panel with thin ribbon tie shoulder straps. This is a quick little dress that is easy to whip up in a day without a pattern and looks flattering on most body shapes.

You need:

  • Shirring elastic thread
  • Coordinating thread
  • 2 yds of cotton fabric (border print is optional), 44-45″ wide

1. For the fabric cut, measure the bust and double the measurement and this will be the width of fabric you will need.

Measure from very top of crease of underarm down to where you want the finished length to hit. (I usually prefer the knee or little higher). Add 1 inch to measurement. This will be the length of fabric you will need.

For example, for a size 10/12 and a dress length of 22 inches, the bust is 32 inches.

So fabric needed is approximately 64 x 23 inches for the dress.

From the excess fabric, cut a strip of fabric 1 ½” x 60″ for the ribbon ties.

2. To make it easy, I would find a border print that would work widthwise (44-45 in) as opposed to the usual lengthwise. Cut the length of fabric to this measurement. You are going to do this parallel to the selvedge to make effective use of the border (railroaded pattern).

On the other hand, for directional cutting on the straight of grain, cut 2 pieces of fabric (bust mmt. x finished length + 1″). This dress will have 2 side seams instead of 1 centerback seam.

3. Finish the raw seam edges of the length as desired. (I used pinking shears). Hem the top of the dress using a ¼” double rolled hem finish.

4. Begin shirring about 3/8″ under the hem stitch line. Continue shirring about 20 to 22 more rows down. Space the shirring about ½” or width of your presser foot parallel to your last row of shirring. Make sure to hand-wind the elastic thread onto a bobbin and use regular thread on the top, loosen your tension slightly and do some backstitching to tack the shirring so it doesn’t come unsewn.

5. With right sides together, match the raw edges of the back seam and sew it closed. Press seam flat. (I usually do some topstitching to both sides of the seam so it reinforces the seam).

6. Press the fabric strip in half lengthwise with wrong sides together. Open the fold and align each long edge to the foldline and press. Refold the strip and edge-stitch along perimeter of the strip to create the ties. Cut equally into 2 or 4 pieces as desired for ribbon shoulder straps.

7. Try the dress on and mark the placement of the ribbon ties. Sew in place. (When you sew the ribbon ties, I like to sew them on the hemline of the top of the dress and I tack them so they are secure).

8. Hem the bottom of the dress using a ½” hem finish.

Here’s a clever little idea…convertible clothing. This dress works double duty as a skirt. It’s ideal for weekend wear or travel wear. It’s functional and versatile at the same time.

Basically the concept is a wrap-around garment so it is adaptable to many shapes and sizes. The body proportion that needs to be considered is no more than a 7-8 inch difference between bust and waist measurements. Other than that ratio, it is quite flexible for most body shapes. The look is versatile as well. Through different fabrications it can be anything from a casual wrap by the pool to a sophisticated little black dress for a cocktail reception.

No pattern is needed to construct it. It is a simple block layout. You need a solid colour woven fabric width of 54-60″ wide. (see cutting diagram). Small to medium sizes = 2 yds. in length and medium to large sizes = 2 ½ yds. in length. The grainline is crossgrain so this cut is not ideal for prints unless they are railroaded or abstract in direction.

  • Cut 2 panels along each selvedge edge 15″ wide for wrap ties
  • Remaining fabric panel is wrap skirt portion.

Assembly:

On the large skirt portion, fold in a ½” turn on each short edge to the wrong side of the fabric.

Then turn each folded edge in ½” again. Press. Topstitch to finish.

Along one of the long edges, create a rolled hem by turning ½”, then 1″. Slipstitch or machine stitch in place. Lightly steam the foldline of the hem.

Next, fold the skirt portion in half and align and match the finished edges. Mark the fold on the long raw edge. This is the center of the garment.

From the finished edges along the long raw edge, measure 6″ and mark this location point. Set aside.

Now, take the two tie portions and align them, right sides together, along one short edge. Pin and baste along seam using a ½” seam allowance.

Measure and chalk 1 ½” from each end of the seam. Then measure and chalk 4″ from each of the chalk marks. This will be an open slit when completed.

Machine stitch the seam, leaving the 4″ distances unsewn. Remove basting. Press seam open flat.

Divide the bust measurement by 4. (eg. for size 10 = 34″ divided by 4 is 8 ½”).

From the seam (wrong side face up), measure and chalk ¼ the bust mmt. to the left of the seam and ¾ the bust mmt. to the right of the seam.

Fold the tie portion, matching up the 2 chalk marks and mark the foldline. This is the center of the garment.

Now, with right sides together, align and match the center marks of the tie and skirt portions. Pin together. Align each 6″ chalk point of the skirt portion to the bust mmt. chalk mark on each end of the tie portion. Pin together.

To control the excess fabric on the skirt portion, make 4 pleats equally spaced on both sides of center and pin and baste to tie portion. You will have 8 pleats in total. Ideally all pleats should fold towards center.

Machine stitch seam using ½’ seam allowance. Remove basting. Press seam open then press all seam allowances upward to tie.

Fold tie portion, with right side together, in half width-wise. Align and match raw edges on each tie end. From finished front edges, pin and baste long ties and short ends. Machine stitch using ½” seam allowances. Remove basting. Press seam open. Grade corners.

Turn tie ends right side out and turn in remaining raw edge by ½”. Place folded edge on top of pleating aligning to machine stitching. Pin and baste to encase raw edges. Press a sharp knife edge along the perimeter.

Edge-stitch by machine along the tie portion edge to finished. Align small 4″ opening and slipstitch together to complete garment.

To wear: Wrap garment around bust or waist, slipping the tie end closest to body through the 4″ opening. Continue to wrap tie end around the body and tie together with a bow to the other tie end.


A fun and fabulous trend from the runway that works for all “non-model” body shapes! Baby-doll dresses, with their forgiving fit and romantic feel, are the smart choice for balmy summer weather. Flirty, flowy, and feminine, they are a perfect staple for work, weekend, or travel. Wear with flat sandals for day and transform for night with strappy stiletto heels or wedges. For instant effortless style, choose one in a bold, solid color or floral print, like this one from Nicole Miller at Bloomingdale’s. And if you’re feeling extra daring, try a geometric pattern. Best of all, these dresses work wonderfully well with this season’s essential accessories. Try layering with leggings underneath for a not-so-hot day or cinch high above the waist with a funky belt for an edgier look. Baby-doll dresses have surfaced as one of the most prominent fashions in the collections of designers everywhere. Given the emphasis on short hemlines and loosely fitted clothes, it was perhaps inevitable. There’s only one requirement: a great pair of legs.

THE PATTERNDRAFT

Let’s begin by folding the paper in half, lengthwise (for symmetry).

At the top of the paper, square a line across from the fold.

From this line, measure along the fold the finished length of the dress.

For example, the finish length of the model photo is 28″.

Square a line from this point across the paper from the fold.

Now along each of these draftlines, measure half the hip or bust measurement plus 6 inches (whichever is larger).

Join each point to create a rectangle. Label ABCD.

From line AB, make a parallel line 9 inches down the fold.

Divide this line into three equal sections and label the second third, point X. Square up from X.

Divide the distance from X to the edge in half. Label point O.

Join a straight line from O to D. (side seam)

Parallel to line AB, draft a line across from fold 1 inch. This will be the foldline for the drawcord casing.

Where it intersect line X, label +. Swing a shallow curve from + to O as shown.

Above point D, place a set-square on the sideseam line (OD) and draw in hemline with a smooth curve blending into the line CD from the 90 degree angle. [see bubble for detail].


For the three tiers, draw two parallel lines from line CD, each 3 inches apart.

Trace off each tier for each layer of the dress. [do this on folded pattern paper].

Add seam and hem allowances. Open the folded paper for the complete pattern piece. Indicate the straight grain parallel to the foldline with a grainline on each pattern piece.

Each pattern piece is cut 2 times and is used for both front and back portions.

  • Stitch up sideseams and hem.
  • Layer 2 tiers together and drop third tier inside by stitching together at armholes before turning right side out.
  • Fold over top edge to create a casing and thread drawcord to create gathered neckline.