 The Shape
The shape of the necktie is an interesting item as it tends to fade in and out with current styles. Designers prefer a shape known as the “half bottle”. This shape enables a much more becoming knot with a small touch of refinement. However the true half bottle shape which looks like the neck and shoulder of a bottle typically doesn’t lend itself to some of the more narrower styles. By narrow, I mean anything under 3.5 inches.
The four major parts of the necktie draft equation are the length of the tie from the big tip to the knot, the knot itself, the tie around the neck, and finally the tail end of the tie that is hidden behind the front of the tie. The length should be reasonable so that when one tip is touching the belt buckle, the other tip can be securely held in place in the carrier on the back side.
You will need:
- sharp pair of scissors or rotary cutter
- silk pins
- ruler
- tailor’s chalk
- thread
- a new needle
- 1 square yard of silk fabric
- approximately 1 yard of wool tie fuse for your interlining.
THE NECKTIE DRAFT
A necktie is a symmetrical shape cut on the true bias grain (45 degrees).
You will need your height measurement and your neck measurement.
Tie Width = 3.5 – 3.75 inches (it can vary on current fashion)
Four in Hand Knot = 2 inch allowance
Pratt Knot = 4 inch allowance
Half Windsor Knot = 5 inch allowance
Full Windsor Knot = 6 inch allowance
Take a yard-length of kraft paper (36″) and fold it lengthwise. Open the paper and draw a straight line on the creased fold. Refold the paper.
FACE SECTION
 On the fold, mark a point, 1.
2 from 1 = (.30 x height) + neck measurement
Square across from 1 and 2.
3 from 2 = 3 x half the width measurement
4 from 1 = ½ distance of line 2-3
Join 3 to 4 with a straight line.
Divide line 2-3 and line 1-4 into thirds. Label points 5, 6 and 7, 8.
Connect 5 and 7 with a dotted line; connect 6 and 8 with a dotted line.
9 from 2 = line 2-3
Square across from 9. Label the intersection, point 10
Join point 9 to point 2.
11 from 1 = line 1-4
Square across from 11. Label the intersection, point 12.
Join point 1 to point 12.
13 from 2 = 7 inches
Square across from 13. Label the intersection, point 14.
Along the edge 14-10-2, make a parallel line ¼” and add a ½” seam allowance.
Trace all lines with a tracing wheel, then open paper and draw in lines using a ruler to retrace the lines.
To complete top portion, extend the line 1-12 with a tangent line across all lines.
Add ½” seam allowance parallel to tangent line.
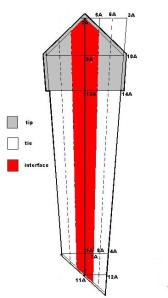
Trace out the interface pattern and tip end as shown.
TAIL SECTION
 On the fold, mark a point, 1A.
2A from 1A = (.30 x height – 3) + knot measurement
Square across from 1A and 2A.
3A from 2A = 3 x quarter the width measurement
4A from 1A = ½ distance of line 2-3
Join 3A to 4A with a straight line.
Divide line 2A-3A and line 1A-4A into thirds. Label points 5A, 6A and 7A, 8A.
Connect 5A and 7A with a dotted tangent line; connect 6A and 8A with a dotted tangent line.
9A from 2A = line 2A-3A
Square across from 9A. Label the intersection of the tangent line, point 10A.
Join point 9A to point 2A.
11A from 1A = line 1A-4A
Square across from 11A. Label the intersection, point 12A.
Join point 1A to point 12A.
13A from 2A = 6 inches
Square across from 13A. Label the intersection, point 14A.
Along the edge 14A-10A-2A, make a parallel line ¼” and add a ½” seam allowance.
Trace all lines with a tracing wheel, then open paper and draw in lines using a ruler to retrace the lines.
To complete top portion, extend the line 1A-12A with a tangent line across all lines.
Add 1/2″ seam allowance parallel to tangent line.
Trace out the interface pattern and tip end as shown.
Make a carrier loop 6 inches by 1 ½ inches.
See this link to assemble and finish your necktie.
Check out this site to learn how to tie your necktie.
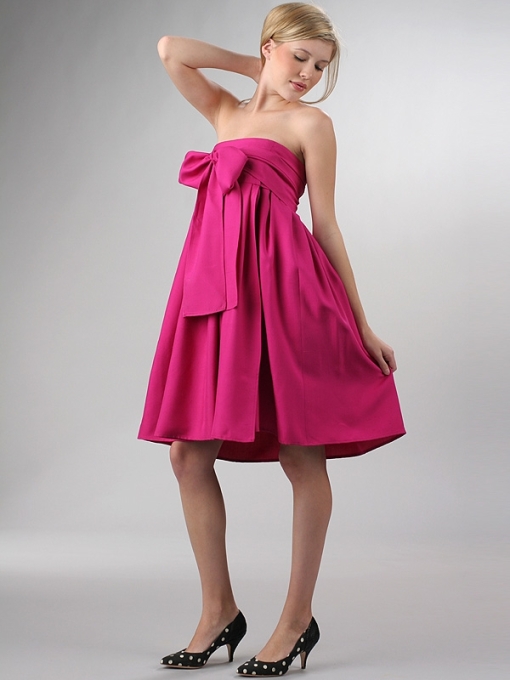
 Here’s a clever little idea…convertible clothing. This dress works double duty as a skirt. It’s ideal for weekend wear or travel wear. It’s functional and versatile at the same time.
Basically the concept is a wrap-around garment so it is adaptable to many shapes and sizes. The body proportion that needs to be considered is no more than a 7-8 inch difference between bust and waist measurements. Other than that ratio, it is quite flexible for most body shapes. The look is versatile as well. Through different fabrications it can be anything from a casual wrap by the pool to a sophisticated little black dress for a cocktail reception.
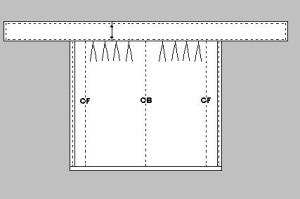
No pattern is needed to construct it. It is a simple block layout. You need a solid colour woven fabric width of 54-60″ wide. (see cutting diagram). Small to medium sizes = 2 yds. in length and medium to large sizes = 2 ½ yds. in length. The grainline is crossgrain so this cut is not ideal for prints unless they are railroaded or abstract in direction.

- Cut 2 panels along each selvedge edge 15″ wide for wrap ties
- Remaining fabric panel is wrap skirt portion.

Assembly:
On the large skirt portion, fold in a ½” turn on each short edge to the wrong side of the fabric.
Then turn each folded edge in ½” again. Press. Topstitch to finish.
Along one of the long edges, create a rolled hem by turning ½”, then 1″. Slipstitch or machine stitch in place. Lightly steam the foldline of the hem.
Next, fold the skirt portion in half and align and match the finished edges. Mark the fold on the long raw edge. This is the center of the garment.
From the finished edges along the long raw edge, measure 6″ and mark this location point. Set aside.
Now, take the two tie portions and align them, right sides together, along one short edge. Pin and baste along seam using a ½” seam allowance.
Measure and chalk 1 ½” from each end of the seam. Then measure and chalk 4″ from each of the chalk marks. This will be an open slit when completed.
Machine stitch the seam, leaving the 4″ distances unsewn. Remove basting. Press seam open flat.
Divide the bust measurement by 4. (eg. for size 10 = 34″ divided by 4 is 8 ½”).

From the seam (wrong side face up), measure and chalk ¼ the bust mmt. to the left of the seam and ¾ the bust mmt. to the right of the seam.
Fold the tie portion, matching up the 2 chalk marks and mark the foldline. This is the center of the garment.
Now, with right sides together, align and match the center marks of the tie and skirt portions. Pin together. Align each 6″ chalk point of the skirt portion to the bust mmt. chalk mark on each end of the tie portion. Pin together.
To control the excess fabric on the skirt portion, make 4 pleats equally spaced on both sides of center and pin and baste to tie portion. You will have 8 pleats in total. Ideally all pleats should fold towards center.
Machine stitch seam using ½’ seam allowance. Remove basting. Press seam open then press all seam allowances upward to tie.
Fold tie portion, with right side together, in half width-wise. Align and match raw edges on each tie end. From finished front edges, pin and baste long ties and short ends. Machine stitch using ½” seam allowances. Remove basting. Press seam open. Grade corners.
Turn tie ends right side out and turn in remaining raw edge by ½”. Place folded edge on top of pleating aligning to machine stitching. Pin and baste to encase raw edges. Press a sharp knife edge along the perimeter.
Edge-stitch by machine along the tie portion edge to finished. Align small 4″ opening and slipstitch together to complete garment.
To wear: Wrap garment around bust or waist, slipping the tie end closest to body through the 4″ opening. Continue to wrap tie end around the body and tie together with a bow to the other tie end.
 On the fold, mark a point, 1A.


