qphrt01_e982562e-heart-bag1

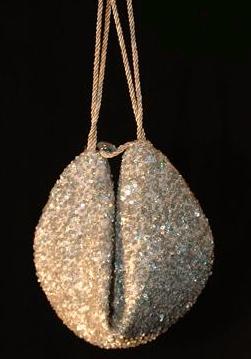
Step out with your Valentine with this heart-shaped disco bag.

You will need:

  • fashion fabric, 45″ wide
  • lining, 45″ wide
  • polyester fleece interfacing
  • Transfer web
  • cable cord, ½” dia.
  • coordinating thread
  • 1 dome snap set or Velcro tab, ½” dia
  • 1 tasseled decorative cord for bag strap
  • kraft paper

PATTERN

bag-draft

Make a circle. Measure the diameter (D).

Make a square with sides equal to D + ½”.

Cut circle in half.

Fold square in half matching opposite corners. Open fold.

Join semi circles to square matching Xs and Os to form heart shape.

Draw a 1″ dart between the semi circles 4″ long.

Bag Tab for closure – make a rectangle 3″ wide and 1/2 the diameter of the circle.  (1/2 D)

Add ½” seam allowances to all pattern pieces.

CUTTING

heart-lay1Fuse fleece interfacing to back of fashion fabric using transfer web before cutting out bag front & back and bag tab. Follow manufacturer’s direction for application.

Bag Shell – cut 2X self

Bag Lining – cut 2X lining

Tab – ½ D long x 3″ wide, self

Bias Strips for piping – 1″ wide (enough to go around perimeter of heart shape)

Cable Cording – perimeter of heart + 2″

ASSEMBLY

Make Piping

Make up corded bias piping. Join enough bias strips for the required length and wide enough to cover the cable cord plus the seam allowance. Lay the piping-11cord in the centre, on the wrong side of the bias strip.

Fold the bias strip over the cord matching the raw edges. Stitch the 2 sides of the bias strip together along the length. Use a zipper foot or cording foot on the sewing machine to ensure that the stitches are close to the cord.

Trim Bag Front

Place the corded piping around the outer edge of the interfaced heart piece, right sides together (RST) and matching the raw edges. Align the seams on the piping, allowing 1″ extra and begin at the dart; continue around the perimeter of the bag so that the piping gently curves around the heart shape (clip piping seam allowance if necessary). Finish at the dart and allow 1″ extra again. Carefully clip and remove the filler (cord only) from ends of the piping and crisscross the ends to neaten. Baste in place, 1/2″ in from the raw edges. Sew piping in place using a zipper foot.

Carefully cut through center of dart. Place ends of piping flat in center of dart. Fold heart in half and sew up dart to encase piping ends.

At  bottom of dart (●), attach bottom portion of dome snap set, according to manufacturer’s instructions. Set aside.

Front Bag Lining

Make a square patch pocket and place it in the center of one lining piece beneath the dart. Topstitch in place, leaving the top edge open. Sew up the dart.

With wrong sides together (WST), align and match the heart shape of the lining to the piped fashion fabric and baste together around the top part of the heart shape between the “O”s.

Stitch around the top edge using ½” seam allowance. Grade and trim seam allowance if necessary. Clip seam allowances at point O. Turn front bag section right side out and press edge flat. Topstitch along edge if desired. Baste the open edge of lining to the wrong side of the front piece from the Os to the point of the heart shape.

Bag Back Section and Lining

Sew up the dart on the bag back portion and on back lining piece.

With WST, align and match the heart shape and baste together around the top part of the heart shape between the “O”s.

Stitch around the top edge using ½” seam allowance. Grade and trim seam allowance if necessary. Clip seam allowances at point O. Turn back section right side out and press edge flat. Topstitch along edge if desired.

Apply the top portion of the dome snap set  to the bag tab, according to manufacturer’s directions.

Attach tab closure to face of back section, securing it at the bottom of the dart.

Joining Bag Front to Back

With WST, align and match the front and back sections following the heart point shape.

(Do not include the back lining.) Pin /baste together and sew along the piping using a zipper foot.  Grade seam allowance and trim point.

Turn under seam allowance of back lining and align folded edge with the machine-stitching. Slipstitch the opening edge of the lining closed.

Turn bag right side out.

Finishing Bag

Hand-stitch ends of tasseled cord securely at points O.


twelve-by-twelve-vest-belt-mystical-forestFeatured: Forever 21 belt from Twelve By Twelve

A unique and eye-catching haberdashery “vest-style” belt to make.

You will need:

  • ½ yd. [0.5 m] of fashion fabric, 45″ [115 cm] wide
  • ¼ yd. [0.25 m] of fusible interfacing, 45″ [115 cm] wide
  • Covered button kit, 10 mm diameter/line 16
  • Coordinating thread

PATTERN

belt-2

1 square = 1 inch [2.5 cm]

Note: Add seam allowance.

Lengthen/shorten the waistline of the belt at CB fold.

CUTTING

belt1Belt – cut 2X on fold

Belt Interfacing – cut 1X on fold

Welt – cut 1X

Welt Facing – cut 1X

ASSEMBLY

  1. Iron fusible interfacing to wrong side of OUTER belt section, following manufacturer’s direction.
  2. Make 4 – 3/8″ (10 mm) covered buttons [line 16] following manufacturer’s directions.
  3. For a single welt on the belt, you will need a welt piece and a facing piece. The welt strip should be 2 ½ ” (6 cm) deep [ 3/4″ (2 cm) finished] and 1 ¼” (3 cm) longer than welt placement line. The facing piece should be twice as wide as the welt and 1 ¼ ” (3 cm) longer than placement line. Interface the facing piece. Transfer all placement markings to the welt, the facing, and the OUTER belt section.
  4. With wrong sides together, fold the welt piece in half lengthwise. Baste the raw edges together. On the right side of the garment, position the welt with the raw edges aligned with the centre of the placement line and the folded edge extending beyond the bottom of the placement line. Pin and baste in place along placement line of welt on the surface of the left hand side of the belt section.
  5. Place facing piece, right side face down over area above placement line. Stitch along marked placement line being careful not to touch top and side edges of welt in seam. Cut along centre of the placement line, ending ¼ ” (7 mm) from ends, being careful not to cut through welt strip. Turn raw edges to inside with welt strip centre in opening.
  6. bbh-1c3Fold back the belt to expose the seam allowance at the upper edge of the opening. Matching raw edges and with right sides together, centre facing piece over the seam allowance. Sew in place. From right side of belt piece, fold back welt opening to expose small triangular pieces and welt of pocket. Stitch along welt side seamlines, catching small triangles in seam. Stitch across bottom of welt opening catching the facing portion to close the opening. Trim seam allowance and clean-finish edges.
  7. With wrong sides together, layer the two belt sections  together and match up raw edges. Pin/baste the perimeter. Machine stitch around the belt, leaving a 5″ (13 cm) opening to turnout. Grade seam allowances and trim corners. Turn belt right side out. Press edges flat.
  8. On right hand side of belt face, thread-mark 4 – 1/2″ (1.25 cm) buttonholes. Stitch buttonholes. Hand-stitch the covered buttons to the left front of the belt.
shoulder-vest1SHOULDER VEST

The Commuter Bandolier is a comfortable easy-to-wear shoulder vest and can totally tote your possessions in its pouches as you go about your daily routine. Cheerfully strap it on, head out into the world, and start a culture-wide fashion trend.

You will need:

  • 1 yd. [0.90 m] of fashion fabric, 45″[114 cm] wide
  • 1/3 yd. [0.30 m] of pocketing, 45″ [114 cm] wide
  • 2/3 yd. [0.60 m] of fusible interfacing, 45″ [144cm] wide
  • Coordinating thread
  • 2 nylon pocket zippers, 10″ [25 cm] long
  • ¼ yd. [23 cm] of Velcro® fastener, ½” [1.25 cm] wide
  • kraft paper

PATTERN

bag-2Dimensions are given in inches (imperial). **

NOTE: Length and width measurements may be adjusted by slashing through the RED lines and increasing or decreasing the amount needed in proportion.

** Add seam allowances to all pattern pieces.

CUTTING

bag-layout1Cut each pattern piece 2X in fashion fabric.

Cut each pattern piece 1X in fusible interfacing.

(flip pattern)

Cut each pocket piece 2X in pocketing.

Cut interfacing 1″ X 11″ [2.5cm X 28 cm] for each zipper opening.

Cut 1 Velcro hook side – 7″ [18 cm] long.

Cut 3 Velcro loop side – 3″ [7.5 cm] long.

ASSEMBLY

  1. Iron fusible interfacing to the wrong side of the INNER FACING pieces of the vest, following the manufacturer’s directions.
  2. On the OUTER pieces of the shoulder harness and right front piece, center and fuse interfacing to the wrong side of the fabric at the zipper placement.
  3. With right sides together (RST), match the upper pocket piece to the zipper placement on the shoulder harness. Baste in place. Stitch the outline of the pocket opening 10″ [25 cm] long X ½” [1.25 cm] wide, pivoting at the corners.
  4. Slash through center of outlined stitching and cut diagonally into the corners. Pull pocket lining through opening to wrong side of shoulder harness. This opening should form a perfect rectangle. Roll edges of opening between your fingers until each seam is at the edge of the opening. Press so that none of the lining shows on the outside.
  5. Center the zipper with the slider pointing upward behind the opening and baste in place.
  6. Topstitch around the pocket opening to secure the zipper.
  7. Match the remaining pocket lining piece to the upper pocket lining and align raw edges. Pin/baste the perimeter and sew up the pocket bag.
  8. Baste vertical seams of pocket bag to shoulder harness.
  9. Repeat inset zipper application to pocket opening on right front piece, as described above.
  10. Match front and back of shoulder harness with RST. Pin/baste long edges together. Sew seams, catching the pocket bag in the stitching. Turn shoulder harness right side out and press seams flat. Topstitch along the long edges.
  11. Match the vertical seams of the OUTER pieces of the “belt” portion of the vest. Pin/baste each seam and machine-stitch. Press seams open.
  12. Repeat last procedure for the vertical seams of the interfaced INNER pieces of the “belt” portion of the vest.
  13. Position the Velcro® hook vertically 1″ [2.5cm] from raw edge along the right front edge on the INNER portion (allow for seam allowance) with the right side UP. Stitch in place.
  14. Baste shoulder harness to OUTER portion on front and back along top edge, matching up RED dots.
  15. Pin/baste INNER and OUTER “belt” sections with RST and match up seams. Beginning at the center of the bottom edge, sew around the perimeter and pivot at the corners, leaving a 6″ [15cm] opening to turn out. Be certain to catch pocket bag in the stitching. Grade seam allowances and trim corners.
  16. Turn vest right side out and press edges flat. Topstitch around the perimeter to close opening.
  17. On left front, position 3 Velcro® loops horizontally and equally spaced approximately ¼” [0.5 cm] from the front edge on the OUTER section with the right side UP. Stitch in place through all layers.
maggy-london-pull-through-satin-stoleFeatured: Maggy London Satin Stole

Lustrous satin fashion fabric shapes an elegant wrap designed with a pull-through slit opening for easy adjustability, like this one by Maggy London.

You will need:

  • 2 yds. (1.8 m) of satin fashion fabric, 45″ wide
  • Coordinating thread
  • Small patch of fusible interfacing
  • Fray Check ® fabric sealant

PATTERN

wrapdraft-a2Make stole pattern approx. 16″ X 80″.  Round the ends with a circular template (I used a large pie plate). Position slit opening 4″ from one end.

CUTTINGwrapdraft1

Cut 2X self

ASSEMBLY

Making a Bound “Buttonhole” Slit

TIP: To insure perfect results, make a trial buttonhole slit on the same number of fabric layers as your garment for practice.

Step 1: Mark slit position and length on WRONG (interfaced) side of one of the stole portions. Thread-trace a 4-inch slit, extending the thread tracing beyond end markings. The thread-traced markings should resemble a ladder.

bbh-1aStep 2: Cut a self fabric patch for the slit on straight grain, 2″ (5cm) wide and 5″ (13cm). Make a center line horizontally across the length of the patch. With RIGHT sides together, baste the center of the patch along ladder rungs with ends extending 1/2″ (1.3cm) beyond ladder sides.

Step 3: On WRONG side, mark lines 1/8″ (3mm) above and below buttonhole marking, using tailor’s chalk.

Step 4: Using a small machine-stitch, start sewing along one long side of the buttonhole, following pencil lines, being careful to end stitching exactly at thread-traced ends. Do not stitch across ends, back-stitch or pivot at corners. Bring thread ends to WRONG side and tie in a knot.

bbh-1bStep 5: Snip between the two stitching lines and clip diagonally to corners, as shown. Be careful not to clip through machine stitching. (TIP: Add a dot of seam sealant such as Fray Check® to corners, and allow to dry.)

Step 6: Pull patch through opening to WRONG side of front. This opening should form a perfect rectangle. Roll edges of opening between your fingers until each seam is at the edge of the opening. Press so that none of the patch shows on the OUTSIDE.

Step 7: To form “buttonhole” lips, fold each long side of the patch over the opening, so that the folds meet exactly at the center.

Step 8: On OUTSIDE, baste “buttonhole” lips together along fold lines and press in place. Basting should remain in place until stole is completed.

bbh-1cStep 9: To secure “buttonhole” lips and keep them from shifting, with front RIGHT side up, fold it back out of the way until you can sew the end of the patch and the triangle (formed by clipping corners in step 5) together. Using small machine stitches, stitch across the base of the triangle, catching patch. Trim end to 1/4″ (6mm). Repeat on other end.

Step 10: Stitch horizontal seam allowance of buttonhole and patch together, just inside the original stitching. Trim patch to 1/4″ (6mm). Repeat on other seam. Set aside.

Step 11: On second stole portion, repeat step 1.

Step 12:  Cut a self fabric patch for the slit on bias grain, 5″ (13cm) wide and 5″ (13cm). Make a center line diagonally across the patch. With RIGHT sides together, baste the center of the patch along ladder rungs with ends extending beyond ladder sides.

bbh-1aa2Step 13: On WRONG side, mark lines 1/8″ (3mm) above and below buttonhole marking, using tailor’s chalk.

Step 14: Using a small machine-stitch, start sewing along one long side of the buttonhole, following chalk lines, being careful to end stitching exactly at thread-traced ends. Pivot at corners and complete the “rectangular” shape of the back opening.

Step 15: Snip between the two stitching lines and clip diagonally to corners, as shown in step 5. Be careful not to clip through machine stitching.

Step 16: Pull patch through opening to WRONG side of front. This opening should form a perfect rectangle. Roll edges of opening between your fingers until each seam is at the edge of the opening. Press so that none of the patch shows on the OUTSIDE.

Step 17: After the stole perimeter is completed, align the opening with the bound “buttonhole” slit and slipstitch rectangle opening to back of “buttonhole” lips.

Making The Stole

Step18: With RIGHT sides together, layer the 2 stole pieces and align the slit openings. Pin/baste the outer edges. Stitch around the perimeter, leaving 5″ opening along one long edge. Grade and trim seam allowances.

Step 19: Turn stole right side out. Slip stitch opening closed.

Step 20: Match and align bound “buttonhole” slit. Complete step 17.

The trendy fox styles of winter headwear are ideal for coldest weather and make a great fashion statement of you.

You will need:

  • ¾ yd. of faux fox fur, 60″wide
  • ¾ yd. of velveteen, 40″ wide
  • 3 yds. of twill tape, ½” wide
  • ¾ yd. of grosgrain ribbon, 1″ wide
  • ½ yd. of Kasha lining, 45″ wide
  • Heavy-duty thread

MEASUREMENTS

Head Measurement – measure around the head over the ears.

PATTERN

Note: Add ¼ inch seam allowance to perimeter of cap pattern piece.

CUTTING

Cap – cut 6X on bias grain in velveteen. (one-way nap)

Cap lining – cut 6X on bias grain in kasha lining.

Fox trim** – cut 1X on straight grain in faux fur. (one-way pile)

Sweatband – cut 1X in grosgrain ribbon.

**note: do not cut fur trim with scissors. Cut the backing of the faux fur with an x-acto knife or safety razor blade then gently pull apart the excess material away.

ASSEMBLY

  1. Take the fur trim and butt short ends together, with right sides facing. Push all hairs of trim to the fur side along the short end. Whipstitch the short ends together with small even hand-stitches using heavy-duty thread.
  2. On top and bottom edges of fur trim, whipstitch twill tape to edges on the fur side. (fig. 4) Keep hairs on fur side and under the twill tape.
  3. Turn tape to backside of fur trim and catch in place with long zig-zag stitches. (fig. 5 & 6)
  4. Turn fox trim right side out and comb fur in one direction.
  5. Pin/baste 3 cap pieces together, with right sides facing. Machine-stitch seams. Press seams open. Repeat on remaining 3 pieces. (fig. 1)
  6. Layer the pair together, with right sides together and pin/baste together. Machine stitch from front to back to create cap. (fig. 2) Turn cap shell right side out. (fig. 3)
  7. Repeat above procedures to make up cap lining. Set aside.
  8. With wrong side of fur trim to right side of cap, slipstitch fur trim to cap, leaving 1″ free along bottom edge of cap.
  9. With wrong sides together, drop cap lining into cap and match up seams. Baste lining to outer shell along bottom edge of cap.
  10. Sew grosgrain ribbon to bottom edge on right side of cap to catch both layers of fabric. Fold back raw end to neaten at centerback.
  11. Turn sweatband up inside of hat and tack at centerback.

Featured: Ruffle bag by Rianrae (India Rose Textiles)

A beautiful drawstring totebag made of soft cotton with a cascade of ruffles.

You will need:

  • Fashion fabric, 45″ wide equal to 3.5 times your bag circumference measurement (W).
  • Coordinating thread

PATTERN

This draft is an exercise in proportion. It is based on two measurements:

X = ruffle depth + 1″

W =  circumference around the bag + 1″ (or 2 X finished width + ½”)

CUTTING

Ruffle strips – cut 6X self

Bag – cut 1X self

Drawstring casing – cut 1 ½”strip equal to W, cut 1X self

Draw cord – cut 1 ¼” strip equal to 2 x W, cut 1X self

ASSEMBLY

  1. Take 2 of the ruffle strips and with right sides together (RST), fold each strip in half lengthwise. Pin/baste and sew using ½” seam allowance.
  2. Turn each piece right side out and press flat. Edge stitch perimeter of each strap.
  3. On remaining 4 ruffles strips, match up short ends together and join with a narrow French seam to create a “tube” on each strip. Hem top and bottom edges of each tube with a narrow double rolled hem. Then, sew a gathering stitch ½” below the top edge to gather the ruffle.
  4. On bag piece, hand-baste 4 rows of running stitches according to dimensions shown in illustration. Once completed, fold the bag piece in half lengthwise with RST and match up side seam. Pin/baste and sew seam using ½” seam allowance. Press seam open. Turn bag right side out.
  5. Beginning at the lowest running stitch, pin gathered ruffle to bag aligning the gathers on top of the running stitch line. Match ruffle seam with bag’s side seam. Distribute gathers evenly around the body of the bag. Turn bag wrong side out and machine stitch through the gathers on the ruffle. Remove running stitches.
  6. Repeat this step with each tier of ruffles on each subsequent row of running stitches. Each ruffle will overlap the last one.
  7. On wrong side of bag opening, centre each handle strap on half of the bag width without twisting the strap. Pin and baste upside down to top edge of bag.
  8. Take the drawcord casing strip and turn under the short ends ½” and press. Edgestitch along the short ends. Then, turn under ½” along one long edge. Press.
  9. Start at the midpoint between one of the handle loops, pin/baste raw edges together with right side of casing facing wrong side of bag opening. Butt the two short ends together. Sew around top of bag and encase strap ends using a ½” seam allowance. Grade seam.
  10. Turn bag right side out and fold over casing strip to the outside of the bag along the seam. Press casing flat. Baste  casing strip along the face of the bag. Keeping bag straps free, topstitch along bottom and top edges of casing.
  11. Take drawcord strip and with wrong side together, fold in half lengthwise and press.
  12. Open fold and fold raw edges to center. Press again.
  13. Turning in short ends to the inside, refold strip and edgestitch around the perimeter to create a drawcord tie. Thread tie through casing.
  14. To complete the bag, turn bag wrong side out and flatten from side seam. Match up bottom raw edges and pin/baste. (Do not catch ruffles in seam.) Stitch across bottom. Press seam open.
  15. At bottom corner, line up side seam on top of bottom seam to create a right angle with the fabric. Stitch across the point as shown. This seam will equal X (or 1/2X on either side of center seam). Repeat on opposite corner. Turn bag right side out.

Knotted fringe is actually quite easy to make and can be a lovely addition to any number of fashion design ideas such as on a vest, a skirt hem, or even, curtains. The first thing you must decide is whether your design project requires the addition of fringe or whether the fringe can be knotted from existing strands. You can apply the fringe trim similar to the macramé knotted fringe on this luxurious alpaca and silk shawl from the Viva Terra collection.

The second option, that of loosing weft (horizontal) threads leaving the remaining warp (veritcal) threads hanging. Measure out how long you want the fringe to be and mark that measurement with a line of stay-stitching. Then draw out the threads up to that stitching line. Decide how many threads you want to bundle together to tie in a knot. Then tie the knots and you will have a lovely fringed trim.

You will need:

CUTTING

Cut a rectangle 60″ X  21″ from the fashion fabric.

Cut a piece of cardboard about 8″ wide and half as long as desired length for finished strands (add extra length to account for take-up of knotting for thicker yarns). Wind yarn loosely around cardboard, cut across one end when card is filled. Repeat several times and then start fringing; you can wind more strands as you need them.

ASSEMBLY

Finish the edges of the rectangle with a narrow hem around its perimeter.
Hand-stitch a blanket stitch to the two narrow ends of the rectangle using yarn and darning needle. Use this stitching as the anchor to apply the fringe.
Follow these instructions from the Craft Yarn Council of America for knotted fringe to create a diamond pattern of knotting.

For single knot fringe, hold the number of strands specified for 1 knot of fringe together and fold in half.

With crochet hook draw folded end through space or stitch. Pull loose ends through folded section and draw knit up tightly. (fig. 1 & 2)

For double knot fringe, after completing fringe as above, turn so right side of work is facing you. Work knots in a diamond pattern as shown in diagrams to left. (fig. 3 & 4)


material source: Craft Yarn Council of America


Featured: Burberry

Two of a kind – a fringed scarf with two handsome options. A sleek satin side and a warm wooly side.

You will need:

  • 2 yds. of wool fabric, 54″ wide
  • 2 yds. of printed satin fabric, 45″ wide
  • 1 yd. [0.9 m] of Stitch Witchery® bonding web, ½” wide
  • Coordinating thread

FOR THE WOOL

woolStraighten the fabric edge you want to fringe.

Cut a rectangle shape 72″ X 16″ from the wool fabric.

On the 2 short ends of the rectangle, pull a thread yarn across the fabric at the “depth” line. (1″ wide or as you desire). Use this line as a guide for running small machine stitches to secure the fringe.

To create the fringe, clip every 2-3″ perpendicular to the edge, up to but not through, the stitching or the perpendicular threads (these will be part of the fringe). Complete the fringe by pulling away all the threads below the stitching (I used a straight pin) as shown.

FOR THE SATIN

Cut a rectangle shape 73″ X 16″.

On the 2 short ends, turn ½” under and press.

ASSEMBLY

Layer the fabrics, with right sides together, matching the folded ends of the satin to the “depth” line of the wool fringe. Sew the two long edges of the rectangle. Press seams open.

Turn right side out. Press along the long seams.

Sandwich a 15″ strip of the bonding web between the fabric layers at each short end. Press to fuse the opening close following manufacturer’s direction.

(TIP: Use a presscloth whenever fusing fabric.)

Travelling through the urban jungle isn’t like dustin’ crops, buddy! For one thing, you’ve got to make sure you’ve got all your gear with you. You’ve got a cell-phone, iPod, headphones, keys, wallet, sunglasses… Before you know it, your pockets are bulging, and you’ve got nowhere to hook your thumbs and look cool.

I’ve found this awesome holster that hold lots of gadgets, and keeps them readily available. You never know when you’ll need to grab your cellphone, iPod, wallet, keys, headphones, pen, whatever… so make sure they were right at the ready to go. The pattern is easy and the fabrication is simple.

You will need:

  • 1 yd. of cotton poplin or duck, 60″ wide
  • 5/8 yd. of fusible interfacing, 60″ wide
  • 1 closed  8″ coil zipper
  • 1 square ring, 2″ diameter
  • 1 slider, 2″ diameter
  • 1 dome snap set, 3/4″ diameter
  • 30″ of  cable cord, ¼” thickness
  • Coordinating thread

PATTERN

CUTTING

Cut ring tab and wallet #5 2X and cut all remaining pieces 1X in fabric.

Cut all pieces 1X in fusible interfacing.

Cut 30″ of  1 ¼” wide bias binding for piping.

ASSEMBLY

  1. Make up piping trim with bias strip and cable cord using a zipper or cording foot.
  2. Iron the fusible interfacing to the wrong side of all fabric pieces except 1 wallet piece (#5),  following the manufacturer’s directions.
  3. For the cell latch (1), fold right sides together and stitch long edge and one short end using ½” seam allowance. Grade and trim corner. Turn right side out. Press.
  4. Topstitch around the perimeter. Attach top part of dome snap as illustrated, following manufacturer’s directions.
  5. For cell pocket (2), sew each miter corner using ½” seam allowance. Trim.
  6. With right side together, fold pocket in half and align corners one on top each other.
  7. Sew along the raw edge, leaving an opening on one side for turning. Trim and grade seams.
  8. Turn right side out and press finished edge. Attach bottom part of dome snap as illustrated, following manufacturer’s directions.
  9. For ring tab (3), layer both pieces with right sides together. Sew along both shaped sides using ½” seam allowance. Trim and grade seams (the center should be 2″ wide). Turn right side out and press. Topstitch along finished seams.
  10. For wallet, turn under straight top edge of one piece of #5 and stitch down. Layer this piece with the second #5 piece to create a pocket. Baste outer edges together.  Attach top (4) and bottom (5) together, then topstitch this seam.  Apply corded piping to outer edge. (clip the piping in the corners to release the buckling).
  11. Attach zipper around top edge of the face of the wallet, next to the piping. Start midway up side, over the top, and down the opposite side.
  12. For the wallet side (6), fold strip in half with right side together and sew up short ends using ½” seam allowance. Press seam open.
  13. Fold “loop” in half with wrong sides together and match up raw edges. Baste together.
  14. Press the folded edge.
  15. Pin and baste raw edge of wallet side (6) to zipper and remaining wallet front (4-5) along the piped edge.  Sew wallet side (6) close to zipper through all layers using a zipper foot and continue around the face of the wallet section.
  16. For the holster shoulder strap (7), fold the fabric with right sides together and pin/baste the long edge. Stitch across both short ends and the long edge leaving 5″ opening for turning using ½” seam allowance. Grade and trim corners.
  17. Turn right side out. Press. Topstitch around the perimeter.
  18. Wrap ring tab (3) around 2″ square ring.
  19. Position the holster strap face up with the folded edge of the strap to the left.
  20. Place the wallet on the wide end of the holster strap. Pin in place. Sandwich the ring tab (3) between the wallet and the strap midway between zipper and bottom of wallet. Baste the wallet in place. Edgestitch through all layers around pressed edge of wallet.
  21. From top of wallet, measure upward 6 inches. Center cell latch (1) on holster strap face down. Sew across unfinished short end. Trim.
  22. From top of wallet, measure upward 3 inches. Center cell pocket (2) on holster strap. Pin/baste and edgestitch around finished edge being certain to catch the turn opening in the seam stitching.
  23. Apply 2″ slider to narrow end of holster strap. Insert narrow end of strap through the square ring and back on itself to the slider. Tack ends in place.


Confucius say: “Make this bag and good fortune will bestow upon you.”

You will need:

  • ½ yd. of Fashion fabric, 45″ wide
  • ½ yd. of Satin lining, 45″ wide
  • ½ yd. of Fusible interfacing, 22″ wide
  • 1 yd. of Cording
  • Coordinating thread
  • 1 Closed nylon zipper, 12″ long
  • 1 shank button

PATTERN

CUTTING

Cut fashion fabric, lining, and interfacing each 1X.

Cut cording 16″ long 2X; button loop 4″ 1X

ASSEMBLY

  1. Iron fusible interfacing to wrong side of fashion fabric following manufacturer’s directions.
  2. With right sides together, lay lining on top of fashion fabric. Baste together.
  3. On centerline, draw a narrow rectangle equal to the zipper length + 1/8″.
  4. Staystitch around this outline.
  5. Cut down center of rectangle and diagonally into the corners at each end using sharp pointed scissors. Remove basting.
  6. Flip fabrics right side out by inserting lining through slashed opening.
  7. Press seams of opening flat for a neat professional look.
  8. Place zipper face up in center of opening. Pin and baste into place.
  9. Topstitch around the zipper opening. Open zipper.
  10. Add 2 long cord loops, one on each end of bag. Double the cording to form a large strap loop. Attach cut ends side-by-side at end of zipper.  Sew a button loop to on end and attach a shank button on the other (as shown in model). *
  11. With right sides together, fold the fashion fabric in half and match notches. Pin and baste together along curved edge. (Keep lining free).
  12. Stitch curved seam and catch cording in the seam using a ½” seam allowance. Clip and notch seam allowance along curve.
  13. Repeat procedure for lining, leaving a 5″ opening.
  14. Turn bag right side out through zipper opening and slip stitch lining seam closed.
  15. To form the fortune cookie shape, “fold” purse and latch button to the button loop.

* OPTION: You can also make 1 long strap loop to slip through the button loop and draw up on it and omitting the button, if desired.