June 2009
Monthly Archive
June 24, 2009
 Featured: Mitered Pillows by Foley & Cox HOME
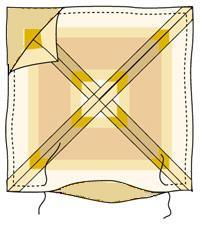
Clever use of the stripe from Foley & Cox HOME creates the illusion of mitered corners. With careful cutting and matching, a smart striped home décor fabric takes on a novel contemporary style when stitched into a mitered designer pillow. Select a favourite striped fabric and coordinate the colours with your home décor for this easy DIY project.
You will need: (for each pillow)
- 54″ [137 cm]wide balanced stripe home decor fabric*
- 1 loose fiber-filled knife-edge pillow form
- matching all-purpose thread
- kraft paper
* calculate required yardage by reviewing Cutting Instructions times the number of pillows desired.
PATTERN

Measure the pillow form from seam to seam (length & width). Using a ruler and right-angled square, draw a SQUARE template following these dimensions. Divide the paper pattern into 4 equal sized triangles by drawing two straight lines from opposite corners, intersecting in the center. Cut paper into 4 pieces along lines. TRACE off onto additional paper, add a 1/2″ [12mm] seam allowance to all edges of each of the four triangles.
CUTTING
 The paper triangle patterns have two sides of equal length. Label the pattern with the letter X, at the center point, between these two equal sides. Label the corners on the unequal side with the letter O. With the points and corners of each triangle facing in the same direction, position the triangles on the striped fabric so each O-O line is parallel to and measures the same distance from a stripe. Mark and cut 8 identical triangles from fabric; four for pillow front and four for pillow back.
Design Note: To create the “cross” motif, align X facing in the same direction and position the triangles on the striped fabric so each O-O line is perpendicular to and centered on a stripe.
ASSEMBLY
1. With right sides of fabric facing, and raw edges even, pin and stitch together one short edge of two triangles, matching stripes. Press seam open. Repeat for remaining 3 pair of triangles.
2. With right sides facing, and raw edges even, pin and stitch together two triangle assemblies matching stripes and center seams. The Xs of the individual triangles will now be in the center and the Os will make up the corners of the pillow. Press seam open. Repeat for remaining pair creating a mitered pillow FRONT and mitered pillow BACK.
 3. With right sides of fabric facing, pin pillow front to pillow back along all edges. Sew front to back using ½” [12mm] seam allowance and leaving a wide opening at the center of one edge. Clip corners and press seams open. Turn mitered pillow cover to the right side through opening and press flat.
4. Insert pillow form into cover through opening. Pin opening closed around form and using a hand needle and thread, slip-stitch opening closed.
Design Tip: Embellish the pillow edges with corded piping or a brushed fringe to change the pillow style from contemporary to traditional if desired.
June 11, 2009
 Featured: Selma dress
In many cases, discover your fabric as inspiration and the theme for the piece begins there. There are so many design ideas you can do with patterned fashion fabric and a bit of elastic. Take for instance, the Selma dress with an elasticized bodice and striking rope trim makes for a nautical style and fun back by Christopher Deane. Come across your own themed fabric and try this dress draft for summer.
You will need:
- approx. 2 ½ yds. [2.3m] of fashion fabric, 45″ [114 cm] wide (depends on desired length)
- shirring elastic thread.
- 4 yds. [3.6m] of cording, 1/2″ [12mm] diameter
- Coordinating thread
MEASUREMENTS
X = bust measurement (measure just under the arms around the fullest part of the chest).
Finished length = measure vertically from the armpit to the desired hemline .
PATTERN

This is a patternless design (simple block draft). Plot and cut block layout directly onto the fabric according to your measurements as illustrated (seam allowance is included).
CUTTING
Cut 1 front, cut 1 back, cut 4 bra cups and cut 4 loop carriers (1-1/2” [4 cm] wide strips).
ASSEMBLY
1. Make 2 self-lined bra cups. Begin by layering 2 pieces, with right sides together. Stitch across narrow top edge using ½” seam allowance. From machine stitching, measure down ½” and sew down both sides of bra piece, using ½” seam allowance. Press seams open; then turn bra cup right side out. Press bra cups flat and topstitch across the top of each bra cup below the openings. Baste the raw edges together. Set aside.
2.  With FACE side up, shirr fabric panels using elastic thread in the bobbin. Begin 1” from top edge of panel and stitch across width of each panel. Do parallel rows of shirring about ½” apart (I used the presser foot width as a guide) and continue until you have a shirred length of fabric equal to 1/3 X.
For example: if the bust equals 36 inches , you would shirr 12-inch length from the top edge of the panel.
3. With right sides together, layer the fabric panels and align the shirred portions while matching the edges along the length. Pin or baste and stitch to create a tube, using ½” seam allowances. Press seams open.
Design Note: The fit of this style is not a snug one. The dress is designed to hang from the shoulder straps. You may get a closer fit by increasing the seam allowance at the side seams.
4. Hem the bottom edge of the tube with a narrow double rolled hem by turning under the bottom edge twice by ½” and press. Topstitch hemline.
5. On one panel front, find the center of the panel above the shirring and mark. Pin/baste one bra cup on either side of this mark, with right side facing. Sew across bottom edges of bra cups.
6. Make carriers 1/2″ X 3″ [12mm X 75mm]; you will need 4 of them. At the outer edges of the bra cups, fold a carrier in half to form a loop and secure to either side of the garment. Divide the back portion between the two loop carriers into thirds. Place a loop carrier at each location and secure.
7.  Serge or pink the raw edge of the top edge. Turn top edge to inside and press. Topstitch in place.
8. Cut 2 lengths of cording. Thread cord in each bra casing and gather up excess fabric to create the gathers. Knot cording together to create halter straps and thread through loop carriers.
June 8, 2009
 Featured: Best Behavior
Stay “kewl” this summer with this gossamer sun serape. It is a cinch to whip up in an afternoon. Take your styling cues from Danish design house, Best Behavior and layer it over your tiny tees and baggy pants.
You will need:
- approx. 2 yds. [1.8m] of transparent fashion fabric, 45” [114 cm] wide such as chiffon
- 1 pkg. of bias binding, 1” [25 mm] wide (matching colour)
- coordinating thread
DIMENSIONS: approximately 34” X 44” [86 cm X 112 cm]
PATTERN

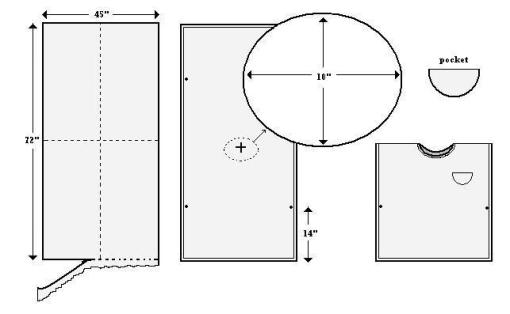
This is a patternless design (a simple block draft). You can plot it directly onto your fabric but you will need to straighten the cut ends of your fabric before you are going to cut. The corners should be 90°. Once that is done, trim away the selvedges.
CUTTING
Cut a rectangle 72” X 45” [183 cm X 114 cm].
ASSEMBLY
- Find the center of the cloth by folding it in half, both lengthwise and widthwise. Mark the location with a pin. Radiating from the center, lightly chalk an arc 5″ [12.5 cm] away from one fold to the other. Carefully cut on chalked line through all layers to create the neck opening. Reserve cut away portion.
- Fold the width of the bias tape in half and align the raw edges of the tape along the FACE side of the neck opening. Stitch around the neck opening using a ¼” [6mm] seam allowance. Grade the seam allowance. Turn bias binding to inside of opening and press seam flat. Topstitch around neck opening.
- Open the fabric flat, FACE side down and machine a narrow double rolled hem along all sides.
- To make the pocket, re-fold the cut away portion from the neck into quarters, with right sides together. Reduce the radius of the arc by 1″ [25mm].
- Open the fabric flat and fold in half , with RST. Stitch around the curved edge, using a ½” [12mm] seam allowance, leaving a small opening to turn-out. Trim the seam allowance close to the stitching. Turn pocket right side out and slipstitch opening closed. Press pocket flat.
- Align pocket to left side of centerfront and edge-stitch pocket to front of garment.
- Fold garment in half and align corners. Measure up from matching corners on each side approximately 14”[35.5cm] . Tack front and back together at this point (●).
June 7, 2009

Featured: Chulette
Simple eyelet vest with a “peek-a-boo” attitude.
Try styling it similar to this one from Chulette; fully lined with tan colour cotton fabric to add some contrast.
You will need:
- 1 ¼ yds. [1.15 m] leno-cut fabric, 45” [114 cm] wide such as eyelet.
- 1 ¼ yds. [1.15m] of matching lining, 45” [114 cm] wide such as broadcloth.
- Coordinating thread
- Kraft paper
MEASUREMENTS
Bust – measure around fullest part of chest, just under the armpit.
Waist – measure around narrowest part of torso, just above the navel.
Shoulder – measure shoulder length from ball socket to neckline.
Back width – measure across shoulder blades from armpit to armpit.
Backwaist length – measure vertically from nape of neck to waistline.
PATTERN

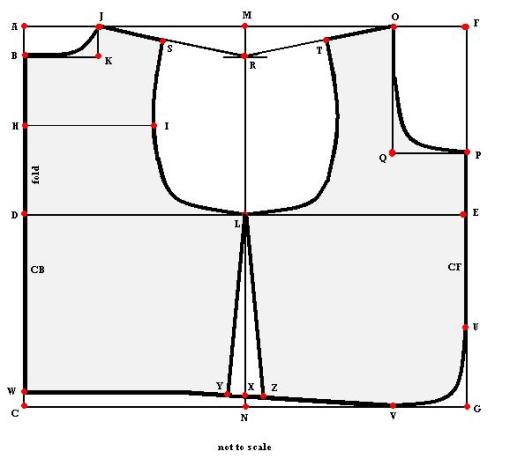
Cut a length of kraft paper equal to your bust measurement + 3” [75mm].
Fold the paper in half across its widest point.
Plot point A on the foldline at the top of the paper.
A-B = 2” [50mm]
B-C = backwaist length
C-D = ½ of B-C less 1” [25mm]
Square across all points at 90°
D-E = ½ of bust measurement
Square up and down from E to locate F and G.
H = midpoint of A-D.
Square across from H.
H-I = ½ of back width minus 1” [25mm].
A-J = 3 ½” [90mm].
K is located where lines squared from B and J intersect.
Draw a shallow arc at K to join B to J as shown.
L is half of D-E.
Square up and down from L to locate M and N.
F-O = 3 ½” [90mm].
E-P = 3” [75mm].
Q is located where lines squatted from O and P intersect.
Draw a deep arc at Q to join O and P as shown.
M-R = J-K + ½” [12 mm].
Draw a straight line from J and O to R.
J-S = 2/3 of shoulder measurement.
O-T = 2/3 of shoulder measurement.
Join S-I-L with a smooth curve as shown.
Trace this curve on the front portion between L and T.
G-U = 3 ½” [90mm].
G-V = 3 ½” [90 mm].
Draw a smooth arc at G connect U and V as shown.
C-W = 1” [25mm].
Square a line across from W.
N-X = ½” [12 mm].
X-Y = 1” [25 mm].
X-Z = 1” [25 mm].
Join points W-Y and V-Z with a smooth line.
Join points Y and Z to L with a straight line.
Add seam allowances to perimeter of pattern pieces except armhole.
Cut out pattern with paper on the fold.
Grainlines are parallel to CB and CF of pattern.
CUTTING
 Cut 2 bias strips 2 ½” wide [65mm] in lining fabric.
Cut front 2X self
Cut back 1X self
Cut front lining 2X lining
Cut back lining 1X lining.
ASSEMBLY
- With right sides together (RST), match up vest fronts to vest back and pin/baste side seams and shoulder seams. Stitch seams and press open.
- Repeat Step 1 for vest lining.
- With RST, align and match vest to lining around outer edges. Pin/baste in place. Stitch around the perimeter of the garment. Trim and grade seam allowance close to stitching. Turn vest right side out through armhole.
- Press seam flat around outer edge of vest. (Use a press cloth as not to mar fabric).
- Align and match up armhole opening. Baste both layers of fabric together.
- Bind each armhole with bias strip. To do this, fold the bias strip in half lengthwise (wrong sides together) and press foldline (use an up & down motion). Place the raw edges of the bias strip along the armhole on the face side of the vest. Stitch around the armhole using a 3/8” [1 cm] seam allowance. Turn under the short ends to neaten and complete.
- Fold the bias binding over the seam allowance in the armholes and align the folded edge to the machine-stitching. Slipstitch binding to lining.
 Featured: Mitered Pillows by Foley & Cox HOME
 The paper triangle patterns have two sides of equal length. Label the pattern with the letter X, at the center point, between these two equal sides. Label the corners on the unequal side with the letter O. With the points and corners of each triangle facing in the same direction, position the triangles on the striped fabric so each O-O line is parallel to and measures the same distance from a stripe. Mark and cut 8 identical triangles from fabric; four for pillow front and four for pillow back.
 3. With right sides of fabric facing, pin pillow front to pillow back along all edges. Sew front to back using ½” [12mm] seam allowance and leaving a wide opening at the center of one edge. Clip corners and press seams open. Turn mitered pillow cover to the right side through opening and press flat.
 Featured: Selma dress
 With FACE side up, shirr fabric panels using elastic thread in the bobbin. Begin 1” from top edge of panel and stitch across width of each panel. Do parallel rows of
 Featured: Best Behavior


 Cut 2 bias strips 2 ½” wide [65mm] in lining fabric.