tiesFeatured: Silk ties by Terrence Dobbs

Make Dad your own specially-designed tie for Father’s Day.

Fresh from the Hamptons, Terrence Dobbs will inspire you with his ‘Father & Son’ ties.

You will need:

  • 1 square yard [meter] of fashion fabric (try something silky)
  • coordinating thread
  • kraft paper

THE NECKTIE PATTERN

This tie is drafted by height.

The four major parts of the necktie draft equation are the length of the tie from the big tip to the knot, the knot itself, the tie around the neck, and finally the tail end of the tie that is hidden behind the front of the tie. The length should be reasonable so that when one tip is touching the belt buckle, the other tip can be securely held in place in the carrier on the back side.

Height = measure vertically from top of head to heels.

Neck measurement = measure around base of neck.

Tie Width = 3.5 – 4 inches [9-10 cm] (it can vary on current fashion)

Tie Knot = 5 inch allowance [12.5 cm] (Half-Windsor type)

Take a length of kraft paper and fold it lengthwise. (You may glue 2 pieces together if needed).

Along the fold, plot the following:

draftA-B = 0.30 of the height

B-C = neck measurement + ½” [12mm]

C-D = knot allowance

D-E = 0.30 of the height – 3” [75mm]

Square 90° across from foldline at all points.

F-C =  0.75 of tie width

G-C = C-F

Join F and  G with a straight line.

H is mid-point of F-G.

I-C = C-D

J-I = C-F

K-A = tie width; square up.

L-K = K-A

M-L = K-A

Join M to J with a straight line.

Join L to H with a straight line.

Using a set square placed on line L-H, square a line from A to locate N on line M-J.

Join L-A and L-N with a straight line.

O-E = 0.50 of the tie width

O-P = E-O

P-Q = E-O

Join Q and  F with a straight line.

Join P and  H with a straight line.

Using a set square placed on line P-H, square a line from E to locate R on line Q-F.

Join P-E and P-R with a straight line.

Join F to J with a straight line.

At B and D, draw a 1” x 1” square [25mm X 25mm] with one of its sides positioned on the foldline.

Add 3/8” [1cm] seam allowance around the perimeter of the tie pattern.

grainlineCut out the tie pattern and open the folded paper.

Extend line F-G across the pattern piece. Cut through line F-G.

Draw a grainline through opposite corners of the square box at B and D.

CUTTING
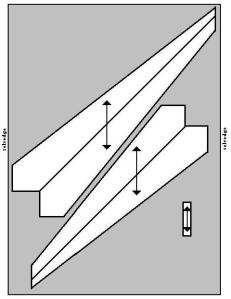
layCut 1X self for upper portion of tie.

Cut 1X self for under portion of tie.

Cut 1X self for carrier – 6” X 2 ½” [150 mm X 65mm]

Tip: A rotary cutter is ideal for cutting fabric on bias grain.

ASSEMBLY

1. Make a carrier loop 6 inches by 1 ½ inches [150mm X 40mm].

2. With right sides facing, align and match upper and under portions of tie together at center seam. Pin/baste and stitch seam using a ¼” [5mm] seam allowance. Press seam open.

3. With right sides facing, align and match each tie end along raw edges. Pin/baste and sew each tie point using a 3/8” [1cm] seam allowance. Press seam open. Grade and trim points. Turn tie right side out.

Tip: A wooden chopstick lets you get into tight corners when pressing a seam open.

4. Fold the tie fabric with wrong sides together; align and match raw edges along length of tie. Baste both layers together.

This tie is self-lined. Select which side of the tie will be the face side.

5. Fold the tie carrier in half to form a loop and secure it 10” [25.5cm] from the front tip on the face side of the tie. Sew it to the seam allowance.

6. With the tie face down, fold the basted raw edge 3/8” [1cm] over the center of the tie along its length. Herringbone stitch along the raw edge catching only the top layers of fabric.

Tip: Use waxed thread and a new needle whenever doing hand-stitching.

7. Place the folded edge over the basted raw edges and align to center (careful  not to stretch fabric).  Slipstitch along folded edge, catching only the top layer of fabric to complete the tie.

8. Without touching the  fabric, gently steam the tie  shape. Let fabric cool before handling. (Do not press the tie.)

sundress12Courtesy: Vogue

A flirty flouncer has that button-to-hem flippancy and shows lots of sun-kissed shoulder.

A very easy sundress draft to get you in that tantalizing “island-in-the-sun” attitude.

You will need:

  • Approx. 2 – 2 ¼ yds [1.8 – 2m] of fashion fabric, 45″ [114 cm] wide
  • 2.5 yds. [2.3 m] of pre-cut interfacing, 1″ [2.5 cm] wide
  • 1 pkg. of single fold bias tape, ½” [12.5 mm] wide
  • 1 yd of elastic, 3/8″ [10 mm] wide
  • 8 buttons, line 20; ½” [12.5 mm] diameter
  • Coordinating thread
  • Kraft paper

MEASUREMENTS

Bust = measure around the fullest part of chest just under the arms.

Hip = measure around the fullest part of the seat about 9″ [23 cm] below the natural waist.

Back waist length = distance from nape of neck to natural waistline.

PATTERN

draft2This pattern is drafted by height.

Make a SQUARE template with length and width equal to your Back Waist Length.

On the kraft paper, square lines from X at 90 degrees.

The line squared down from X is the length. It equals the centerline. (dress length)

Along the length line of the paper, set up A-B-C as shown.

Across the width line of the paper, set up C-D-E-F as shown.

1. On square A, divide the length into 3 equal parts.

Add 1 inch [25 mm] at the first division by marking a parallel line above the division line.

Subtract the difference between your hips and bust measurements on this new line, opposite the centerline.

Join this point to the bottom corner of square B with a straight line.

Cut pattern  piece A-B out.*

This is the pattern piece for the front and back of the dress.

2. Save remaining piece of square A for O.*

This is the pattern piece for the shoulder straps.

3. Parallel to the centerline, draft K piece from X and make it 2 inches [50 mm] wide.

Cut pattern piece K out.*

This is the pattern piece for the front button placket.

4. Along the top edge of C-D-E-F, add 1 inch [25 mm] by marking a parallel line above the squares.

Along the bottom edge of C-D-E-F, add ½ inch [12.5 mm] by marking a parallel line below the squares.

Label centerline on square C.

Cut out pattern  piece C-D-E-F.*

This is the pattern piece for the flounce of the dress.

* Note: Add seam allowances to pattern pieces.

Grainline is parallel to centerline.

CUTTING

dresslay2Dress Back – cut 1X self on fold

Dress Fronts – cut 1X self on fold

Button Placket – cut 2X self

Shoulder Straps – cut 2X self

Flounce – cut 2X self

Interfacing – cut 2 strips equal to dress length

ASSEMBLY

  1. For the shoulder straps, fold each O piece lengthwise with right sides together (RST).
  2. Stitch along the long edge. Press seam open.
  3. Stitch across one short end. Grade and clip corners. Turn strap right side out. Press flat.
  4. Make 2 shoulder straps. Set aside.
  5. For flounce, cut one of the two fabric pieces in half. Align and match each short piece to either side of the long piece with RST at the short ends. Pin/baste and sew the seams. Press seams open. Finish  the raw seam edge (I used pinking shears).
  6. Hem the bottom edge of the flounce by turning under ¼” [0.7 mm] and then ¼” [0.7mm] again. Press turnings. Machine stitch in place.
  7. Then, turn upper edge down 1 inch [25 mm] to make a heading for the flounce, and baste. Gather fabric along the basting. Set aside.
  8. For the dress fronts, cut one folded fabric piece in half. Align and match each front piece to either side of the back piece with RST at the side seams. Pin/baste and sew the seams. Press seams open. Finish  the raw seam edge (I used pinking shears).
  9. bias-tapeTurn upper edge of dress down 1 inch to make a gathered ruffle, and baste. Apply the bias fold tape on top of the raw edge of the turned dress edge. At this time, place one shoulder strap under the top edge of the bias fold tape and locate it in the middle of the front pieces. Make a casing for the elastic by stitching on both sides of the tape’s edge, ensuring you catch the raw end of the shoulder straps.
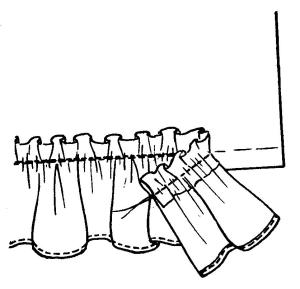
  10. ruffleOn the bottom of the dress, apply the flounce to the bottom edge. Gather along the lower edge of the heading and distribute the gathers evenly. Pin/baste flounce in place. Stitch on top of the first stitching to secure the gathers to the dress.
  11. Wrap elastic over the bosom and stretch to a comfortable fit. Cut elastic to that length. Thread elastic through casing to shirr the top and secure at each end with stitching.
  12. Fold each button placket piece (K) in half lengthwise with wrong side together. Press fold. Open each placket piece and baste the interfacing strips to one half by aligning with foldline.
  13. Pin/baste each placket piece to the front edge of the dress from the top edge down to the hem of the flounce with right sides of the placket facing the wrong side of the dress. (Note: Remember to allow for seam allowances at top and bottom edges). Stitch plackets to dress.
  14. On opposite side of placket, turn under seam allowances and press. Then turn under the seam allowances on the short ends. Press. Align and match the turned edges of the placket to the stitched seam of the front edge to encase the raw edges and topstitch the plackets to the dress.
  15. Divide the right hand side placket into 8 equally spaced vertical buttonholes. Make buttonholes.
  16. On the left hand side placket, hand-sew 8 buttons to align with buttonholes.
  17. Try dress on and drape dress straps over shoulder and pin to fit. Hand stitch ends of straps securely to inside of dress on bias tape.


moncler3aFeatured: Rouge Passion Capelet by Giambattista Valli for Moncler.

The famed puffy ski coats from Italy’s Moncler has teamed up with Giambattista Valli for the Moncler Gamme Rouge Collection. The beautifully sculpted pieces flaunt huge collars with twisted closures. Why not hit the ski slopes wearing a capelet puffer?

You will need:

  • Approx. 60″ [152cm] of Marilite® waterproof nylon, 60″ [153cm] wide
  • Approx. 24″ [61cm] of hi-loft terylene batting, 60″ [153cm] wide
  • Coordinating polyester thread
  • 4 sets of covered dome snaps, ½” [12 mm] dia.
  • Kraft paper
  • Tissue paper

MEASUREMENTS

This pattern is drafted by height. The body proportion is made up of 8 heads.

Your height divided by 8.

Shoulder width = distance from shoulder point to shoulder point across the back.

PATTERN

draft-a1

BODY:

Make a perfect square equal to ½ of the shoulder width measurement.

redoUse a set-square to draw a 90 degree angle on the Kraft paper.

Set up a grid using the square as shown: A,B,C

Point O is 4″ from top right corner on square C.

Point Z is midpoint of right side on square C.

Join points O and Z with a curved line as shown in draft.

Point ■ is midpoint of upper square B.

Point X is located at left top corner of square C.

Points ■ (red) are located 2″ [5cm] from point X.

Fold new sheet of kraft paper into quarters.

Place left bottom corner of square A on folded corner of paper.

Trace out solid line outline of squares A-B-C.

This is the back and sleeve portion of the capelet.

Fold a second sheet of kraft paper in half width-wise.

Place bottom of square C on fold of paper.

Trace out solid line outline of square C.

This is the front piece of the capelet.

NOTE: Add seam allowance around perimeter of pattern pieces. (thick solid line)

Cut out pattern pieces while paper is still folded.

COLLAR:

Use a set-square to draw a 90 degree angle on the Kraft paper.

Set up a grid using the square as shown:

1st row: A,B,C,D

2nd row: E,F,G,H

Find the vertical midpoint of squares D and H. Join with a straight line.

Point + is midpoint of upper square C and lower square G

Add seam allowance to perimeter and cut out pattern piece. This is the collar.

Draw a rectangle 24″ x 2″ [61cm x 5cm]. This is the neck band.

Draw a rectangle 15″ x 5″ [38cm x 12.5cm]. Divide into 3 equal parts. These are carriers.

Add seam allowance to perimeter of neckband and carriers. Cut out pattern pieces.

CUTTINGlay1

Capelet Back and Sleeves – cut 1X self

Capelet Fronts – cut 2X self

Capelet Neckband – cut 2X self

Capelet Collar – cut 1X self

Carriers – cut 3X self

lay-bBack and Sleeve Insulation – cut 1X batting

Front Insulation – cut 2X batting

Neckband Insulation – cut 1X batting

Collar Insulation – cut 1X batting

ASSEMBLY

  1. For each carrier piece, fold in half lengthwise with right sides together (RST).
  2. Pin/baste long raw edges. Stitch seam and press open. Turn right side out and press flat.
  3. For each front piece, place one carrier at point Z face up. Fold fronts in half width-wise with RST.
  4. Pin/baste front edge and side seam. Sew seams, ensuring the carrier is caught in the seam, and press seams open.
  5. For back and sleeve portion, fold in half width-wise with RST.
  6. Pin upper edge and pin/baste under-sleeve arm edge on both ends. Sew seams and press seams open.
  7. Attach one front armhole to armhole on back portion with RST. Pin/baste armhole seam in a “U” shape. Sew armhole seam. Clip seam allowance if necessary.
  8. On back portion, fold self fabric at point X with RST, and pin/baste from X to red point. Sew seam and press open. Repeat on opposite end.
  9. Insert batting into each body piece. Baste insulation to seam allowance of armholes on the front portions and upper edges of all self pieces. Topstitch through all layers on back portion vertically at CB and vertical sides of square B to contain the insulation. (see tip below)
  10. Align one piece of the neckband to the upper edge of the body at the CB and at the CF with RST. Match the upper edge of the front piece and shoulder with the neckband and allow for seam allowance at the front edges. Pleat out any excess on the sleeve portion. Gather the upper back edge evenly into the neckband. Pin/baste into place. Layer the second neckband piece on the inside of the body to sandwich the 3 layers together. Pin/baste in place. Machine-stitch the neckband to the body. Sew up short ends of the neckband.  Press seams and trim if necessary. Turn right side out.
  11. Insert batting into neckband and baste upper edge closed.
  12. For collar piece, staystitch at pint +. Fold collar lengthwise in half and pin/baste from point + to end of collar and across short end. Sew seam; press and grade seam.
  13. On opposite short end, gather edge to remaining carrier. Fold carrier to form a loop and attach midway in seam. Gather collar onto it. Fold collar lengthwise with RST. Sew gathered end. Grade and trim seam allowance if necessary. Turn right side out.
  14. Insert batting into collar and baste to seam allowance. Pin/baste collar to neckband between the + . Sew collar seam. Turn seam allowance into the collar and slipstitch the open side to the neckband.
  15. To complete the capelet, handstitch 4 sets of dome snaps evenly-shaped to front edge closure and attach short end of carrier under the armhole by turning under the open end and sewing to the back of the capelet to create a sleeve.

TIP: To sew batting with fabric, place the batting side, face down on tissue paper and machine-stitch with the self fabric on top of the batting. Tear away the tissue paper from the seam afterwards.

_5555502-tunicFeatured: Nordstrom Metallic Print Tunic

Bias-cut one-shouldered tunic is fashioned with a single batwing sleeve and angled hemline .

You will need:

  • approx. 2 yds. [2m] of fashion fabric, 45″[115cm] wide. *
  • coordinating thread
  • Kraft paper

* allow extra yardage to match a one-way or printed fabric.

MEASUREMENT

This pattern is drafted by height. The body proportion is made up of 8 heads.

Your height divided by 8.

eg. for a person 5 foot 4 inches: 64″/8 = 8 or 163/8 = 20.4

1 head amount = 8 inches or 20.4 cm.

PATTERN

tunicMake a perfect square equal to 1 head amount.

Use a set-square to draw a 90 degree angle on the Kraft paper.

Set up a grid using the square as shown:

1st row : A,B,C

2nd row: D, E

3rd row: F, G

4th row: – , H

Point 1 is left midpoint on square D.

Point 2 is bottom left corner of square F.

Point 3 is top midpoint on square B.

Point 4 is top right corner of square C.

Join points 1 and 3 and join points 2 and 4, with a straight line.

Point 5 is bottom right corner of square H.

Point 6 is right midpoint of square C.

Join points 5 and 6 with a straight line.

Point 7 is intersection point of lines.

Draw a ½-inch [1.25 cm] facing parallel to lines 1-3, 4-6, and 5-7.

Line 2-4 is the grainline.

NOTE: Add seam allowance around perimeter of pattern piece. (thick solid line)

CUTTING

Cut 2X self.     Note: Flip pattern to cut back section.

ASSEMBLY

  1. With RIGHT sides together, match raw edges of front and back pieces. Pin/baste between 1-2, 3-4, and 6-7. Stitch seams and press open.
  2. Turn under facing ½” [1.25 cm] at neck and on sleeve opening and hem.
  3. Turn under slit facings between 5 and 7 and stitch down. Then, hem bottom of tunic.