Hello designers, fellow craftsmen/women, and those of you who happen to drop by 🙂

After 12 ? years of blogging on-and-off in my free time while working in the Industry, I finally decided to take it a step further and try to get a bit more involved with my followers.
I decided to relaunch and rebrand my website and incorporate my two blogs into one site on a platform where I have more control over the content.

relaunch

So my blogs will merge and open up under the brand and domain “weekend-designer.com” in a few weeks. I’m working very hard on it but it’s so exciting! 🙂

One of the tools that will be available to me (finally) is a newsletter where I can communicate what is going on, let my followers know when new blog posts and tutorials and other exciting content is posted. It will also be helpful when gauging what you would like to see in the future.

If you would like to help me and give me little starting off boost, you can already sign up for my Newsletter. That way I can let all my past followers know when the new site is up and running.

I’m eager to get to know you all, both new and old subscribers, especially those of you who have been with me from Day 1 when I started this thing!  🙂
Most important though is that I hope you will get to know me and enjoy the topics I post about as I show you how to be your own fashion designer.

.So please don’t forget to sign up for my Newsletter below. It would be a tremendous help for me. Just click the new logo below and you will be taken to a landing page where you can sign up.  Thank you in advance! 🙂

I hope that I will see you all at the new site on launch day!

/Don

Weekend-Designer-Logo-600x180

I have been overwhelmed with the mail I’ve received since August from followers of Weekend Designer. Your kind words and best wishes are much appreciated.


So, what have I been up to for the past 5 months, you wonder? Trying a few new ventures.


Some have worked; some have failed yet all is good as that is what designing is all about…innovation, experimentation and execution. I’ve been travelling, offering some pattern-making classes as well as conducting a new handbag design workshop. It is a very rewarding feeling to teach a newcomer to design, skills that will unlock their creativity and now I want to share them with you.


In response to all the mail I’ve received, I am starting a new design blog in the New Year.

It is called Bag’n-telle.


It will basically be a fashion pattern-drafting blog much like that of Weekend Designer yet will offer some insight into the design process of fashion accessories. The blog will be more simplified in content and will feature only my own creations from some of my design workshops. All the projects are geared to the novice designer and the equipment available to them — meaning a domestic sewing machine and a few easy-to-use tools.


I encourage readers to use my design ideas and how-to’s as a guide and make it your own. YOU be the designer. The skills are easy to learn but it is your creativity that makes it special. I hope you will follow along. Here is the link: Bag’n-telle


I wish you and yours all a very Merry Christmas and a very Happy New Year.


Don


Yes, it’s true.

Watch for my new design blog project called BAG’nTELLE.

It is about expert ideas and tutorials about fashion accessory design, bag design, construction techniques, do-it-yourself approaches, and more from designer and educator Don Morin (aka Weekend Designer).

I am hoping that you’ll come back and check it out.

patterns

Today is the 100th post of the Weekend Designer and the last one for this blog. It seems like a good place to stop as I believe I have made my point that everyone is a designer and that making your own pattern “isn’t rocket science”. Weekend Designer has been a fun project as I have discovered the world of blogging and explored desktop publishing. My aim with the subject matter is to show how to execute those creative ideas for your wardrobe and home through pattern drafting. Some of the drafting techniques used were traditional flat pattern methods, drafting by height, transfer grids, simple block designs, and sometimes no pattern at all. While the examples cited are not complex, I have been able to show that making your own patterns is not a talent that you are born with nor a blessed gift, but simply a learned skill. It is like learning a new language. The more you practice it, the more fluent you become. Pattern drafting will allow you to make your creative ideas into reality.


Fabrics, trims, buttons, and embellishments are among our favourite resources for expressing our creativity in fashion design.  There is something particularly special and rewarding about designing and wearing your own creations or decorating your home interiors.  Garments speak a language; they are an extension of yourself, expressing personality, aspirations, moods, and style.  When you know you look great, it’s only natural to feel positive and confident about yourself. The same can be said of  our home decor.


You do not have to be an expert to be your own designer.  With simple pattern modifications and some common sense ( sometimes a bit of trial and error too), you can create your own  design details. When combined with the ideal fabrications you can realize your own creative visions.


You’ve probably discovered many sources of inspiration from the Weekend Designer.  Here are some design tips and advice to help you turn that inspiration into creativity.


  • Be Disciplined – Pattern-making can be hard work and takes concentration. A defined work-space and a preplanned time frame are often helpful. Try to plan creative time every day, or whatever time is available to your lifestyle. Planning a time frame in a space where you can concentrate will help slow down your ideas so you can actually be productive with them.  If you’re in a hurry or if the ideas come too fast, it’s difficult to convert them into a design.


  • Be Prepared – Pattern-making is a skill. However to make that skill work to its best advantage, you need the proper tools and supplies. Take precise and accurate measurements. It does not matter whether amounts are in imperial or metric but be consistent with whichever you choose. The applied math is basic but if you cannot convert fractions then use a calculator as an aid. Get a long straight ruler (yardstick) to draw lines, a set square to make 90° and 45° angles, a French curve to draw curved lines and a tracing wheel. You are only as good as your tools you use. Get a good sewing reference book. The more you know about sewing construction, the more you can expand on your pattern-making.


  • Set Goals – Channel your creativity by setting goals. Let your goals grow as you grow in your knowledge of pattern drafting. Perhaps your goal is to resolve a particular design challenge or to redesign a fashion detail and integrate it into your next design. Know that pattern drafting will eventually free you of “cookie-cutter” fashion and develop a personal made-to-measure style. One technique that I always use is to begin each project with a list of “what do I see”. This will set up your thinking as to how to proceed with your pattern-making.


  • Value Mistakes – Believe it or not, mistakes can be beneficial.  They cause us to search for a different and often better way.  They facilitate experimentation with new materials, techniques, or styles.  Mistakes or challenges are an important part of the design process because they provide unique opportunities for creativity. Always make a toile or muslin fitting to test your pattern before cutting into your fashion fabric. Don’t be disappointed if it does not ‘turn out ‘ on the first attempt as planned; that is what toiles are for. These mock-ups allow you to modify the end result, correct the pattern, and work out the sewing/assembly process.


  • Temporarily Let Go – When you have a creative block or cannot find a resolution to a design problem, there comes a time when it may be more productive to stop working on the pattern drafting. Let it go; do something else. While you have consciously stopped thinking about the problem, your mind is still working on it. Sometime we get too close to see the answer; however when we step back there is room for clarity.


  • Enjoy the Process – don’t forget the reason why you’re doing this.  Is this your hobby, your career, your creative release, your personal time for indulgence? Even if your concentration is on the end product, don’t forget to have fun with the process of pattern drafting.


Lastly, I would like to thank all the readers of Weekend Designer for their interest, comments, compliments, and encouragement. Many of you have set up links to this blog and made referrals to it in your sewing groups. Thank you for your support. Imagine my surprise and delight when I made the Top 100 Blogs on WordPress; it was all your doing.

Thank you again.


Wishing you many a creative weekend.


Don


oscarFeatured: Oscar de la Renta Tiered Gown

Among the occasion gowns, a tiered empire-waisted number is always a standout with its elegant double-ruffled flounce. In coral silk taffeta, it’s unmistakably Oscar.

You will need:

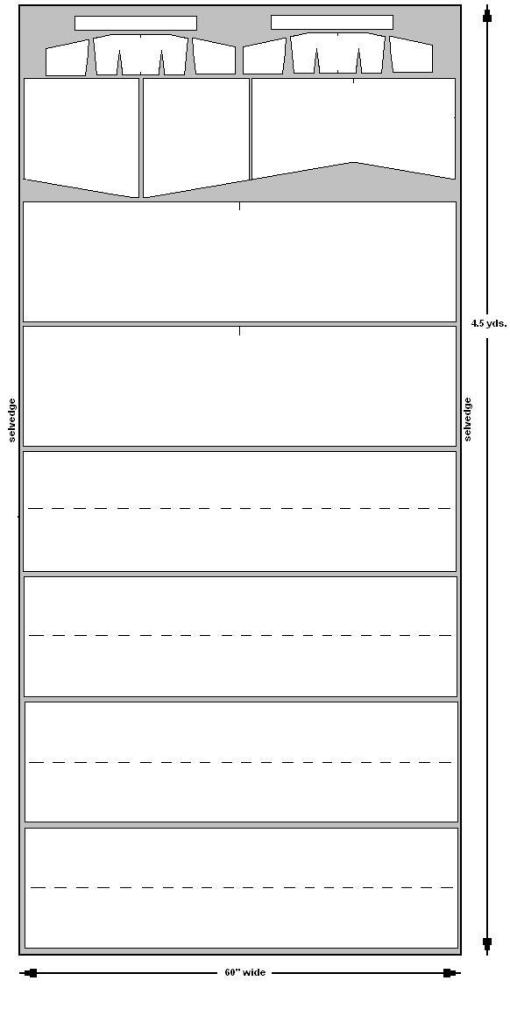
  • Approx. 4 ½ – 5  yds. [4.2 – 4.6 m] of fashion fabric, 60” [152 cm] wide
  • 1 dress zipper, approx. 15” [30 cm] long
  • Coordinating thread
  • Kraft paper

MEASUREMENTS

Bust – measure around the fullest part of breast, just under the arm.

Chest – measure around upper torso, just under the breast.

Waist – measure around narrowest part of torso, just above navel.

Back width – measure across shoulder blades from armhole to armhole.

Back waist length – measure vertically from nape of neck to waistline.

Dart Size = 2 ¾” [7 cm].  (This is an average bust dart amount for a B-cup. More or less darting may be taken, if desired.)

PATTERN

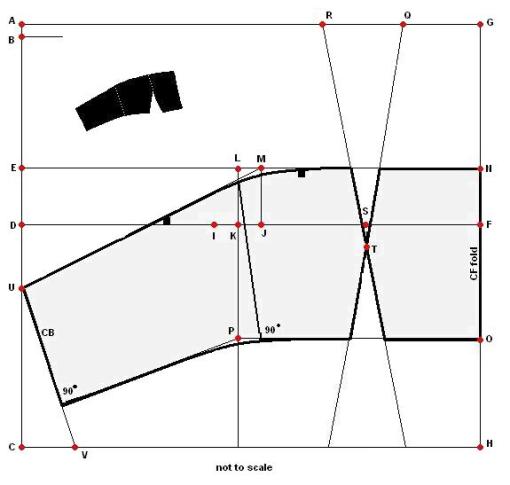
bodice draft 2

Bodice Section:

Draw 2 lines at a 90° angle from point A.

A-B = ¾” [20mm].

B-C = back waist length.

Square across from C. (waistline)

B-D = half of B-C. (bustline)

D-E = quarter of B-C.

D-F = half of bust measurement.

Square up and down from F to locate G and H.

D-I = half of back width

F-J = half of back width + half of dart + ½” [12 mm].

K is located midway between I and J.

Square up from K to located L.

M is located at the intersection from J.

N is located at the intersection on the centerfront line.

F-O = 2 times distance of N-F.

Square across from O.

Square down from K to locate P at intersection.

G-Q = 3” [75 mm].

Q-R = dart size.

F-S = half of line F-J.

S-T = ½’ [12 mm].

Connect Q to T with a straight line and extend to waistline.

Connect R to T with a straight line and extend to waistline.

D-U = quarter of C-D.

Connect M to U with a straight line.

H-V = half of waist measurement less darting.

Join U to V with a straight line.

Place set square on line U-V and draw a line at a 90° angle to connect to P.

At M and P, smooth the chevron with a curve to blend the lines together.

Place set square on baseline and square a line to L. (side seam)

Shoulder strap front placement is located midway between side seam and dart. (■)

Shoulder strap back placement from side seam equals front amount + 1” [25 mm].

To complete draft, cut through the center of the bottom dart and close top dart to release it into bottom dart, pivoting at T. (see silhouette in diagram above)

Fitting Tip: Measure the bottom edge of the bodice pattern and compare to the chest measurement. Adjust the dart with the difference, if necessary.

Grainlines are parallel to CF and CB.

Add ½” [12 mm] seam allowance to bodice pattern. (Cut front pattern on fold)

For shoulder strap, draw a rectangle = back waist length X 5” [12.5 cm].

Skirt Section:

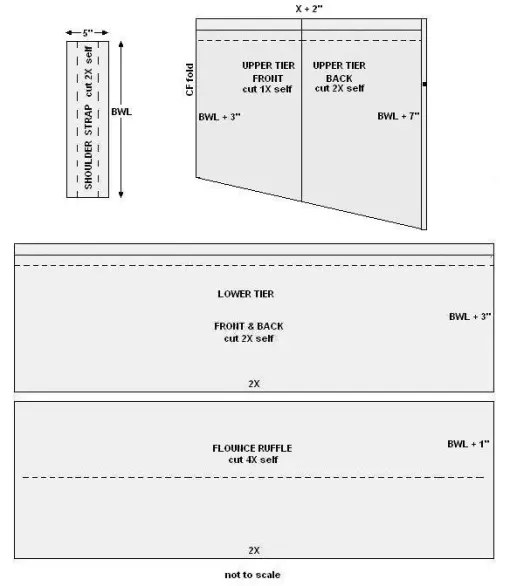
sheath draft

Measure bottom edge of bodice, less darts . This amount is X.

For the upper tier, draw a rectangle.

Make the CF = ½  X – 1” [25 mm] x back waist length + 3” [75 mm].

Make the CB = ½  X + 1” [25 mm] x back waist length + 7” [180 mm].

Connect the bottom with a diagonal line and divide the pattern.

For the lower tier (front & back), draw a rectangle = 2X x back waist length + 3” [75mm].

For the ruffled flounce, draw a rectangle = 2X x back waist length + 1” [25 mm].

Grainlines are parallel to CF and CB.  (Cut upper tier front pattern on the fold).

Note: Seam allowance (1/2″ or 12 mm) is included in skirt section.

Fitting Tip: The finished length may be adapted by adding or subtracting equal amounts from the top edge of the tier panels. Take gown length measurement while wearing evening shoes.

lay

CUTTING

Shoulder Straps – cut 2X self

Bodice Front – cut 2X self

Bodice Back – cut 4X self

Upper Tier Front – cut 1X self

Upper Tier Back – cut 2X self

Lower Tier – cut 2X self

Flounce Ruffle – cut 4X self

ASSEMBLY

1. Make 2 shoulder straps. With right sides together (RST), fold strap piece in half lengthwise and sew along long open edge. Press seam open. Turn strap RIGHT SIDE OUT. Center seam in middle of width and press flat. Set aside.


2. Make flounce. With RST, sew ruffle panels together along short ends of rectangle to make a “loop”. Press seams open.


With RST, fold the loop in half aligning the raw edges and matching the seams. Sew around the loop, leaving a 6” [15 cm] opening for turning out. Turn flounce RIGHT SIDE OUT and fold 2” [50mm] from seam. Press gently along fold. Set aside.


3. Sew darts on front bodice pieces.


4. Sew bodice backs to bodice front at side seams. Press seams open.


5. Pin/baste shoulder straps to bodice at ■. (You may need to adjust its length).


6. With RST, sew the bodice pieces together along the top edge, ensuring to catch shoulder straps in the stitching. With inner bodice (lining) FACE UP, under-stitch along top edge of bodice. Turn under seam allowance on lower edge of inner bodice and press flat. Set aside.cornerb


7. With RST, sew upper tier backs to upper tier front, matching at side seams and CB seam from bottom of zipper opening. Press seams open.


Turn under top edge of upper tier by 1 ½” [40 mm] and gently press fold.

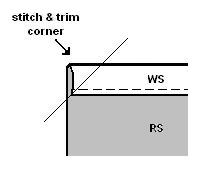
With RST, stitch a diagonal seam at each corner of zipper opening. Trim excess away and turn RIGHT SIDE OUT. Set aside.

8. With RST, sew lower tier panels at side seams and press seams open. Turn under top edge of lower tier by 1 ½” [40 mm] and gently press fold. Hem bottom edge with a ¼” [6 mm] double-rolled hem finish.ruffle


9. With lower tier and flounce FACE UP, attach flounce to bottom edge of lower tier. Gather along the horizontal seam of the flounce and ruffle the top edge. Distribute the gathers evenly along the bottom edge of the lower tier and stitch through all the layers 2” [50 mm] from fold. ( gathering ratio = 2:1)


10. With upper and lower tiers FACE UP, attach lower tier to bottom edge of upper tier matching at the side seams. Gather 1” [25 mm] from the top fold of the lower tier and ruffle the top edge. Distribute the gathers evenly along the bottom edge of the upper tier and stitch through all the layers 1” [25 mm] from fold. (ratio = 2:1). From inside the garment, stitch the ½” [12 mm] seam allowance of the lower tier to bottom edge of upper tier.


11. With upper tier and bodice FACE UP, attach upper tier to bottom edge of bodice matching at the CF, side seams, and CB seam. Gather 1” [25 mm] from the top fold of the upper tier and ruffle the top edge. Distribute the gathers evenly along the bottom edge of the bodice and stitch through all the layers 1” [25 mm] from fold. (gathering ratio = 2:1). Press seam upward.


12. Insert dress zipper into CB seam from top of bodice using the center slot application.


13. Align bottom edge of inner bodice to stitching line and match at seams. Slip-stitch along bottom edge of inner bodice and along zipper tape.

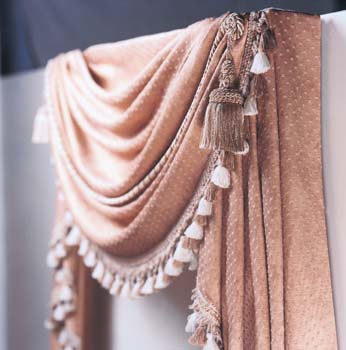
arlene interiorsPhoto Credit: Arlene’s Interiors

Swags are elegant treatments for tall, narrow windows yet easy-to-make. This window covering is pleated at the sides to create rounded folds and is used most often in formal home décor. Use them in tandem with cascades or jabots.

You will need:

  • Drapery fabric, 54” [137 cm] wide. *
  • Drapery lining, 54” [137 cm] wide. *
  • Twill tape, 1” [25 mm] wide.
  • Decorative trim (optional).
  • Pelmet mounting board**
  • Coordinating thread.
  • Staple gun.
  • Kraft paper.

* for yardage required, see Cutting Instructions below times the number of windows.

** Pelmet should be slightly wider than window frame.

abcMEASUREMENTS

Swag Width = the horizontal dimension of the mounting board or pole hardware. (A)

Swag Depth = the vertical drop of the swag, measured from the center of the board or pole line to the bottom of the swag. (B)

Swag Sweep = the bottom curve length of the swag from the board line, down to the longest point and up to the board line. (C)

Cascade Length = the vertical drop of the cascade from the board line down to the desired finished length. (D) Traditional proportions are equal to 3X the swag depth.

Cascade Width = 1/3 of swag width + mounting board width. (E)

Design Tip: To obtain the sweep measure, mount the pelmet board or pole hardware over the window. Drape a length of weighted cord from one end of the finished treatment to the other. Hold the cord on top of the hardware at each end at the point where the fabric will end. This will give you a finished curve length which includes the pelmet board allowance. Measure the length of the cord and that will be your sweep length.

PATTERN

swag draft

Swag Section

Draw a straight line on center of paper. Plot point A on line.

A-B = 2 X swag depth + 5″ [12.7 cm] (the featured sample swag depth is 18″ [45.7 cm] long.)

Square across from A and B.

A-C = ¼ of the finished swag width.

A-D = A-C.

B-E = ½ of the swag sweep

B-F = B-E.

Square up from E and F.

E-G = ½ of swag depth.  (Note: the angle of C-G will be greater than illustrated)

F-H = E-G.

I is located midway A and B.

Draw a square box with one of its sides touching on the centerline (A-B). Draw a diagonal line through the opposite corners of the box. This is the grainline.

Cascade Section

J-K = finished cascade length + 1” [25mm].

J-L = C-D.

Square down from L

L-M = A-I.

Join M to K.

Square across from K.

J-N = width of mounting board

Square down from N.

O is located at intersection of K and N.

The grainline is parallel to J-K.

Add seam allowances to pattern pieces.

Marking the Pleats:

The length of the pattern and the pleated sides combine to give the swag its character. The length of the pattern determines the fullness of the swag. The sides are pleated into folds which distribute the fullness and give the swag visual interest.

swag1_illus5Mark the center of the top and bottom edges of the swag pattern (A-B).


Fold the pattern along the center and mark the pleats as follows:

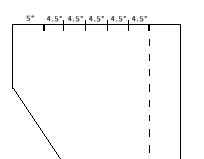
5″ from the top for first pleat. This will determine your “picture” size. (see design tip below)

4″ up from the bottom.

Divide the space between the first and last pleat into equal pleats of 4-6″.


All of the pleats between the first and last must be equal in size. Mirror  pleatsmarkings on opposite side and open pattern flat.


On the top edge of the cascade pattern, mark the first pleat as follows:

5” from inner edge of cascade tail (L).

Divide the space between the first pleat and the corner (J) into equal pleats of 4-6″.

lay

CUTTING (per window)

Swag – cut 1X self

Swag lining – cut 1X lining

Cascade – cut 4X self

Cover pelmet board* with self fabric.

Design Tip: The center of a finished swag is the “picture”. It showcases the motif of the fabric. The first fold on the swag acts as the picture frame. The top of the swag pattern should be aligned on the fabric surface to maximize the motif size in the swag.

For the cascades, you may wish to create a contrast edge by using a solid coloured lining, as the back side of the cascade will be visible.


ASSEMBLY

1. Turn under seam allowance on top edge of swag and press flat. Repeat step on swag lining.


2. With right sides facing together, align and match outer edges of swag and lining.

Baste decorative trim between self fabric and lining along bottom edge, if using.

Pin/baste and sew, leaving top edge open. Turn RIGHT SIDE OUT and press flat.

Edge-stitch the opening closed.


3. Turn under seam allowance on top edge of cascade pieces and press flat.


4. With right sides facing together, align and match 2 pairs of cascade tails. Pin/baste and sew, leaving top edge open. Turn RIGHT SIDE OUT and press flat. Edge-stitch the opening closed.


5. Transfer pleating markings to cloth of swag and pair of cascade tails.


MOUNTING


6. Use a pelmet board, preferably one that is covered in self fabric.  Mark the center of the board. Mark the center of the top edge of the swag. Set aside.


7. Staple the top edge of the cascade 1″ [25 mm] up on the top of the board, draping the long side of the cascade across the end of the pelmet board. Fold around the corner of the mounting board and pleat at the first fold. Staple point of the pleat along the edge on topside of the pelmet.


8. Continue pleating all of cascade tail to the end. Mirror the pleats on the left side exactly the same as the right, with the other cascade.


9. Staple the top edge of the swag 2″ [50 mm] up on the top of the board, aligning the center marks.


10. Pleat the first fold, right side and left side. Align point of the pleat along the edge of the top of the pattern. (This first fold sets the ‘picture’ on your swag). Staple top edge in place.


11. Continue pleating all but the last fold.


The distances between the pleats and the angle at which they fall off the board should be equal for all pleats. Pleat the left side exactly the same as the right. The ends of the swag will overlap the cascades.


12. Pleat the last fold. You will also have to take the end of it and pull it up onto the board to secure. This will cause the bottom edge of the swag to tuck neatly up.


13. Neaten the top edge of the treatment by covering the staples with twill tape.


Design Tip: Embellish the swag with decorative fringe, trims, banding, or tassels.


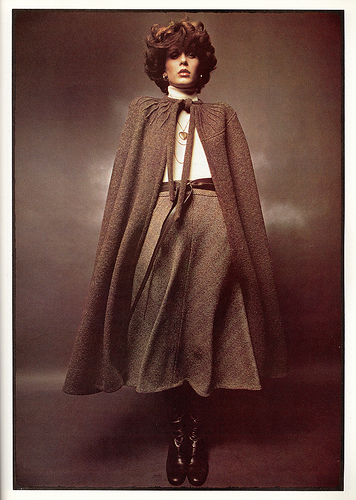
tweed cape_lubaFeatured: Luba tweed cloak

The sunburst yoke, always a favourite, is the feature of this flattering and simple cloak. This one by Luba is fashioned in tweed but any double-faced bottom-weight fashion fabric will do.

You will need:

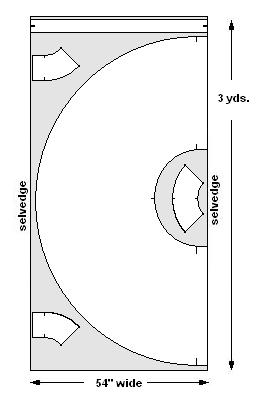
  • approx. 3 yds. [2.75 m] of fashion fabric, 54” [137 cm] wide.
  • ½ yd. [0.5 m] of stay tape, 1/2” [12 mm] wide.
  • coordinating thread
  • kraft paper

DIMENSIONS: approx. 44” [112  cm] long  and 160” [400 cm ] sweep.

PATTERN

cape draft

Cape Section

Draw 2 lines across paper at a 90° angle from point A.

A-B = width of fashion fabric less 2” [75 mm]; eg. 52” [132 cm].

A-C = A-B.

A-D = 9” [23 cm].

A-E = A-D.

Arc a radius of 9” [23 cm] from A connecting D to E.

D-F = 8” [20 cm].

E-G = D-F.

Arc a radius of 17” [43.2 cm] from A connecting F to G.

A-H = A-B on a 45° tangent line taken from A.

I is located at the intersection of F-G.

Arc a radius of 52” [132 cm] from  connecting B, H, and C.

Extend C to E by 1” [25  mm]; draw a parallel line to C-E.

Sunburst Yoke Section

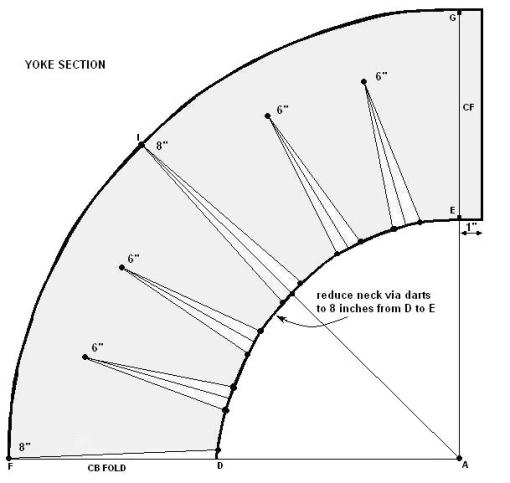
cape yoke

Create the sunburst detail on the yoke with 11 neckline darts.

Reduce the neckline to 8” [40.5 cm]  from D to E. (Total measurement = 16″)

Dart width = 1 ⅛” [30 mm].

Design Note: For a smaller neckline, increase the number of darts. Keep the darting symmetrical to create the sunburst effect.

Place first dart on line A-I.

Place second dart (half-width) at centerback (D-F). Both are 8” [20  cm] long.

Divide distance between the 2 darts equally into thirds. Square 6” [15.2 cm] from line D-E. Draw in a dart at each location.

Divide distance between A-I and E-G equally into thirds. Square 6” [15.2 cm] from line D-E. Draw in a dart at each location.

Trace off yoke section onto folded paper with D-F on the foldline.

Separate yoke at shoulderline (A-I).

For neckline tie, draw a rectangle 54” long  X  2” wide  [137 cm x 5 cm].

Add ½” [12 mm] seam allowance to tie, yoke seams, shoulders, neckline, and hem.

cape layCUTTING

Cape Body – cut 1X self

Yoke Back – cut 1X self

Yoke Front – cut 2X self

Cape Tie – cut 1X self

Cutting Tip: Align front edges of pattern pieces on selvedge of fabric for a neat  seam finish.

ASSEMBLY

1. With right sides together (RST), fold tie in half lengthwise and sew each end of tie leaving neck measurement open at center. Trim corners and turn RIGHT SIDE OUT. Set aside.


2. With right sides together, sew yoke fronts to yoke back at shoulders.  Grade seams and fold along shoulder seam with wrong sides together. With yoke FACE UP, sew dart at shoulder seam and secure shoulderline on underside with stay tape.


3. With wrong sides together, sew up darts along neckline on yoke.


4. With RST, sew yoke to body along yokeline. Grade seam and press upward. With garment FACE UP, topstitch yokeline.


5. Turn in 1” [25 mm] along CF edge. Topstitch in place.


6. Align and match tie to neckline of cape. Sew tie to neckline. Tuck seam allowance into tie and slip-stitch opening closed.


7. Hem sweep of cape.

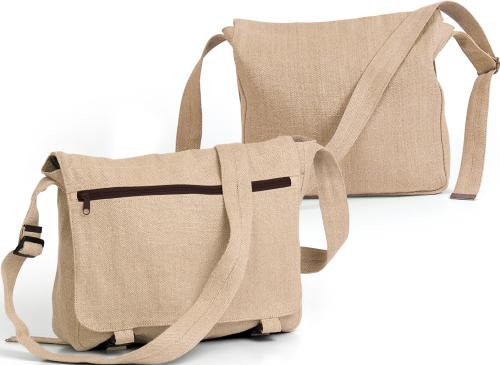
CMB1Featured: Messenger Bag by Ecolution

Originally created for hard-working couriers, the classic Messenger Bag has been in circulation for several decades. Known for its long-lasting rugged durability and distinctive “envelope” styling, the classic Messenger has been adopted around the world as the everyday all-purpose carryall. Make a simplified version for yourself in hemp, similar to the featured tote from eco-friendly, Ecolution.

You will need:

  • 1 ¼ yds. [1.2 m] of hemp or organic cotton canvas, 54″ [137 cm] wide.
  • ½ yd. [0.5 m] of cotton sateen lining, 54” [137 cm] wide
  • 1 ½ yds. [1.4 m] of fusible interfacing, 45″ [114 cm] wide.
  • 1 closed zipper, 12” long *
  • 1 buckle slider, 2” inner dia. *
  • 1 belt tip hardware, 2” wide *
  • matching cotton thread
  • grid paper

* Match zipper to colour/metal of hardware.

BAG DIMENSIONS:             approximately 4″ x 11.5″ x 14″.

[10 cm x 29.5 cm x 35.5 cm]

PATTERN

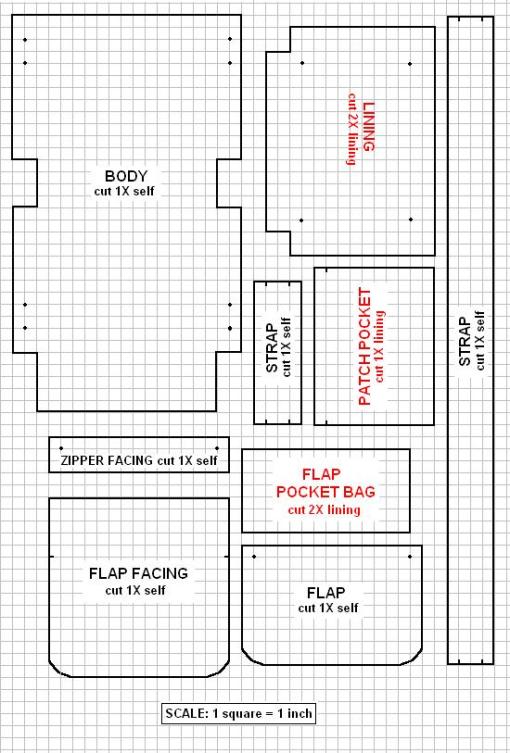
Scale: 1 square = 1 inch (25mm)

bag draft

Add seam allowances to all pattern pieces.

CUTTING

bag layBag Body – cut 1X self; cut 1X fusible

Shoulder Strap – cut 1X self

Strap Tab – cut 1X self

Flap – cut 1X self; cut 1X fusible

Flap Facing – cut 1X self; cut 1X fusible

Zipper Facing – cut 1X self; cut 1X fusible

Bag Lining – cut 2X lining

Patch Pocket – cut 1X lining

Pocket Bag – cut 2X lining

ASSEMBLY

1. Iron fusible interfacing to back (wrong side) of bag pieces following manufacturer’s directions, except for strap pieces.

2. Make up bag straps. With right sides together (RST), fold strap pieces in half lengthwise and sew along long edge. Press seam open. Align the short ends so that the seam is centered in the middle of the strap width. Stitch across one end only. Trim corners. Turn straps RIGHT SIDE OUT. Press flat with long seam at center. Topstitch around perimeter of straps if desired. On open end, attach a metal belt tip on long strap and a buckle/slider on the short strap. Set aside.

3. Prepare bag lining. On the patch pocket, turn under the top edge ¼” [6mm] and press. Turn top edge once more: ¾” [20mm] and stitch down. Turn and press seam allowance on remaining three sides.

With one of the bag lining pieces FACE UP, center the patch pocket and edge-stitch along pocket sides and bottom.

With RST, center-align and match flap facing to top of body lining piece.

With RST, align and match remaining bag lining piece to this lining section. Stitch side seams and press open.

Stitch 2” [50mm] on each end of the bottom seam; then align the side seam to the bottom seam and sew across the seams to create a miter. Set aside.

stay4. Prepare flap pocket. Begin by aligning the zipper facing with the top of the flap, right sides together.  Stitch an outline of the pocket opening equal to the length of the zipper teeth X half the zipper’s width.

(eg. 12 inches X ⅜” + seam allowance)

Carefully clip diagonally at the corners of the stitching and turn the zipper facing FACE UP. Press seam flat.

zipperWith the flap piece FACE UP, align and center the zipper FACE UP in the indentation. Edge-stitch around pocket opening to secure the zipper.

With RST, sew one pocket bag piece to the bottom edge of the zipper facing.

Flip the lining downward and topstitch along the seam.

With flap piece FACE DOWN, align and match remaining pocket bag piece to top of zipper. Stitch zipper to lining; then stitch sides of pocket bag.

Trim the excess from the lining on the bottom of the pocket bag and sew bottom seam. Set aside.

miter5. Construct the body of the bag. With RST, fold the bag body together and match up the side seams. Sew side seam and press open.

Miter the bottom corners by aligning the side seam in the center of the bottom edge and stitch across the seam.  Turn bag RIGHT SIDE OUT.

With RST, align and match top of body to flap. Stitch across top edge, ensuring the catch the zipper tape in the seaming. Grade seam allowance and press seam away from zipper. On the FACE SIDE, topside along the zippered seam.

6. Assemble the bag. With RST, insert bag body into bag lining. Align and match up outer edges of flap and flap facing. Line up the raw edges of the bag x stitchopening. Stitch around the opening and the flap. Grade and trim seam allowances. Turn bag RIGHT SIDE OUT through opening in bottom of lining. Press the perimeter of the flap and the opening edge flat. Top-stitch around flap and opening.

Slipstitch opening in lining closed.

7. Complete the bag. Align the square end of the straps to each side of the messenger bag. Place each approximately 4” [10 cm] from the top edge of the bag opening and sew an X-stitch through all layers. Hook the shoulder strap into the buckle slider and adjust the desired length.


UPDATE: Though this blog is closed now, I have been getting inquiries about this simple zipper application. Here are the steps:

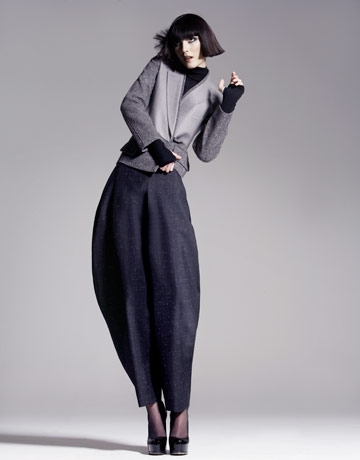
stefano pilati for YSLFeatured:  Stefano Pilati for YVES SAINT LAURENT

Explore volume and proportion by challenging conventional principles of tailoring for your Autumn wardrobe. Here is a great example by Stefano Pilati for YVES SAINT LAURENT, a ‘zoot’ trouser balancing a fitted cropped top. The pattern draft is a bit more advanced for those daring to try pleated trousers yet it is an easy project to construct.

You will need:

  • Bottom-weight fashion fabric, 54” [137cm] wide **
  • ¼ yd. [0.25 m] of fusible interfacing, 45” [114cm] wide.
  • ⅓ yd. [0.30 m] of pocketing fabric, 45” [114 cm] wide
  • 1 zipper, 7” [18 cm] long.
  • 1 set of pant hook & bar
  • Kraft paper

** A minimum of 3 yards of fabric is required for pleated trousers – for an average sized person. If you’re taller than 6′ – you’ll need 3 1/2 yards of fabric.

MEASUREMENTS

Waist – measure around narrowest part of torso just above the navel.

Hip – measure around fullest part of seat, about 9” [23cm] below waistline.

Body Rise – measure vertically from waistline to top of chair seat, while seated.

Outseam – measure vertically from waist to heels.

Trouser Bottom Width – measure length of foot.

PATTERN

Easy Fit template for “baggy” trousers.
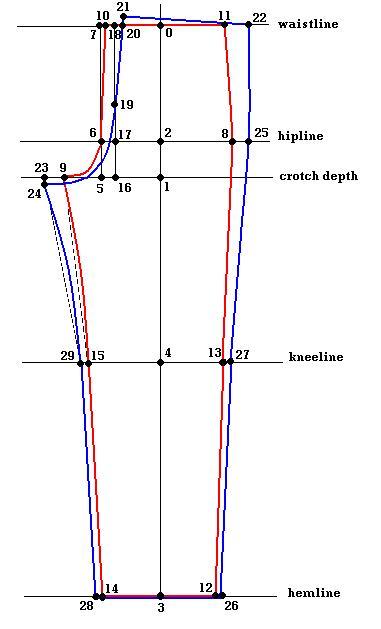
easy fitting pant draft

Front (Red)

Draw a long straight line down center of the paper and plot point 0 at the top end.

Square both ways from 0.

0-1 = body rise – waistband width + ⅜” [10mm]; square across.

0-2 = 9” [23cm] – waistband width; square across.

0-3 = outseam – waistband width; square across. (creaseline)

1-4 = half the measurement of 1-3 minus 2” [50mm]; square across.

1-5 = 1/12 of hip + ¾” [20mm]; square up to locate 6 and 7 at intersections.

6-8 = ¼ of hip + 1” [25mm].

5-9 = 1/16 of hip + ⅜” [10mm].

7-10 = ⅜” [10mm].

Join 10-6 with a straight line and 6-9 with a smooth curve, missing 5 by approx. 1 ⅜” [35mm].

10-11 = ¼ of waist + 2” [50mm].

3-12 = ½ of trouser bottom width – ¼” [6mm]; join 8-12 with a straight line. Mark point 13 on kneeline.

Draw in side seam; join 8-11 with a slight curve.

3-14 = ½ of trouser bottom width – ¼” [6mm].

4-15 = the distance of 4-13.

Draw inside leg seam; join 14-15 with a straight line; join 9-15 with a slight curve inwards ⅜” [10mm] as shown.

Back (Blue)

5-16 = ¼ of measurement 1-5; square up to locate 17 on hipline and 18 on the waistline.

16-19 = half the distance 16-18.

18-20 = ¾” [20mm].

20-21 = ¾” [20mm].

21-22 = ¼ of waist + 2 ⅜” [60mm]; join 21-22 to touch the horizontal line from 0.

9-23 = half the distance 5-9.

23-24 = ⅛” [3mm].

Join 21-19 with a straight line; join 19-24 with a deep curve missing 16 by approx. 1 ¾” [45mm].

17-25 = ¼ of hip + ¾” [20mm].

12-26 = ⅜” [10mm].

13-27 = ⅜” [10mm].

Draw in side seam; 22-25 curves outward slightly; 25-27 curve inwards slightly and join 27-26 with a straight line.

14-28 = ⅜” [10mm].

15-29 = ⅜” [10mm].

Draw inside leg seam; join 28-29 with a straight line; join 29-24 with a curve inwards by ⅜” [10mm].

Design Note: PUT EXTRA EASE IN THE SEAT ANGLE (CB seam)

Most easy fitting trousers require extra ease in the back crotch line, especially pleated pants. Trace off back section of trouser template and add more ease. Begin by, cutting along the hipline and spread open a wedge as desired, approximately 1 ½” [40mm] wide at the back CB line. (The more rounded the behind, the greater the seat angle.) Re-draw the back seam curve as shown.

easy fitting pant adaptation

Style Adaptation

Pleated “zoot” trousers are full at the waistline and shaped in at the hem.

Trace round basic easy-fit trouser template onto additional paper.

Back Section *

Add additional ease in CB seam if necessary (see above).

Mark points (a) and (b) on hemline ¾” [20 mm] inward from leg seam.

Draw straight line from (a) to kneeline.

Draw in a bowed outseam (curve) from hipline tapering to (b).

Shape the bottom hemline with a slight curve outward ⅜” [10mm]. ***

Divide line 21-22 into 3 equal parts. At each point, draw in a waist suppression dart.      (2 in total).

Dart = 1 ⅛” wide x 4” long [30mm x 100mm].

Front Section *

Trace round front trouser template onto additional paper.

Cut across kneeline; then cut top section dividing along the crease (grainline). Spread open at waistline for desired amount of pleating and extend waistline at side seam to blend smoothly with outseam of leg.  (For instance, open 2” [50mm] at waist and extend 1 ⅜” [35mm] at side seam. With dart allowance this gives 4 ⅛” [10.5 cm] fullness).

Divide fullness into 3 equal pleats.

Design Note: More fullness can be added at the waistline by opening the grainline further at the waist and making deeper pleats.

Mark points (c) and (d) on hemline ¾” [20 mm] inward from leg seam.

Draw straight line from (d) to kneeline.

Draw in a bowed outseam (curve) from hipline tapering to (c).

Shape the bottom hemline with a straight line. ***

Grainline is parallel to creaseline.

For fly & fly facing *, trace off CF seam and waistline from 10.

Draw a parallel line 2” [50mm] from CF line and taper 1” [25cm] below zipper notch.

Grainline is parallel to CF line.

For waistband *, draw a long rectangle equal to the waist measurement X desired width.

Add a 2” [50mm] extension to one short end of pattern.

pocketMirror the final dimensions of the waistband along the foldline.

Grainline is parallel to foldline.

For sideseam pockets, make a pocket bag pattern *.

A-B = 9” [23 cm]; square across from A and B.

A-C = 6” [15 cm]; square down to locate D.

A-E =  6” [15 cm]; square across.

B-F = 1” [2.5 cm]; square up to G.

Draw in an arc with a compass from H to I as shown.

Fold paper on line C-D and trace off C-A-E-G-H-I-D as mirrored image. Open flat for bag pattern piece.

Grainline is parallel to foldline.
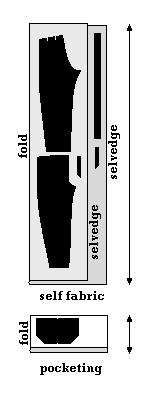
lay* Add seam allowances to all pattern pieces.

*** Add 1 ¼” [30mm] hem allowances to trouser bottoms.

CUTTING

Front Leg – cut 2X self

Back Leg – cut 2X self

Waistband – cut 1X self

Waistband Interfacing – cut 1X fusible

Fly – cut 3X self

Pocket Bag – cut 2X pocketing

ASSEMBLY

1. Fold pocket bag piece in half crossways and stitch a French seam along curved edge of bag. Set aside.


2. Iron fusible interfacing to back (wrong side) of waistband, following manufacturer’s directions. Set aside.


3. Fold pleats along waistline of front trousers and baste down. Set aside.


4. Sew waist darts on back trouser. Set aside.


5. Finish seams on all cut pieces with pinking shears or overlock machine.

6. With right sides together (RST), align and match side seam of front and back trouser legs. Leaving a 6” opening from top edge of cut pieces for pockets, sew up the side seam and press open.

Attach a pocket bag to each seam allowance at the opening and stitch in place. Set aside.


7. flyWith RST, sew curved edge of fly facing. Grade seam allowance and turn RIGHT SIDE OUT. Press seam and topstitch. With the fly facing FACE UP and the curved edge to your left, stitch the zipper FACE UP to the straight edge of the fly facing (fig.1). Set aside.


8. With RST, sew fly to right front leg. Grade seam allowance and press seam to one side. Under-stitch fly.


9. With RST, align and match front pieces along CF line and crotch. Stitch from bottom of fly to within 2” of the inseam.

10. With the fronts FACE UP, sew the fly facing FACE DOWN to the left front leg. This will encase the zipper into the CF seam. Flip the zipper FACE UP and edge-stitch along the zipper teeth (fig. 2).


11. Lay the front of the trousers FACE UP. Align the CF line and smooth out the fly opening. Baste the fly opening shut. Once completed, fold the fronts in half with the left front leg on top. Pin back the fly facing to reveal the zipper FACE DOWN on the fly. Stitch the zipper tape to the fly. (fig. 3) Baste curved edge of fly to left front.


12. With garment FACE UP, sew a J-stitch to secure the fly. Begin with a bar-tack at the bottom of the fly opening and topstitch the J-stitch following the basting thread markings up to the top.


13. With RST, align and match back and front at the inseam. Baste/pin raw edges together along the inseam of each leg. Sew inseams and press seam open.


14. crotch1Pull one leg RIGHT SIDE OUT and drop down into other leg. Align and match up inner leg seam and CB crotch seam. Baste/pin crotch seam. Sew seam from bottom of fly to top edge of back section (in a U-shape). Turn garment RIGHT SIDE OUT and set aside.


15. Turn under seam allowance on one long edge of waistband and press flat. Fold waistband in half, with RST and stitch up short ends, allowing for seam allowance. Trim corners and grade. Turn waistband RIGHT SIDE OUT.


16. Pin raw edge of waistband FACE UP to inside edge of trousers waistline, allowing for 2” [50mm] extension on left-hand side of waistband. Ease in waistline onto waistband. Baste across top of pocket bag and pleats. Stitch waistband to waistline, ensuring to catch top of front pocket and pleats in the seaming. Grade seam allowance and turn up into waistband. Align and match folded edge of waistband to machine-stitching on FACE SIDE of garment. Edge-stitch the waistband to the garment.


17. On each cuff bottom, turn up 1 ¼” [30mm] hem. Turn under ¼” [6mm] and hand-stitch hem in place.


18. Hand-stitch set of hooks and bars onto the waistband, just above the zipper.


Design Tip: Design the waistband width ½” [12 mm] greater than the width of your favourite belt and add belt loops.

lacy-camisole-ella mossFeatured: Ella Moss Camisole

Lacy lingerie-inspired camisoles are the hottest tops for summer. Treat yourself to a fluid bias-cut top, similar to this one by L.A.’s Pamella Protzel for Ella Moss. The “bias-cut” technique is used by designers for cutting clothing to utilize the greater stretch in the bias or diagonal direction of the fabric, causing it to accentuate body lines and curves and drape softly, thereby eliminating the need for darts.

You will need:

  • Approx. 1 ½ yds. [1.4 m] of fashion fabric, 45” [114cm] wide.
  • ½ yd. [0.5 m] of insertion lace, 1” – 2″[25-50 mm] wide.
  • Coordinating thread
  • Kraft paper

MEASUREMENTS

Bust – measure around fullest part of chest just under the arms.

Armhole Depth – measure vertically from top of shoulder to armpit level.

Neck – measure around base of neck.

Back width – measure across shoulder blades from armpit to armpit.

Back waist length – measure vertically from nape of neck to waist line.

PATTERN

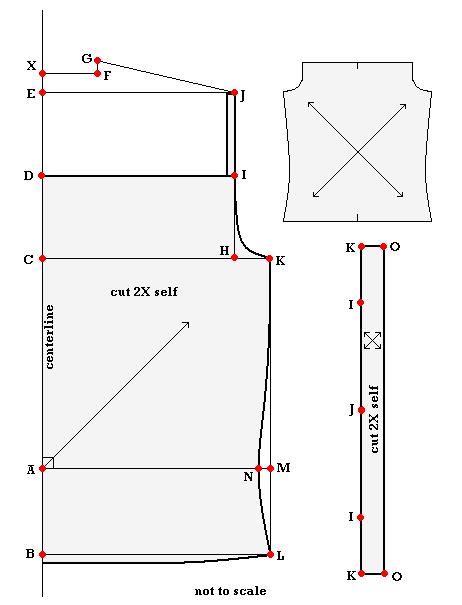
bias2

Fold paper in half lengthwise. Plot X at the top of the foldline.

Along the foldline, square across from X at a 90° angle.

X-A = back waist length + ⅜” [10mm]; square across.

A-B = 6” [15.2 cm]; square across.

X-C = armhole depth + ⅝” [15mm]; square across.

X-D = half the measurement X-C; square across.

X-E = one fifth the measurement X-D; square across.

X-F = one sixth the neck size; square up.

F-G = ¾” [20mm].

C-H = half of the back width – ⅝” [15mm]; square up to locate I and J at the intersection of lines.

Join G to J with a straight line.

C-K = quarter of the bust measurement – ⅝” [15mm]; square down to locate M on waist line and L on high-hip line.

Draw an armhole curve from I to K as shown.

M-N = 1 ⅝” [45mm]; shape sideseam with a smooth curve between K and L.

Shape the hemline at a 90° angle from L, missing B by ⅜” [10mm].

Draw a square box with 2 sides located at A. Draw a grainline through opposite corners of the box.

For shoulder strap, measure distance from J-I-K. Double the amount and plot it on a straight line.

K-O = 1 ⅝” [40mm]; join O-O and K-O with a straight line.

Draw a grainline at 45° to K-O.

Add seam allowance to body pieces except for armhole & shoulder straps.


Cutting Tip: Widen seam allowances for bias-cut. Although bias cuts don’t fray, the fibers on cut edges relax and open up, so even half-inch away from a cut edge isn’t an accurate stitching line. To your pattern pieces, add 1-1/2-inch-wide seam allowances. Use 1/2-inch seam allowances at the neckline for the lace trim. Always mark stitching lines with thread as soon as the fabric is cut, before removing the pattern pieces. Once sewing and pressing are done, seams can be trimmed.

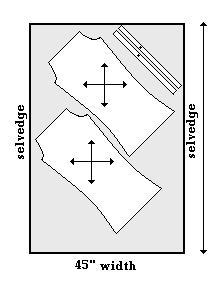
layCUTTING

Front – cut 1X self

Back – cut 1X self

Shoulder strap – cut 2X self (make longer than needed for shaping)

Trim – Cut length of lace to match width at top of the garment.

Fitting Tip: Pin/baste the fabric pieces together and try it on before you sew the garment. This is called trial fitting, and it allows you the chance to define the fit of the bias cut with better accuracy and mark the stitching lines. If you’re sewing a garment for someone else, have them try on the fitting. Allow enough “ease” to slip over the head.

ASSEMBLY

  1. Sew a narrow double-rolled hem across the top edge of the back piece turning it to the inside.
  2. Fold the top edge of the front piece to the outside and stitch along folded edge. Trim seam allowance close to stitching. Lay insertion lace on top of finished edge and edge-stitch across the bottom of the trim.
  3. bindingWith right sides together, align and match front to back at side seams. Stitch 1” [25mm] from top edge on stitching line. Stay-stitch the armholes.
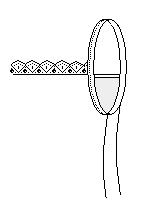
  4. For shoulder straps, fold the strap pieces in half along its length with wrong sides together to create a bias binding; press lightly. Turn in cut edges of binding to crease of foldine; press. Re-fold center crease and press.
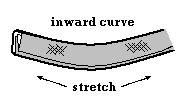
  5. strapPre-shape the bias binding to match armhole edge of garment by stretching the two folded edges to match the shape of the inward curve of the armhole.
  6. Pin/baste binding to armhole, beginning at side seam, and extend the binding as a loop for the shoulder strapping as need. Continue by joining ends on straight grain; turn in one and lap over the other to complete. Stitch the open edge of the binding to the armhole and continue stitching to make the shoulder strap.
  7. Baste your bias-cut garment together along the side seams and drape onto a dressform or let it hang for a day or 2 before you use your sewing machine to complete the seams. This will help to smooth your seams out and encourages the fabric to stretch naturally. Thread-mark the stitching line again if necessary.
  8. Stitch the side seams following the basted stitching line. When stitching seams on your bias-cut garment, be sure to go slowly and allow the fabric to take its natural shape, rather than pulling it taut as you pull it through the sewing machine. It is best to stitch the seams in short bursts, allowing the fabric to relax and take its natural shape each time before continuing. Likewise, once the seams are stitched, allow the garment to hang for a while before you hem the bottom. This will allow the garment to develop a natural fall and ensure that the hems are straight and smooth. When ironing the hem, do not move the iron side to side along the hem as you would with a normal cut garment; instead, move the iron along the line of the bias.
  9. Trim excess away in seam allowance. (I prefer to pink the seam allowance rather than overlock the raw edge.)
  10. Make a narrow rolled edge on the hemline.

Bias-cut garments don’t wrinkle as easily as straight-grain garments do, but they can “grow” on a hanger, so always store them folded and flat.