
A fun and fabulous trend from the runway that works for all “non-model” body shapes! Baby-doll dresses, with their forgiving fit and romantic feel, are the smart choice for balmy summer weather. Flirty, flowy, and feminine, they are a perfect staple for work, weekend, or travel. Wear with flat sandals for day and transform for night with strappy stiletto heels or wedges. For instant effortless style, choose one in a bold, solid color or floral print, like this one from Nicole Miller at Bloomingdale’s. And if you’re feeling extra daring, try a geometric pattern. Best of all, these dresses work wonderfully well with this season’s essential accessories. Try layering with leggings underneath for a not-so-hot day or cinch high above the waist with a funky belt for an edgier look. Baby-doll dresses have surfaced as one of the most prominent fashions in the collections of designers everywhere. Given the emphasis on short hemlines and loosely fitted clothes, it was perhaps inevitable. There’s only one requirement: a great pair of legs.
THE PATTERNDRAFT
Let’s begin by folding the paper in half, lengthwise (for symmetry).
At the top of the paper, square a line across from the fold.
From this line, measure along the fold the finished length of the dress.
For example, the finish length of the model photo is 28″.
Square a line from this point across the paper from the fold.
Now along each of these draftlines, measure half the hip or bust measurement plus 6 inches (whichever is larger).
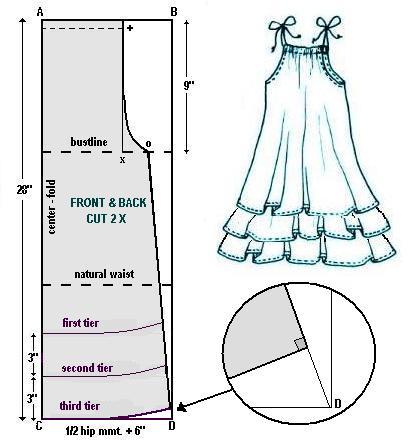
Join each point to create a rectangle. Label ABCD.
From line AB, make a parallel line 9 inches down the fold.
Divide this line into three equal sections and label the second third, point X. Square up from X.
Divide the distance from X to the edge in half. Label point O.
Join a straight line from O to D. (side seam)
Parallel to line AB, draft a line across from fold 1 inch. This will be the foldline for the drawcord casing.
Where it intersect line X, label +. Swing a shallow curve from + to O as shown.
Above point D, place a set-square on the sideseam line (OD) and draw in hemline with a smooth curve blending into the line CD from the 90 degree angle. [see bubble for detail].
For the three tiers, draw two parallel lines from line CD, each 3 inches apart.
Trace off each tier for each layer of the dress. [do this on folded pattern paper].
Add seam and hem allowances. Open the folded paper for the complete pattern piece. Indicate the straight grain parallel to the foldline with a grainline on each pattern piece.
Each pattern piece is cut 2 times and is used for both front and back portions.
- Stitch up sideseams and hem.
- Layer 2 tiers together and drop third tier inside by stitching together at armholes before turning right side out.
- Fold over top edge to create a casing and thread drawcord to create gathered neckline.

