tiesFeatured: Silk ties by Terrence Dobbs

Make Dad your own specially-designed tie for Father’s Day.

Fresh from the Hamptons, Terrence Dobbs will inspire you with his ‘Father & Son’ ties.

You will need:

  • 1 square yard [meter] of fashion fabric (try something silky)
  • coordinating thread
  • kraft paper

THE NECKTIE PATTERN

This tie is drafted by height.

The four major parts of the necktie draft equation are the length of the tie from the big tip to the knot, the knot itself, the tie around the neck, and finally the tail end of the tie that is hidden behind the front of the tie. The length should be reasonable so that when one tip is touching the belt buckle, the other tip can be securely held in place in the carrier on the back side.

Height = measure vertically from top of head to heels.

Neck measurement = measure around base of neck.

Tie Width = 3.5 – 4 inches [9-10 cm] (it can vary on current fashion)

Tie Knot = 5 inch allowance [12.5 cm] (Half-Windsor type)

Take a length of kraft paper and fold it lengthwise. (You may glue 2 pieces together if needed).

Along the fold, plot the following:

draftA-B = 0.30 of the height

B-C = neck measurement + ½” [12mm]

C-D = knot allowance

D-E = 0.30 of the height – 3” [75mm]

Square 90° across from foldline at all points.

F-C =  0.75 of tie width

G-C = C-F

Join F and  G with a straight line.

H is mid-point of F-G.

I-C = C-D

J-I = C-F

K-A = tie width; square up.

L-K = K-A

M-L = K-A

Join M to J with a straight line.

Join L to H with a straight line.

Using a set square placed on line L-H, square a line from A to locate N on line M-J.

Join L-A and L-N with a straight line.

O-E = 0.50 of the tie width

O-P = E-O

P-Q = E-O

Join Q and  F with a straight line.

Join P and  H with a straight line.

Using a set square placed on line P-H, square a line from E to locate R on line Q-F.

Join P-E and P-R with a straight line.

Join F to J with a straight line.

At B and D, draw a 1” x 1” square [25mm X 25mm] with one of its sides positioned on the foldline.

Add 3/8” [1cm] seam allowance around the perimeter of the tie pattern.

grainlineCut out the tie pattern and open the folded paper.

Extend line F-G across the pattern piece. Cut through line F-G.

Draw a grainline through opposite corners of the square box at B and D.

CUTTING

layCut 1X self for upper portion of tie.

Cut 1X self for under portion of tie.

Cut 1X self for carrier – 6” X 2 ½” [150 mm X 65mm]

Tip: A rotary cutter is ideal for cutting fabric on bias grain.

ASSEMBLY

1. Make a carrier loop 6 inches by 1 ½ inches [150mm X 40mm].

2. With right sides facing, align and match upper and under portions of tie together at center seam. Pin/baste and stitch seam using a ¼” [5mm] seam allowance. Press seam open.

3. With right sides facing, align and match each tie end along raw edges. Pin/baste and sew each tie point using a 3/8” [1cm] seam allowance. Press seam open. Grade and trim points. Turn tie right side out.

Tip: A wooden chopstick lets you get into tight corners when pressing a seam open.

4. Fold the tie fabric with wrong sides together; align and match raw edges along length of tie. Baste both layers together.

This tie is self-lined. Select which side of the tie will be the face side.

5. Fold the tie carrier in half to form a loop and secure it 10” [25.5cm] from the front tip on the face side of the tie. Sew it to the seam allowance.

6. With the tie face down, fold the basted raw edge 3/8” [1cm] over the center of the tie along its length. Herringbone stitch along the raw edge catching only the top layers of fabric.

Tip: Use waxed thread and a new needle whenever doing hand-stitching.

7. Place the folded edge over the basted raw edges and align to center (careful  not to stretch fabric).  Slipstitch along folded edge, catching only the top layer of fabric to complete the tie.

8. Without touching the  fabric, gently steam the tie  shape. Let fabric cool before handling. (Do not press the tie.)

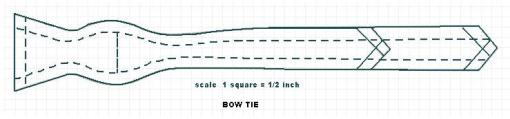
Old-fashioned silks or snazzy brocades, pop polka dot or preppy pinstripes. Or score vintage fabrics from thrift stores or even from clothes that might be out of date. Solid or stripe, paisley or Art Deco, a bow tie can do a rare thing to a man’s wardrobe: add notes of polish and surprise at the same time. Bow ties traditionally come in two varieties, the classic thistle or butterfly cut, (as pictured here) and the sleeker bat-wing variety. Hugh Laurie or Elvis Costello? Sean Combs or Daniel Craig? Which one you prefer depends on whether you’re going for a tongue-in-cheek panache or a certain punk minimalism.

Beats fashion, and according to the New York Times, the bow tie is back this year. That’s the great thing about being playful with your wardrobe – sooner or later everything will be in vogue again.

CLASSIC THISTLE BOW TIE

Dimensions: 4.5″ long x 2.5″ wide

You will need:

  • 5/8 yard of silk fabric, 45″ wide
  • 1/4 yard of fusible interfacing, 45″ wide
  • coordinating thread
  • 1 bow tie set *

PATTERN

Enlarge the pattern on graph paper. Scale is 1 square = ½ inch

ASSEMBLY

1. Cut along the pattern’s thick solid lines for a classic thistle shape bow tie, using the outline for the longer piece first. Fold the fabric in half. Pin the pattern to the fabric, aligning it parallel to the fold (or, if you want diagonal stripes, at a 45-degree angle to the fold). Cut the fabric through the two thicknesses.

2. Repeat the process, using the pattern for the shorter piece. Now you’ll have two long pieces of fabric and two shorter pieces.

3. Cut out one long piece and one short piece from the interfacing. Iron the interfacing to the wrong side of one of each length of the fabric pieces, according to manufacturer’s directions.

4. Pin the right sides together of each bow tie section to each interfaced bow tie section. Stitch using ½ inch seam allowance, leaving a 2-inch-wide opening along the straight side of both pieces.

5. Grade the edges (trim ¼ inch from the top edge to reduce the bulk) and trim the corners, then turn each piece right-side out  (I use a loop turner)  and steam press. Slip stitch the openings.

6. Attach the pieces of the bow tie set: Thread the end of the longer tie piece through the adjuster, then through one of the hook pieces. Slide the end of the tie back through the adjuster and slip stitch the end in place. Thread the shorter tie piece through the other hook piece, turn back the end and slip stitch the edges.

* A bow tie set is a very inexpensive pair of hooks and a metal adjuster that attaches to both ends of the tie. This allows you to adjust the circumference and to tighten and loosen the tie once you’ve put it on. To find bow tie sets, check the notions section of your local fabric or tailor supply stores.

Jockey shorts are a no-no but boxers are a capital YES. No longer relegated to the underwear department, boxer shorts are everywhere. Teens wear them with T-shirts, men and women wear them for sleep shorts and athletes wear them for playing basketball. Boxers are easy to make, requiring only one pattern piece, and no fitting. So ditch those tighty-whities and embrace a new style of colourful drawers today!

You will need:

  • 1 yd. [1 ¼] of cotton fabric (45″wide) for waist 24″-36″ [37″-45″] *
  • 1 ½” wide sew through sport elastic, buy waist measurement minus 3 inches.
  • Coordinating cotton thread
  • Kraft paper
* Buy 1/2 yd. more when sewing directional prints, matching a pattern repeat, or making legs longer than 3 ½”.

MEASUREMENTS

Waist – measure around the waistline at navel level

Hip – measure around fullest part of hipline 9″ below waistline

Rise – while sitting measure side of body from waistline to top of seat.

PATTERN

Draw a straight line across top of kraft paper. Label point 1 as shown.

2 from 1 = half the hip measurement + 4″

3 is squared from 2 = rise measurement + ½”

4 is squared from 1 = rise measurement + ½”

5 from 1 = quarter of the hip measurement + 2″

6 is squares from 5 = rise measurement + 9″

7 from 3 = 2 ½”

8 is squared from 7 = 8 ½”

9 from 4 = 3 ½”

10 is squared from 9 = 8 ½”

Join points 8 –  6 – 10.

Point 11 is located midway between 9 and 10.

Using a set square, locate point 12 by drawing a 90° angle 1″ below line 8 – 10 joining points 6 and 11 as shown.

13 from 2 = 1 ½”

14 from 3 = 1½”

Join 13 and 14 to create the fly front on the centrefront (CF) line.

15 from 8 = distance of 11 – 12.

Join 4 – 11 with a smooth shallow curve as shown using a French curve.

Join 14 – 15 with a smooth deep curve as shown using a French curve.

Draw a grainline from point 5 to 6. Label the CF and the CB.

CUTTING INSTRUCTIONS: Cut 2X

ASSEMBLY

1. Once the fabric pieces are cut out, thread mark the center front line (dash line on diagram) on the left and right sides for reference in making the fly. Pin boxer fronts right sides together and baste.

2. Sew lower part of front crotch curve, using a 1/2″ seam allowance from inner leg to 1/2″ above fly-front extension. Clip crotch curve right under fly extension, clipping seam allowance to within 1/4″ of crotch curve stitching.

3. Place shorts on the table with the right sides of the fabric facing you. Decide which side of the shorts you prefer the fly front to lap. (Men’s shorts lap left over right, but if you are making them for women then no fly is need. Trim away the fly extension). Mark lap over side with “O” and lap under side with “X” on some low-tack masking tape and place on each appropriate front piece.

4. On “X” side, fold under 1/4″ on fly extension. Fold again so that the first fold lines up with center-front marking. Sew 1/8″ from fold.

5. On “O” side, fold in fly extension to the wrong side along center-front line. Fold again so that raw edge is enclosed and lap-over side has three thicknesses and the folded edge lies along center-front line. Stitch lap-over side of the fly into place along inside edge of fly extension. This stitching will show on right side of shorts.

6. Position fly onto its placement line and press. Topstitch horizontally across the bottom edge of the fly and across top edge of fly 2″ away from the waistline edge.

7. With right sides together, sew backs to fronts at inner-leg seam. Finish seam with flat fell or overlocked seam. Turn one leg right side out. Insert this leg into the wrong side out leg. Pin remaining crotch curve together. Sew back crotch curve, continuing stitching from front crotch curve. Clip curves and finish seam.

8. Boxers are now ready for the elastic casing at waist. Press down raw edge 1/4″ along entire edge of waistline. To form casing, fold the width of the elastic plus 1/4″ to wrong side of boxers. Topstitch casing closed, leaving a 3″ opening at shorts back to insert elastic.

9. Start out by cutting the elastic your waist measurement minus 3″ or use a pair that you own as your guide to how tight to pull in the elastic. Insert elastic into casing. Try on shorts to determine how snug you would like them to fit. (If the boxers are for sleeping, elastic should be looser. Teenagers like to wear them a little lower than the waist so longer elastic is preferable).

10. To join elastic, butt ends of elastic over a piece of fabric cut twice the width of the elastic. Wrap elastic with fabric scrap. Zigzag-stitch the ends of elastic to fabric scrap. This method eliminates bulk in elastic and works to prevent frayed ends from protruding. Close opening in casing.

11. To hem shorts, press under raw edge of legs under 1/2″. Fold again so that raw edge of fabric is enclosed. Pin and baste.  Topstitch hem into place.


shirt1How about an adult version of “connect-the-dots” to create some men’s wear? Sometimes known as a tropical shirt, Hawaiian or aloha shirt, this casual type shirt is loose fitting, short-sleeved and features a convertible collar with a rever. Make it up in a border print or traditional floral print fabric.

Take the following measurements of your man: chest, neck, arm length and finished length (usually hip level).


Note: 3/8″ seam allowance is included in draft

Working Scale = 1/3 chest measurement + 6″ (15.5 cm)

example: for a men’s medium size the scale = 42/3 + 6 = 20

PLOT EACH POINT & CONNECT-THE-DOTS

Mark point 0 and square both ways from it.

1 from 0 = ½ scale + 1″ (25 mm)

2 from 0 = ¼ scale

3 from 0 = 1/8 scale

4 from 0 = full length (30″/ 76 cm)

5 from 4 = 1 ½” (40 mm) for turn up.

Square all points across the paper.

shirt draft2

6 from 0 = 1/6 scale + 3/8″ (1 cm); square up to 7.

7 from 6 = 1 ¼” (32 mm)

8 from 1 = 1/3 scale + 2 ½” (65mm); square up to locate 9 and 10.

11 from 10 = 1″ (25mm)

12 squared from 11 = 1″ (25 mm); join 7 to 12.

13 from 1 = 2/3 of half the chest measurement + 2″ (50mm)

14 from 1 = ½ of chest measurement + 2 ¾” (70 mm)

15 from 14 is midway between 13 and 14; square up to 16.

16 from 15 = ½ scale + 2 ¼” (58 mm); join 16 to 10.

17 is the distance between 7 and 12 – ¼” (6 mm) and is located on line 16-10.

Join 17 to 13; 18 from 17 = 1 ¼” (32 mm) and is located on line 17-13.

19 is midway 8 and 13; square down to locate 21 at hemline.

20 from 19 = 1 ¼” (32mm)shirt2

Shape armhole as shown with French curve ruler.

22 from 21 = 1″(25mm)

Join 20 to 22 for forepart side seam.

23 is located at intersection of hemline and centerfront (CF) line.

24 from 23 = ¾” (20 mm); shape front hem from 24 to 22 with 90° corners as shown.

25 is located at intersection of lines squared from 16 and 14.

26 from 16 = 1/12 scale + ¾” (20mm)

27 from 25 = 1/6 scale

Connect 26 and 27 and continue 1 ½” (40 mm) more to locate 28.

29 from 16 = ¾” (20 mm) for collar stand and creaseline of rever.

30 and 32 are each 1 ½” (40 mm) from CF line (overlap extension) as shown.

31 from 30 = 1″ (25 mm); join 31 to 29 to indicate roll-line of rever.

33 from 27 = ½” (13mm) for collar step.

Fold along line 28-32; trace out front shoulder, front neckline and front hem.

Shape self-facing as shown, making it 3″ 75 mm) wide at hem and blending uo to the shoulder for 1 ½” (40 mm). Note: The gray-shaded area should be interfaced.

Grainline is parallel to CB and CF lines. The CB may be cut on the fold.

Convertible Collarcollar draft

Point 33 is the collar step for the collar and rever.

Trace out front neckline and rever, front shoulder, and roll line.

0 is located at intersection of roll line and shoulder

1 from 0 = back neck measurement (line 0-7 on body draft)

2 from 1 = 2″ (50mm)

3 from 0 = ½” (6 mm)

X is located where roll line crosses front neckline.

4 from X = 1 ½” (40 mm)

Shape 4 to 2 through point 3 with a French curve ruler.

5 from 3 = 1″ (25 mm)

Join 5 to 2 with a dash line and square on point 2 to locate 6 and 7.

6 from 2 = 2 ½” (65 mm)

7 from 2 = 1″ (25 mm)

Join 6 to 4 passing through point 3 with a French curve ruler.

To locate 8, swing an arc from 28 which is 2 1/8″ (55 mm) and another of equal size from 33.

Connect 8 to 33 and 8-7 with a slight curve. Then blend line 7-3-4. into point X.

Trace out as a separate piece for the top and under collar with the line 6-7 along a folded piece of paper.

Note: The under collar should be interfaced.

Grainline is parallel to line 6-7.

Short Sleeves*

* This may vary due to styling. Measure the circumference of the armhole from your draft.

sleeve draft

Fold paper in half lengthwise.

Plot point 0 on folded edge.

1 from 0 = 1/6 armhole circumference + 1″ (25 mm)

2 from 0 = half of arm length.

3 from 2 = 2″ (50 mm)

4 from 0 = ½ armhole circumference (as it falls on line 1)

5 from 3 = 1/3 scale.

Divide 0-4 into 3 equal parts to locate 6 and 7.

8 from 7 = 3/8″ (10 mm)

9 from 7 = ¾” (20 mm)

10 from 6 = 5/8″ (17 mm)

Shape front sleeve cap 0-8-6-4 with a French curve ruler.

Shape back sleeve cap 0-9-10-4 with a French curve ruler.

Trace out the sleeve and the sleeve cap back portion.

Fold along line 3-5 and trace out bottom facing as shown.

Unfold paper for full short sleeve pattern piece

Note: grainline is located on line 0-2.