August 2007


Volume is one of the fashion directions for Autumn/Winter 2007. The new volume is dramatic, often shocking in its surprise. But most importantly is it does feel new, modern and forward looking however revived or archive raided.

armani_fall 07

That ‘bubble’ hasn’t burst for the bubble skirt, according to Armani, who made the shape the foundation of his new silhouette for fall. Extra volume in clothing is everywhere. The general silhouette is showing a growing acceptance of fullness in all areas and whatever your physique, the trick to carrying off volume is to avoid choosing a garment that makes the body look over burdened with masses of fabric.

Milan Fashion Week continued to play with the airy volumes that designers here seem set on carrying forward into Fall ‘07. Armani’s bubble silhouettes weren’t full jack-o’-lantern sized, but slimmer, prettier versions, softly draped at the hem and worn with flats for a youthful look. If you wear the bubble skirt make sure the top half has a closer fitting bodice, sleek jacket or knit. If you have good waist but saddle bag thighs, cover the thighs with a cinched waist fuller skirt with hemline interest. Many in the collections featured hemline interest trimmed in velvets, fur, or lace.

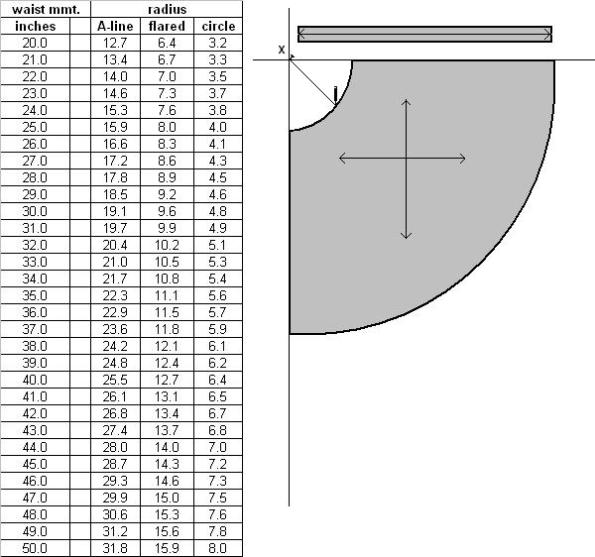
THE BOUFFANT SKIRT PATTERN

bouffant draft

Drafting Method (overskirt):

1. Square the line A-B-C at right angles (90°) on kraft paper.

2. The waist measurement multiplied by 2 divided by 22 multiplied by 7 will equal the radius which is applied from point A to point D.

For example:

The waist measurement

= 66 cm (26”) x 2 = 132 cm (52”)

Divided by 22 = 6 cm (2 1/4”)

Multiplied by 7 = 42 cm (16 ½”)

Therefore D from A = 42 cm (16 ½”)

3. Swing an arc A through D to establish E. This is the waistline.

4. Swing an arc through B for the required skirt length plus 30 cm ( 12”) for blousing. Mark point C. This is the hemline.

5. The skirt is bias-cut with the centerfront grainline established at 45° angle at point A. This pattern is cut 2X. NOTE: Use a crisp textured fashion fabric for best results.

6. Reduce the hem via darts which must be evenly spaced as the diagram illustrates, to approximately half its circumference.

7. Prepare the underskirt to the appropriate length. (reduce skirt length by 10 cm (4”) to create the blousing.

8. Stitch seams along B-D and C-E. Gather overskirt at the hem and the waist to fit the underskirt. Set into a waistband.

underskirt


One pattern – 3 skirts styles…. A-line, flared, or full circle skirt fits a variety of body sizes and shapes. Easy peasy!
skirt illustration
You’ll need:

  • pencil
  • ruler
  • string
  • thumbtack
  • tape measure
  • kraft paper (36″ long X 36″ wide)

3-in1 skirt pattern

Drafting Method:

1. Square a line across the width of the paper and down its length with a ruler to create a 90 degree angle. Label the intersection, X.

2. Measure your waist.
3. Select the radius of the skirt style you wish to create based on your body measurements from the chart provided.
4. Tie a length of string to the pencil. Make the length of the string equal to the selected radius. (eg. for an A-line skirt to fit a 29″ waist, make the string 18-1/2″ long)
5. Pin the loose end of the string at point X using the thumbtack.
6. Extend the string taut with the pencil held steady and upright at 90 degrees and draw an arc from the horizontal line to the vertical line on the paper. This is the waistline.
skirt lengths
7. Next, decide how long you wish to have the finished skirt length. Mini, knee length, mid-calf, maxi? Measure on your body from waist to the desired hem length.
8. Take a second length of string and attach it to the pencil. Make the string length equal to the radius amount plus the skirt length measurement. Pin the loose end of the string at the X and create a second arc on the paper. This is the hemline.
9. Lastly, create a waistband. Fold a piece of paper along its length. Measure along the foldline the full waist measurement plus 1 inch. Make the width 1 inch and mark a line parallel to the foldline and square the short ends.
10. Add seam allowances to all pattern pieces. Cut out skirt body. Cut out waistband piece on the fold and open flat.
11. Mark grainlines on pattern pieces. The waistband grainline is parallel along the foldline. The skirt grainline is parallel along either straight edge of the pattern.

12. For an A-line skirt – cut 1x; for a flared skirt – cut 2x; for a full circle skirt – cut 4x. Sew each panel along straight edges, leaving a opening for zipper. Cut the waistband 1x, and attach to waistline, allowing for a 1″ lapover extension. (Precautionary note: before stitching waistband to skirt body, try on skirt to determine if waistline needs to be adjusted). Hem with a narrow double-turned hem.