pencil-skirt

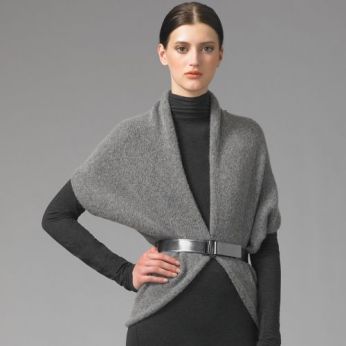
Featured: DKNY Pencil Skirt

Both sexy and classy, the pencil skirt creates a flattering silhouette on every woman, no matter what size. Pair it with an all-business top for work, then slip into a pair of sleek stilettos to glam things up at night. The elastic waistline allows for an adjustable fit and may be worn with a purchased belt. This version of the pencil skirt is fully-lined.

You will need:

  • 1 yd. [0.9 m] of fashion fabric, 45″ [115cm] wide
  • 1 yd. [0.9 m] of  lining, 45″ [115cm] wide
  • 1 yd. [0.9 m] of elastic, 1 ½” [40 mm] wide
  • Coordinating thread
  • Bodkin

PATTERN

skirt-draft

This is a simple block pattern. It may be measured and cut directly on the fabric. Seam allowance is included.

CUTTING

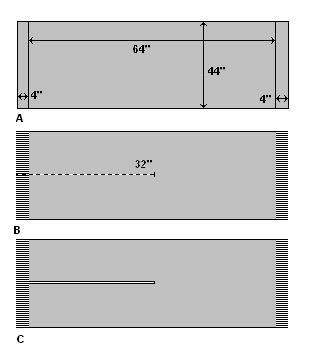
Skirt shell (A+5 x B+5) – cut 1X self

Skirt lining (A x B) – cut 1X lining

Waistband elastic – waist measurement less 6″ [15.25 cm]

Note: Cut all fabrics on the straight grain.

ASSEMBLY

  1. miter4Mark the center of each fabric piece.
  2. On the bottom corners of the fashion fabric, measure up 1″ [2.5 cm] and across 1″ [ 2.5 cm]. Join these 2 points with a straight line and cut the corner away.
  3. Fold this 45° angled line in half with right sides of the fabric together. Pin/baste and sew each corner, using a ½” [1.25 cm] seam allowance, to create a miter in each corner.
  4. With right sides together (RST), align and match the lining and fashion fabric along the length on both side edges, from the inside corner of the miter to the top edge. NOTE: Remember to allow ½” [1.25 cm] seam allowance on the  hem on the lining portion.
  5. miter-12Pin/baste and sew each seam using ½” [1.25 cm] seam allowance. Press the seam allowances towards the lining. Turn this piece right side out.
  6. Align and match up the centers of each fabric and pin the layers at the top edge. Allow the fashion fabric to turn at the ends and press flat along the fold edges from the top to the mitered corners. Turn the skirt wrong side out.
  7. Align and match the lining and hem allowance of the fashion fabric along the bottom edge. Pin/baste and sew the bottom edge using ½” [1.25 cm] seam allowance. Press the seam allowance up towards the lining. Turn the skirt right side out.
  8. slit1Lay out the skirt with the hem away from you and the fashion fabric face up. Fold the fabric along its length so that the 2 sides meet at the center. Measure from the mitered corners 6″ [15.25 cm] and mark the location with a pin. This will be an open slit.
  9. Working from the open end at the waist, align and match the foldlines from the pin to the top edge. Sew the 2 foldlines together to create the skirt from the inside of the layers.
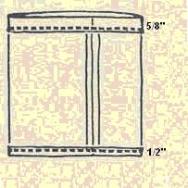
  10. Along the top edge, turn under all layers ½” [1.25 cm] to the inside of the skirt and press flat.
  11. Turn under 1 ¾” [4.5 cm] to create the casing for the elastic waist. Pin/baste the casing through all layers. Press flat.
  12. elastic3Topstitch 1/8″ [0.25 cm] along the fold of the top edge of the skirt.
  13. Topstitch 1/8″ [0.25 cm] along the bottom edge of the casing, leaving a 2″ [5 cm] opening at the back seam.
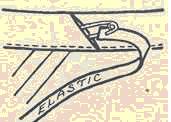
  14. Cut the waistband elastic to your waist measurement less 6″ [15.25 cm] or wrap around the waist and adjust to a proper fit. Using a bodkin, thread the waistband  elastic through the casing and secure the ends together. Be certain not to twist the elastic as you do so. Slipstitch the opening in the casing and complete the topstitching on the skirt.


Wraps and capes are trendy, practical and plentiful this Fall  season. They are rather soft, with a rich brightness that will be specially attractive in the first cool days of Autumn.

This cape-like wrap from Loro Piana is gorgeous in aubergine cashmere and great for staying warm and stylish without crushing delicate fabrics and can accommodate full or dolman sleeves beautifully. The cape pattern can be chalked right onto the fabric if you have a circular shape to trace around. Give every promise of a season of beauty unexcelled by the choice of your fashion fabric… try a cosy pashmina, wool flannel, or even yukon fleece.

Featured: Montella Regina Unita Cape

You will need:

  • 1-½ yard of fashion fabric, 54″wide
  • Coordinating double-folded bias binding, ¼” wide
  • Coordinating thread
  • Tailor’s chalk
  • Tape measure

DRAFT

Fold the fashion fabric in half lengthwise, matching the selvedges together and pin or baste.

From center of fold, measure a radius equal to the width of the folded cloth (eg. approx. 26″) to create a semi-circle.

Place a small circular template (I used a saucer) at the center point with its diameter lying on the fold of the cloth. Trace it with tailor’s chalk.

From the outer edge of the small semi-circle, measure and draw a straight line parallel to the fold.

Place a larger circular template (I used a large plate) at the intersection of the straight line and the curved chalk line. Trace a smooth curve from the straight chalk line blending into the curved chalk line.


ASSEMBLY

Cut the fabric following the heavy solid chalk line and open flat.

Beginning at the back of the neck, bound the raw edges of the fashion fabric with the bias binding.

Here’s a clever little idea…convertible clothing. This dress works double duty as a skirt. It’s ideal for weekend wear or travel wear. It’s functional and versatile at the same time.

Basically the concept is a wrap-around garment so it is adaptable to many shapes and sizes. The body proportion that needs to be considered is no more than a 7-8 inch difference between bust and waist measurements. Other than that ratio, it is quite flexible for most body shapes. The look is versatile as well. Through different fabrications it can be anything from a casual wrap by the pool to a sophisticated little black dress for a cocktail reception.

No pattern is needed to construct it. It is a simple block layout. You need a solid colour woven fabric width of 54-60″ wide. (see cutting diagram). Small to medium sizes = 2 yds. in length and medium to large sizes = 2 ½ yds. in length. The grainline is crossgrain so this cut is not ideal for prints unless they are railroaded or abstract in direction.

  • Cut 2 panels along each selvedge edge 15″ wide for wrap ties
  • Remaining fabric panel is wrap skirt portion.

Assembly:

On the large skirt portion, fold in a ½” turn on each short edge to the wrong side of the fabric.

Then turn each folded edge in ½” again. Press. Topstitch to finish.

Along one of the long edges, create a rolled hem by turning ½”, then 1″. Slipstitch or machine stitch in place. Lightly steam the foldline of the hem.

Next, fold the skirt portion in half and align and match the finished edges. Mark the fold on the long raw edge. This is the center of the garment.

From the finished edges along the long raw edge, measure 6″ and mark this location point. Set aside.

Now, take the two tie portions and align them, right sides together, along one short edge. Pin and baste along seam using a ½” seam allowance.

Measure and chalk 1 ½” from each end of the seam. Then measure and chalk 4″ from each of the chalk marks. This will be an open slit when completed.

Machine stitch the seam, leaving the 4″ distances unsewn. Remove basting. Press seam open flat.

Divide the bust measurement by 4. (eg. for size 10 = 34″ divided by 4 is 8 ½”).

From the seam (wrong side face up), measure and chalk ¼ the bust mmt. to the left of the seam and ¾ the bust mmt. to the right of the seam.

Fold the tie portion, matching up the 2 chalk marks and mark the foldline. This is the center of the garment.

Now, with right sides together, align and match the center marks of the tie and skirt portions. Pin together. Align each 6″ chalk point of the skirt portion to the bust mmt. chalk mark on each end of the tie portion. Pin together.

To control the excess fabric on the skirt portion, make 4 pleats equally spaced on both sides of center and pin and baste to tie portion. You will have 8 pleats in total. Ideally all pleats should fold towards center.

Machine stitch seam using ½’ seam allowance. Remove basting. Press seam open then press all seam allowances upward to tie.

Fold tie portion, with right side together, in half width-wise. Align and match raw edges on each tie end. From finished front edges, pin and baste long ties and short ends. Machine stitch using ½” seam allowances. Remove basting. Press seam open. Grade corners.

Turn tie ends right side out and turn in remaining raw edge by ½”. Place folded edge on top of pleating aligning to machine stitching. Pin and baste to encase raw edges. Press a sharp knife edge along the perimeter.

Edge-stitch by machine along the tie portion edge to finished. Align small 4″ opening and slipstitch together to complete garment.

To wear: Wrap garment around bust or waist, slipping the tie end closest to body through the 4″ opening. Continue to wrap tie end around the body and tie together with a bow to the other tie end.

ruffled blouseWith the current fashion flashback to the 1960’s, try a ruffled shoulder peasant-style blouse. A great piece for casual daywear with any skirt, or an evening out because this kind of soft blouse is flattering for most figure types. And the best thing is, no pattern is required.

You will need:

  • approximately 1-1⁄2 yards (1.37 m) of fashion fabric that is at least 41 inches (104 cm) wide. If using a washable fabric, pre-shrink fabric before sewing.
  • approximately 1-5/8 yards (1.48 m) of 1/4″ inch-wide (0.6 cm) elastic.
  • sewing thread to colour-match.

Pattern Key – see chart for cutting instructions

*The blouse: 1 piece

*Upper ruffle: 4-1⁄2 inch (11.4 cm) wide bias strips – total length of 92 inches (234 cm)

*Lower ruffle: 5-1⁄2 inch (14.0 cm) wide bias strips – total length of 92 inches (234 cm)

Important Note: Seam allowance is 1⁄2 inch (13mm) unless otherwise indicated.

Cutting Chart

blouse cutting plan

Eight Easy Assembly Steps

fig11. Fold and stitch blouse as shown. Blouse width is equal to your bust measurement plus 3-1⁄2 inches (8.9 cm). See cutting chart.

2. Stitch a 1⁄2-inch (1.3 cm) hem on bottom edge of blouse. Stitch a 5/8-inch (1.6 cm) hem on top edge of blouse to form a casing for elastic.fig2

3. On the inside of the blouse, open the casing at the side seam to create a small opening in which to insert the elastic. Draw 25 inches (63.5 cm)* of elastic through entire length of casing, pulling elastic out though the same opening. Overlap ends (be careful not to twist elastic), and sew the two layers securely. Slipstitch closed the opening of casing.fig3

* If this elastic is too tight, take your chest measurement and subtract 3 inches (7.6 cm). You want this elastic to be snug so that the top will not slip down.

4. Join bias strips for upper ruffle and cut strip so it totals 92 inches (234 cm). Join ends to form a circle. Repeat for lower ruffle.fig4

5. Stitch a narrow hem on one raw edge of each ruffle. With right side of upper (shorter) ruffle against wrong side of lower (longer) ruffle, align the two layers so that the raw edges are even. Stitch together.fig5

6. Bring lower ruffle up and over the upper ruffle so that now the wrong side of the upper (shorter) ruffle is against the right side of the lower (longer) ruffle. Stitch 5/8 inches (1.6 cm) from top as shown, creating a casing. Thread or pin baste the mid-points of the ruffle, which will be the center front and center back.fig6

7. Make a small opening in one of the joining seams of this casing in which to insert elastic. Draw a 32-1⁄2 inch (86 cm) length of elastic through casing in same manner as above, pulling elastic out though same opening, and sewing ends together. Stitch opening closed.fig7

8. Lay ruffles over top of blouse, right sides up. Pin ruffle casing to blouse, matching center fronts and center backs. Hand sew ruffle casing to blouse for 2-1/4 inches (5.7 cm) on either side of center front and center back, making sure not to catch the ruffle in the stitching.fig8

coccoon shrug2Saks Fifth Avenue features this season’s trendy cover up, the shrug by Vince. The shrug pattern is an ideal project with which to experiment with fashion design for several reasons — it is knitted or sewn in one piece, there is minimal finishing, it is easy to wear, and relatively quick to make. The Vince version is an angora knit but can be made up in any stretch fabric. Try mohair, stretch velvet, or double knit. Plus, these shrug patterns are easy to adjust. For instance, this basic shrug pattern is relatively snug and feature elbow-length sleeves. If you want to make longer or shorter sleeves or make the back larger, adding or subtracting length is easy. Wear it belted like the model.

SHRUG MEASUREMENTS: SIZE S (M, L)coccoon shrug


Cuff-to-cuff: 45 ½ (46 ½, 47 ½)”

Width at back: 16 ½ (17 ½, 18 ½)”

Top-to-hem: 21 (22 ½, 24)”

NOTE: The greatest stretch of the knit fabric runs around the girth of the body (usually the crosswise grain from selvedge to selvedge). Most stretch fabrics are available in 60″ widths. You’ll need about 2/3 yds. (65 cm).


Measure a rectangle 21″ by 45½” (length X width) for a size SMALL. (Use the measurements above for MEDIUM or LARGE.)

Measure 14½” in from each short end of the rectangle and mark as A,B,C, & D according to the diagram.

Measure 4½ inches down from the top & up from the bottom of each long end of the rectangle and mark as E, F, G, & H.


Measure 2½ inches down from A, B & up from C, D. Mark as I, J, K & L.


With a ruler, draw a line from E to K, F to I, G to L and H to J.

Blend a gentle arc between AF, BH, CE, & DG.

Cut along these 4 lines.

Fold fabric with right sides together. Pin points E to F, A to C, B to D & G to H.

Sew ½” seam allowances along edges  A to F and B to H, leaving an opening between AB & CD to form the “body” portion. Turn right side out.

Turn in raw edges at cuffs and body opening by 1″ and hem. Add a large hook & eye as a closure at waist level.

cashmere cape

This is a very easy ruana to create. Select a wool or cashmere blend fashion fabric where both sides of the fabric look good. You will love the feel and look of this comfortable wrap – make it very warm and soft. Similar ruanas in department stores can cost as much as $100. or more. It measures 36 inches as it hangs from your shoulders to your knees. Each panel in front is 22 inches wide and across the back it is 44 inches in width.

It has a 4 inch (10 cm) fringe at each short edge.

Begin by purchasing 2 yds. (1.85 m) length of loosely woven 54″ (137 cm) wide fashion fabric (plain weaves are best).

Square up the two cut ends of your fabric to create a 72″ rectangle. This can be done by drawing the crosswise yarns across the short ends. Fray each short end about 4″ (10 cm). The frayed edges may be trimmed if necessary. Machine-stitch with matching thread across top of the frayed area. This will create a fringe. (A)cape layout2

Next step is to fold the fabric along its length so that both selvedge edges align. Measure 32″ (81 cm) from one frayed edge, along the fold and slash to that point. (B)

Cut 4″ (10 cm) from each selvedge edge along its length.

Machine-stitch a narrow double-rolled hem (eg. turn in ¼” then turn ¼” again) along the slashed opening and along each of the selvedge edges. (C)

Voila! …your stylish ruana wrap is ready!

One pattern – 3 skirts styles…. A-line, flared, or full circle skirt fits a variety of body sizes and shapes. Easy peasy!
skirt illustration
You’ll need:

  • pencil
  • ruler
  • string
  • thumbtack
  • tape measure
  • kraft paper (36″ long X 36″ wide)

3-in1 skirt pattern

Drafting Method:

1. Square a line across the width of the paper and down its length with a ruler to create a 90 degree angle. Label the intersection, X.

2. Measure your waist.
3. Select the radius of the skirt style you wish to create based on your body measurements from the chart provided.
4. Tie a length of string to the pencil. Make the length of the string equal to the selected radius. (eg. for an A-line skirt to fit a 29″ waist, make the string 18-1/2″ long)
5. Pin the loose end of the string at point X using the thumbtack.
6. Extend the string taut with the pencil held steady and upright at 90 degrees and draw an arc from the horizontal line to the vertical line on the paper. This is the waistline.
skirt lengths
7. Next, decide how long you wish to have the finished skirt length. Mini, knee length, mid-calf, maxi? Measure on your body from waist to the desired hem length.
8. Take a second length of string and attach it to the pencil. Make the string length equal to the radius amount plus the skirt length measurement. Pin the loose end of the string at the X and create a second arc on the paper. This is the hemline.
9. Lastly, create a waistband. Fold a piece of paper along its length. Measure along the foldline the full waist measurement plus 1 inch. Make the width 1 inch and mark a line parallel to the foldline and square the short ends.
10. Add seam allowances to all pattern pieces. Cut out skirt body. Cut out waistband piece on the fold and open flat.
11. Mark grainlines on pattern pieces. The waistband grainline is parallel along the foldline. The skirt grainline is parallel along either straight edge of the pattern.

12. For an A-line skirt – cut 1x; for a flared skirt – cut 2x; for a full circle skirt – cut 4x. Sew each panel along straight edges, leaving a opening for zipper. Cut the waistband 1x, and attach to waistline, allowing for a 1″ lapover extension. (Precautionary note: before stitching waistband to skirt body, try on skirt to determine if waistline needs to be adjusted). Hem with a narrow double-turned hem.