Yes, it’s true.

Watch for my new design blog project called BAG’nTELLE.

It is about expert ideas and tutorials about fashion accessory design, bag design, construction techniques, do-it-yourself approaches, and more from designer and educator Don Morin (aka Weekend Designer).

I am hoping that you’ll come back and check it out.

lifewithbirdbag_notcotFeatured: Turtle Tote by LIFEwithBIRD

An exercise in stylish functionality by Aussie line LIFEwithBIRD. A roomy, oversized canvas carryall, it can seamlessly go from work to after-hours party to weekend getaway, all without missing a beat. Here is a similar carpetbag version easy to draft and make up for your daytripping.

You will need:

  • 1 ¾ yds. [1.5m] canvas or upholstery fabric, 54” [137 cm] wide
  • 1 heavy-duty zipper, 18” [46 cm] long
  • 1 ½ yds. [1.4 m] heavy webbing, 2” [50 mm] wide
  • All-purpose thread
  • Cardboard
  • Kraft paper

DESIGN TIP: Match zipper colour with webbing strap colour.

DIMENISONS: approx. 20” X 10” X 15”   (51 cm X 25.5 cm X 38 cm)

PATTERN DRAFT

bag draft

Add ½” [12mm] seam allowances to all pattern pieces.

CUTTING

layCut 2 of each piece in fabric.

Cut 2 straps from webbing – 26” long

Cut a rectangle 20” X 10” in cardboard

ASSEMBLY

1. Prepare the base. With right sides together, stitch around the perimeter of the base layers, leaving one short end opening. Turn base right side out and press. Insert cardboard into base piece and slipstitch opening closed. Set aside.


2. Prepare patch pockets. Turn under 2” [50 mm] of top edge of pocket pieces and press. Hem turned edge. Turn under pocket side seam allowances and press flat. Set aside.


NOTE: A dome snap, Velcro® tab or zipper may be added to the patch pocket opening if desired. Do so at this time following manufacturer’s directions.


3. With right sides together (RST), align and match raw edges of bag at A and B. Stitch a 1” [25 mm] seam at A and B. Press seam allowance open.


4. zipperCenter zipper FACE down along opening in seam. Stitch zipper tape to seam allowances.

Turn bag FACE UP and topstitch on either side of seam and zipper.


5. With RST, align and match seams between A-C and B-D. Sew seam and press. Turn bag right side out and topstitch along both sides of the seam on the FACE side.


6. On FACE side, center a patch pocket over the  seam between the ● and edge-stitch along the pocket sides.


7. Attach ends of webbing strap at X at A and at B (on either side of zipper opening).

miterOpen zipper and turn out bag through opening. With RST, join A to A and sew across seam, ensuring the straps are caught in the seam. (Be careful not to twist the straps.)

Repeat on opposite side for B to B.


8. Join C-D together (RST) and press seam open. On FACE side, topstitch on either side of the seam.


9. Align and match C to C and D to D. Sew seams, ensuring you catch the bottom of the patch pocket in the stitching.

10. Turn bag right side out through zipper opening. Place self-lined cardboard base into bottom of bag for support.

br-wool-cloche-hatFeatured: Cloche hat from Banana Republic

A buckled cloche for Spring.  Easy-peasy and pretty!

You will need:

  • Graph paper
  • approx. 1 yd. of fusible interfacing, 45″ wide
  • approx. 1 yd. of bottom-weight or upholstery fashion fabric, 54″-60″ wide
  • approx. 1/2 yd. of lining fabric, 45″ wide
  • approx. 3/4 yd. of grosgrain ribbon, 2″ wide
  • 1 belt buckle, 1 ½” wide
  • coordinating thread

DIMENSIONS

This hat draft is a medium size for a head circumference of approximately 23” [58.5cm].

PATTERN

hat

Grid: 1 square = 1 inch [25 mm]

Add ½  inch seam allowances to all pattern pieces.

Trace out and cut pattern shapes on fold of graph paper.

CUTTING

Cut the crown side 2X; lining 2X ; interfacing 2X

Cut the crown top 1X; lining 1X; interfacing 1X

Cut the brim 2X; interfacing 1X

Cut the belt strap 2X; interfacing 1X

Cut the sweatband (grosgrain ribbon) 24” long  X 2″ wide.

ASSEMBLY

1. Iron fusible interfacing to wrong side of each crown piece and to one of each of the brim and strap pairs, following manufacturer’s directions.
2. On each brim piece, pin and baste CB seam with right side together. Stitch seam using a ½” seam allowance and press open.
3. Layer the 2 brim pieces with right sides facing together and align the CB seams. Pin/baste outer edges together. Sew around the perimeter of the brim.
4. Grade and trim the seam allowance and turn brim right side out. Press outer edge flat.
TIP: Due to fabric thickness, it is important to grade the seam allowances as you sew. The bulk will reduce the headfitting measurement. You may also take less of the seam allowance to account for the bulk.

5. Topstitch outer edge of brim.  (I use the width of the presser foot as a spacer.) The more stitching you put, the stiffer the brim. Set aside.
6. Layer the belt strap pieces with right sides facing together. Align and match up raw edges and pin/baste together. Machine-stitch across one short end and along the 2 long edges. Grade and trim seam allowances and turn strap right side out. Press outer edges flat. Topstitch around perimeter of the strap. Set aside.
7. Pin/baste the side pieces to the top section, with right sides facing together. Ease the straight edges into the curved ones. Machine-stitch the 2 side seams of the crown portion. Press the seam open. (You may need to clip the seam allowance to get it to lie flat.) Turn the crown right side out.
8. Repeat the same method for the hat lining. Insert the lining into the hat crown with wrong sides facing together. Baste lining to crown around the circumference of the crown.
9. Align the CF and CB and the Xs of the crown and the brim. Match up these points, pin and basting with right sides together. Machine stitch the crown section to the brim, using a ½” seam allowance.
10. Sew in grosgrain ribbon as a “sweatband”. This should equal the head fitting measurement. Lay the ribbon on top of the seam allowance along the top of the brim and edge stitch along the ribbon edge. Overlap at CB. Grade and trim  the seam allowance . Turn the ribbon up into the crown to conceal the raw edge of the seam allowance and tack to CB of hat with hand stitching.
11. On the left side of the hat exterior above the seamline of the brim, handstitch the open end of the belt strap to the center of the crown side piece using a narrow seam allowance. (Do this with the belt strap pointing to the front of the hat.) Fold the strap back onto itself and slip on the buckle. Wrap the strap around the hat’s crown and slip loose end into the buckle. (Add punched eyelets if you are using a pronged belt buckle).

Thin or wide, bright, basic or bejeweled, a belt is an easy way to add polish to any outfit. Here’s how to update your look with the season’s most stylish belt.

Cinch Belts are the perfect way to introduce a chic pop of colour, texture or ‘bling’ to any outfit; this waist-wringing item is one of few accessories that can take any outfit up a notch, from fine to fantastic. Cinching a wide belt around the smallest part of your torso – your natural waist – emphasizes and slims this very feminine zone while accentuating sexy curves. Thick belts create the most dramatic, waist-narrowing looks since they brace your body in a corset-like fashion.

Featured: Cinch Belt by Cynthia Rowley

If you want to stand out, get creative and fashion yourself a belt out of leather and suede can be a real joy as they are the oldest and most luxurious of all natural materials. Selecting cowhide, pigskin or lambskin for your leather project will help you to create a fashion accessory that you will cherish for years to come!

You with need:

  • Leather or suede hide
  • Covered buckle kit
  • Leather machine needle
  • Rubber cement
  • Topstitching thread
  • Metal straightedge ruler
  • X-acto knife or rotary cutter
  • Awl
  • Rubber mallet

COVERED BUCKLE FORM

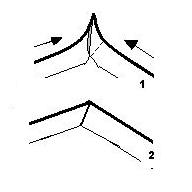
Cut leather 2 times the width of buckle.  Fig.1

Trace outline of the topside blank from the buckle kit in the center of leather (wrong side up).

On inner parts of buckle, slash through each center and diagonally into corners at each end.  Fig.2

On the wrong side of leather, spread a thin layer of rubber cement.

Allow to become tacky.

Repeat glue-ing directions on face of buckle form.

Center the buckle form face down onto the leather. Smooth the leather.

Fold in edges of leather inside the buckle form with fingers – outer edges with thumb. Carefully trim away any bulk with pointed tips of scissors.

Take backing plate (the smaller piece from the kit) and insert in top portion, pressing well in to secure the leather inside. Fig.3

MAKING THE BELT

1. Choose leather and a buckle kit for your belt.

2. Cut your belt from the leather. The belt should be 1 foot longer than the waist measurement and equal in width to the interior width of the chosen buckle plus 1 1/4″.

Cut the leather using a sharp X-acto knife or rotary cutter and a metal straightedge to do this. DO NOT USE SCISSORS. (I like to use a cutting mat to do the cutting as well).

For the model sample shown,

  • Approx. length:  S=36″, M=38″, L=40″, from inside edge of buckle to tip.
  • Approx. width: 2 1/2″.
  • Approx. dimensions: buckle 2 1/4″W x 3 1/2″H.

3. Decide what shape you want the free belt-end to take. You can make it pointed, rounded, square – whatever shape you like. (The model has a squared end). Mark the belt-end and use an X-acto knife to cut it to the desired shape. (Curved shapes may be carefully cut with scissors).

4. Fold the uncut end of the belt back so that a crease is made 1 1/2 inches from the belt end. Using a metal straightedge and an awl, lightly score this line on the back of the leather.

5. Repeat along the perimeter of the belt and score 3/8″ within the edge. Turn in the edge and lightly crease.

6. Since leather will not fray, use rubber cement to finish the edges. Daub a thin layer of rubber cement ½” wide along the perimeter (wrong side only) and allow the glue to become tacky. Then, carefully fold turning edges and working from the buckle end to the corners. Work the folding in both directions to miter the excess into the corners. Trim the “ears” away. (See diagram). Gently tap along the edges with the rubber mallet.

7. Topstitch the perimeter of the belt ¼” from the edge. (Use a new leather needle in your sewing machine. Try a walking presser foot or Teflon presser foot to prevent drag. Loosen your tension and increase the stitch length for better results).

8. Insert the buckle end through the slot of the buckle so that the buckle is correctly positioned. Fold the uncut belt end back so that the bucket is face up and lined up with the scored line.  Machine stitch the end using double topstitching to secure.


A duffle tote is an ideal type of luggage that no traveler should be without. The duffel bag is one of the most versatile and functional forms of luggage. It can be used as a carry-on for plane trips, and can also serve as the perfect overnight or weekend bag. Duffel bags can be made in a variety of styles, designs, colours and fabrics. Therefore, anyone from a business traveler, to a camper, or everyday vacationer, will find use for a duffle tote bag.

You need:

  • 1 heavy-duty closed plastic zipper
  • 2 D-rings, 7/8″ wide
  • 3 or more yards of polyester web strapping, 1″ wide
  • 1 yard of canvas/upholstery weight fabric, 54″ wide
  • Coordinating thread
  • Tape Measure

PATTERN

The size of your duffel tote bag is based on the circumference of a circle. The larger the circle, the larger the bag. Look for a circular object to use as a template or use a compass. (I traced around a large pie plate).

Next, measure the circumference of the circle pattern using the edge of the tape measure. eg. a 9″ pie plate has a circumference of 28 ¼”.

Add 1″ to the circumference measurement. This is the bag height or X. (see diagram)

Now, to determine the width of the duffle, choose your desired zipper length. The longer the zipper, the wider the bag. (I chose a 22″ large-toothed plastic zipper). Measure the zipper tape, end to end, with the tape measure. This is the bag width.

Draw out a rectangle pattern (height x width).

Fold rectangle pattern in half and then each half again to quarter. Open the pattern flat.

Mark out strap placement lines on the foldlines closest to the ends. Allow 3-4″ free from top and bottom edges of rectangle pattern. (see diagram)

Cut the rectangle piece 1 time and the circular end pieces 2 times from your fabric on the straight grain.

ASSEMBLY

  1. Turn the top and bottom edges of the rectangle piece to the wrong side by ½” and press.
  2. Using the pattern as a guide, chalk the placement lines for the strapping on the fabric.
  3. Place the webbing over the placement lines and pin in place. Begin in the center of the center of the placement line and allow for the desired strap looping (I used 3 yds. of webbing and matched the colour to the colour of my zipper) then continue down the opposite end and allow the same amount as before for the strapping loop and finish where you started. You may overlap the ends together or “melt” the shorts end with a match to seal to prevent fraying of the webbing.
  4. Following the dotted lines on the diagram, topstitch the webbing to the fabric as shown. To reinforce the bottoms of the strap loop, sew an X through the webbing at each of the 4 points.
  5. Using a zipper foot, place one of the folded edges on top of the zipper tape with the zipper and face side of the fabric up. Topstitch in place.
  6. Then, place right sides of the fabric together and on the opposite folded edge, open the fold and stitch to the opposite side of the zipper. Open the zipper and face side up, topstitch the folded edge to the zipper. Close the zipper and stitch across the open end. You will have a “tube” shape.
  7. Cut 2 pieces of webbing 1″ long. Wrap each piece through a D-ring. Stitch each D-ring tab to the ends of the zipper tape with the D-ring facing the center of the tube.
  8. Divide the tube ends in quarters, beginning at the zipper position. Divide each circle into quarters.
  9. Open the zipper halfway. Pin the circle ends to each end of the tube following the quarter marks. Using a 3/8″ seam allowance, stitch in place. (You may have to clip the straight edge to sew into the curved edge to release any buckling of the fabric). Check for any uneven stitching then do a second row of stitching on top of the first to reinforce the seam. Turn the bag right side out through the zipper.

You can make a shoulder strap to attach to the D-rings if you desire.