br-wool-cloche-hatFeatured: Cloche hat from Banana Republic

A buckled cloche for Spring.  Easy-peasy and pretty!

You will need:

  • Graph paper
  • approx. 1 yd. of fusible interfacing, 45″ wide
  • approx. 1 yd. of bottom-weight or upholstery fashion fabric, 54″-60″ wide
  • approx. 1/2 yd. of lining fabric, 45″ wide
  • approx. 3/4 yd. of grosgrain ribbon, 2″ wide
  • 1 belt buckle, 1 ½” wide
  • coordinating thread

DIMENSIONS

This hat draft is a medium size for a head circumference of approximately 23” [58.5cm].

PATTERN

hat

Grid: 1 square = 1 inch [25 mm]

Add ½  inch seam allowances to all pattern pieces.

Trace out and cut pattern shapes on fold of graph paper.

CUTTING

Cut the crown side 2X; lining 2X ; interfacing 2X

Cut the crown top 1X; lining 1X; interfacing 1X

Cut the brim 2X; interfacing 1X

Cut the belt strap 2X; interfacing 1X

Cut the sweatband (grosgrain ribbon) 24” long  X 2″ wide.

ASSEMBLY

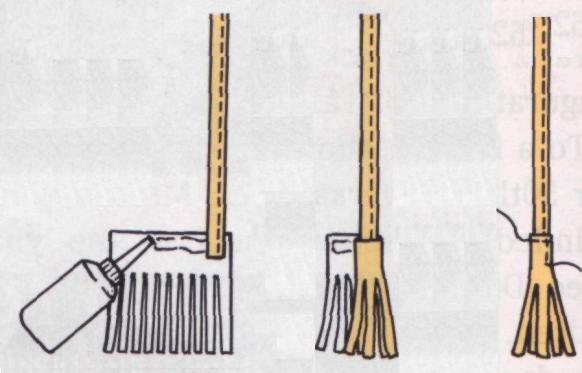
1. Iron fusible interfacing to wrong side of each crown piece and to one of each of the brim and strap pairs, following manufacturer’s directions.
2. On each brim piece, pin and baste CB seam with right side together. Stitch seam using a ½” seam allowance and press open.
3. Layer the 2 brim pieces with right sides facing together and align the CB seams. Pin/baste outer edges together. Sew around the perimeter of the brim.
4. Grade and trim the seam allowance and turn brim right side out. Press outer edge flat.
TIP: Due to fabric thickness, it is important to grade the seam allowances as you sew. The bulk will reduce the headfitting measurement. You may also take less of the seam allowance to account for the bulk.

5. Topstitch outer edge of brim.  (I use the width of the presser foot as a spacer.) The more stitching you put, the stiffer the brim. Set aside.
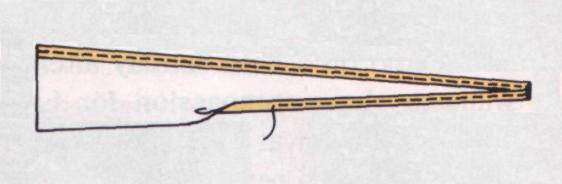
6. Layer the belt strap pieces with right sides facing together. Align and match up raw edges and pin/baste together. Machine-stitch across one short end and along the 2 long edges. Grade and trim seam allowances and turn strap right side out. Press outer edges flat. Topstitch around perimeter of the strap. Set aside.
7. Pin/baste the side pieces to the top section, with right sides facing together. Ease the straight edges into the curved ones. Machine-stitch the 2 side seams of the crown portion. Press the seam open. (You may need to clip the seam allowance to get it to lie flat.) Turn the crown right side out.
8. Repeat the same method for the hat lining. Insert the lining into the hat crown with wrong sides facing together. Baste lining to crown around the circumference of the crown.
9. Align the CF and CB and the Xs of the crown and the brim. Match up these points, pin and basting with right sides together. Machine stitch the crown section to the brim, using a ½” seam allowance.
10. Sew in grosgrain ribbon as a “sweatband”. This should equal the head fitting measurement. Lay the ribbon on top of the seam allowance along the top of the brim and edge stitch along the ribbon edge. Overlap at CB. Grade and trim  the seam allowance . Turn the ribbon up into the crown to conceal the raw edge of the seam allowance and tack to CB of hat with hand stitching.
11. On the left side of the hat exterior above the seamline of the brim, handstitch the open end of the belt strap to the center of the crown side piece using a narrow seam allowance. (Do this with the belt strap pointing to the front of the hat.) Fold the strap back onto itself and slip on the buckle. Wrap the strap around the hat’s crown and slip loose end into the buckle. (Add punched eyelets if you are using a pronged belt buckle).

The trendy fox styles of winter headwear are ideal for coldest weather and make a great fashion statement of you.

You will need:

  • ¾ yd. of faux fox fur, 60″wide
  • ¾ yd. of velveteen, 40″ wide
  • 3 yds. of twill tape, ½” wide
  • ¾ yd. of grosgrain ribbon, 1″ wide
  • ½ yd. of Kasha lining, 45″ wide
  • Heavy-duty thread

MEASUREMENTS

Head Measurement – measure around the head over the ears.

PATTERN

Note: Add ¼ inch seam allowance to perimeter of cap pattern piece.

CUTTING

Cap – cut 6X on bias grain in velveteen. (one-way nap)

Cap lining – cut 6X on bias grain in kasha lining.

Fox trim** – cut 1X on straight grain in faux fur. (one-way pile)

Sweatband – cut 1X in grosgrain ribbon.

**note: do not cut fur trim with scissors. Cut the backing of the faux fur with an x-acto knife or safety razor blade then gently pull apart the excess material away.

ASSEMBLY

  1. Take the fur trim and butt short ends together, with right sides facing. Push all hairs of trim to the fur side along the short end. Whipstitch the short ends together with small even hand-stitches using heavy-duty thread.
  2. On top and bottom edges of fur trim, whipstitch twill tape to edges on the fur side. (fig. 4) Keep hairs on fur side and under the twill tape.
  3. Turn tape to backside of fur trim and catch in place with long zig-zag stitches. (fig. 5 & 6)
  4. Turn fox trim right side out and comb fur in one direction.
  5. Pin/baste 3 cap pieces together, with right sides facing. Machine-stitch seams. Press seams open. Repeat on remaining 3 pieces. (fig. 1)
  6. Layer the pair together, with right sides together and pin/baste together. Machine stitch from front to back to create cap. (fig. 2) Turn cap shell right side out. (fig. 3)
  7. Repeat above procedures to make up cap lining. Set aside.
  8. With wrong side of fur trim to right side of cap, slipstitch fur trim to cap, leaving 1″ free along bottom edge of cap.
  9. With wrong sides together, drop cap lining into cap and match up seams. Baste lining to outer shell along bottom edge of cap.
  10. Sew grosgrain ribbon to bottom edge on right side of cap to catch both layers of fabric. Fold back raw end to neaten at centerback.
  11. Turn sweatband up inside of hat and tack at centerback.

WIDE-BRIMMED SUMMER HAT

You will need:

  • Kraft paper
  • glue or scotch tape
  • tape measure
  • compass
  • approx. 1 yd. of Pellon ® fleece interfacing, 45″ wide
  • approx. 1 1/2 yds. of bottom-weight or upholstery fashion fabric, 54″-60″ wide
  • approx. 1/2 yd. of lining fabric, 45″ wide
  • approx. 3/4 yd. of grosgrain ribbon, 2″ wide
  • coordinating thread


MEASUREMENTS

Begin by measuring the circumference of your head. Wrap the tape measure around the back of the head, over the ears, and high up on the forehead. For most people, this will be approximately 22 ½ inches. Add 1” to your head measurement. This is the head fitting measurement (This number may vary due to hairstyles as well. Most people will pull back the hair or put it in an up-do to wear the hat properly.)


Next, you need to determine the radius (R) you will use to create a circle.

Use the formula, C = 2 п R, where п = 3.14

Eg. 23.5 = 2 x 3.14 x R

R = 23.5 divided by 6.28

R = 3.75


For a head fitting measurement of 23 ½”, you need a radius of 3 ¾”.


PATTERN

CROWN

Draw a rectangle equal to the head fitting measurement X the radius amount.

Divide the rectangle into 8 equal parts.

Slash each line from the top of the rectangle to almost the bottom edge.

Overlap each section left of center by ½” at the top to nil at the bottom and glue down.

Repeat for each section right of center.


Trace this new shape onto a new sheet of paper and blend the curved topline smooth.

Add ½” seam allowance around the perimeter. Label the 2 short ends, centerback (CB) and the centerline, centerfront (CF).


Draw a grainline 45 degrees to the center line. This is the side section of the crown.


Measure the new curved seam that you have created. Record this measurement.

Using the formula again, determine R for the top of the crown.

If you measure the circumference of the top section, it should equal the curved seam measurement of the side section.

(Adjustment Tip: Increasing or decreasing the circle by 1/8” all around will change the circumference by approximately ½”).

Use a compass and draw a circle using the amount for the radius (R).


Divide the circle into quarters. At the top and bottom of the circle extend out ½”. At the sides of the circle, reduce inwards by ½”. Join these points with a smooth arc blending into each point to create an oval. Re-check the circumference of the oval. It should still equal that of the new curved seam on the side section.


Add ½” seam allowance to the circumference and draw a straight grainline from CF to CB. This is the crown top.


BRIM

Fold a large piece of paper in half, then half again; open out flat.

Draw the 2 intersecting lines. Place a point in the center of the intersection.

Using a compass, draw a circle with a radius (r) based on the head fitting measurement plus 1”.

From the same point, draw a second circle with a radius (R) equal to 3 times r.

This is the brim width. (You may increase the width of the outer edge if you desire).


The inner circle must equal the head fitting measurement. Starting at the top of the circle, measure half the head measurement to the left of center and repeat on the right of center. Mark a point at each interval. Square out from this point to the outer edges. Label these edges, CBThis is the interfacing pattern.


Trace this brim shape onto a new sheet of paper. Add ½” seam allowance all around the brim pattern. Draw a straight grainline parallel to the centerline. This is the upper and lower brim patterns.


CUTTING

Cut the crown side 1X; lining 1X (on bias grain)

Cut the crown top 1X; lining 1X (on straight grain)

Cut the crown side interface 1X (on bias grain)

Cut the brim 2X (on straight grain)

Cut the brim interfacing  1X (on straight grain)

Cut 1 strip of self bias 2” wide; length to equal outer edge of brim + 2” (on bias grain)


ASSEMBLY

On each brim piece, pin and baste CB seam with right side together. Stitch seam using a ½” seam allowance and press open.

On the brim interface piece (Pellon ®), butt the two CB edges together and zigzag stitch it together.

Sandwich the interfacing between the two brim pieces with face sides up, lining up the CB seams. Baste together.

Do rows of topstitching parallel to the outer edge, ½” apart, starting from the inner edge. (I use the width of the presser foot as a spacer.) The more stitching you put, the stiffer the brim.


Bind the outer edge of the brim with the bias cut strip of self-fabric, beginning from the CB seam, folding in ½” to bind, and then turning under the end to encase the starting point. Press edge flat.


Baste the side interface to the wrong side of the side section.

With right sides together, pin and baste the CB seam. Stitch seam using a ½” seam allowance and press open. Grade seam allowances.

Divide top edge of crown side and the crown top into quarters. Match up these points, pin and basting with right sides together. Machine stitch the side section to the top of the crown, using a ½” seam allowance. Trim and grade the upper seam allowance and interfacing only.

Repeat the same procedure for the hat lining.

With wrong sides together, place lining into crown, aligning with CB seam and baste seam allowances together. Turn right side out.


Now, insert crown into center hole of brim. Match up CB seams and pin and baste crown to brim. Machine stitch using a ½” seam allowance. (Clip seam allowance if there is any buckling).


Sew in grosgrain ribbon as a “sweatband”. This should equal the head fitting measurement less the inch. Lay the ribbon on top of the seam allowance and edge stitch along the ribbon edge. Overlap at CB. Trim the seam allowance with pinking shears. Turn the ribbon up into the crown to conceal the raw edge of the seam allowance and tack to CB seam with hand stitching.


obi & beret(Courtesy of Vogue/Butterick)

The wraparound obi style belt is sized in small, medium and large. Choose your size by measuring your waist and comparing your measurement to the chart below.

S M L
IN.
24-25
26-28
30-32
CM 61-63.5 67-72 76-81

You will need:

3/8 yds (.35 m) of synthetic suede or leather fabric.

Matching polyester thread.

SOBO TM Fabric glue.

Pattern Piece Key

1. Front

2. Sides

3. Tie Ends

4. Tassel

obi belt

Enlarging the Pattern

Each Square = 1″ (2.5 cm)

Includes ¼” (6mm) seam allowances.

Enlarge your pattern on 1″ graph paper or a pattern tracing material such as Red Dot TM by HTC. Pieces 1 and 3 are given on a fold. For ease of cutting, makes theses full pieces.

Cutting

Front – cut 1

Sides – cut 2

Tie ends – cut 2

Tassels – cut 2

Marking

Use a water-soluble tracing paper and tracing wheel or marking pen. Mark the pleat lines on the wrong side of the belt. Mark the cutting lines for the tassel fringe on the wrong side of each tassel section. Cut along the lines.

Make A Belt In 6 Easy Steps

obi_fig1

1. Make tucks on the FRONT section by bringing the lines of small ●’s together: stitch. Turn in ¼” (6mm) on the curved edges; then stitch 1/8″ (3mm) from the edges. Note: These edges may also be glued in place.

obi_fig2

2. Turn in ¼” (6mm) on the long edge of the SIDE sections. Stitch 1/8″ (3mm) from these edges. Note: These edges may also be glued in place.

obi_fig3

3. With right-sides together, stitch the SIDES to the FRONT. Turn the seam allowances towards the sides; from the right side stitch close to the seam and again 1/8″ (3mm) away.

obi_fig4

4. Fold each TIE END into lengthwise thirds by turning in ¼” (6mm) on one long edge; then turning in ¼” (6mm) on the remaining long edge. Note: Glue edges in place.

obi_fig5

5. Fold the ends of the SIDE section over the TIE ENDS, lapping ¾” (20mm). Starting on SIDES, stitch securely through all thicknesses close to the raw edge. Pull thread ends to the inside and knot.

obi_fig6

6. Place TIE ENDS on the wrong side of TASSEL section. Overlap about ½” (13mm). Apply a bead of fabric glue to the upper edge of the TASSEL. Roll the TASSEL around the TIE END. Let glue dry. If desired, stitch close to the edge and across the top of the tassel to secure.