Featured: Chulette
Simple eyelet vest with a “peek-a-boo” attitude.
Try styling it similar to this one from Chulette; fully lined with tan colour cotton fabric to add some contrast.
You will need:
- 1 ¼ yds. [1.15 m] leno-cut fabric, 45” [114 cm] wide such as eyelet.
- 1 ¼ yds. [1.15m] of matching lining, 45” [114 cm] wide such as broadcloth.
- Coordinating thread
- Kraft paper
MEASUREMENTS
Bust – measure around fullest part of chest, just under the armpit.
Waist – measure around narrowest part of torso, just above the navel.
Shoulder – measure shoulder length from ball socket to neckline.
Back width – measure across shoulder blades from armpit to armpit.
Backwaist length – measure vertically from nape of neck to waistline.
PATTERN

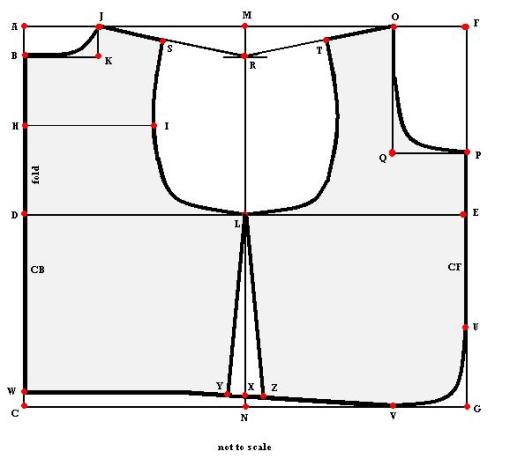
Cut a length of kraft paper equal to your bust measurement + 3” [75mm].
Fold the paper in half across its widest point.
Plot point A on the foldline at the top of the paper.
A-B = 2” [50mm]
B-C = backwaist length
C-D = ½ of B-C less 1” [25mm]
Square across all points at 90°
D-E = ½ of bust measurement
Square up and down from E to locate F and G.
H = midpoint of A-D.
Square across from H.
H-I = ½ of back width minus 1” [25mm].
A-J = 3 ½” [90mm].
K is located where lines squared from B and J intersect.
Draw a shallow arc at K to join B to J as shown.
L is half of D-E.
Square up and down from L to locate M and N.
F-O = 3 ½” [90mm].
E-P = 3” [75mm].
Q is located where lines squatted from O and P intersect.
Draw a deep arc at Q to join O and P as shown.
M-R = J-K + ½” [12 mm].
Draw a straight line from J and O to R.
J-S = 2/3 of shoulder measurement.
O-T = 2/3 of shoulder measurement.
Join S-I-L with a smooth curve as shown.
Trace this curve on the front portion between L and T.
G-U = 3 ½” [90mm].
G-V = 3 ½” [90 mm].
Draw a smooth arc at G connect U and V as shown.
C-W = 1” [25mm].
Square a line across from W.
N-X = ½” [12 mm].
X-Y = 1” [25 mm].
X-Z = 1” [25 mm].
Join points W-Y and V-Z with a smooth line.
Join points Y and Z to L with a straight line.
Add seam allowances to perimeter of pattern pieces except armhole.
Cut out pattern with paper on the fold.
Grainlines are parallel to CB and CF of pattern.
CUTTING
 Cut 2 bias strips 2 ½” wide [65mm] in lining fabric.
Cut front 2X self
Cut back 1X self
Cut front lining 2X lining
Cut back lining 1X lining.
ASSEMBLY
- With right sides together (RST), match up vest fronts to vest back and pin/baste side seams and shoulder seams. Stitch seams and press open.
- Repeat Step 1 for vest lining.
- With RST, align and match vest to lining around outer edges. Pin/baste in place. Stitch around the perimeter of the garment. Trim and grade seam allowance close to stitching. Turn vest right side out through armhole.
- Press seam flat around outer edge of vest. (Use a press cloth as not to mar fabric).
- Align and match up armhole opening. Baste both layers of fabric together.
- Bind each armhole with bias strip. To do this, fold the bias strip in half lengthwise (wrong sides together) and press foldline (use an up & down motion). Place the raw edges of the bias strip along the armhole on the face side of the vest. Stitch around the armhole using a 3/8” [1 cm] seam allowance. Turn under the short ends to neaten and complete.
- Fold the bias binding over the seam allowance in the armholes and align the folded edge to the machine-stitching. Slipstitch binding to lining.
June 8, 2009 at 6:22 pm
thank you! my teen will love this and it will make her choice of grad dress “legal” by school dress code.
June 18, 2009 at 10:57 pm
[…] Craft Link : Draft Your Own Vest Pattern […]
June 27, 2009 at 9:03 am
Fantastic blog.I´ll try this vest with my mother´s sewing machine 😀
September 8, 2009 at 5:10 pm
i need information paterns
i need to bay paterns
October 18, 2010 at 12:12 pm
[…] Draft Your Own Vest Pattern […]
February 18, 2012 at 8:08 pm
[…] EYELET VEST « Weekend designer. […]
July 10, 2012 at 12:44 pm
[…] https://wkdesigner.wordpress.com/2009/06/07/eyelet-vest/ […]