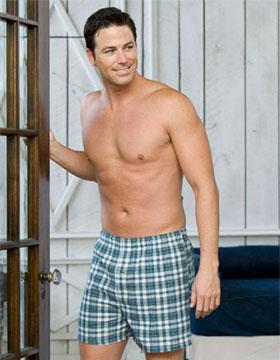
 Jockey shorts are a no-no but boxers are a capital YES. No longer relegated to the underwear department, boxer shorts are everywhere. Teens wear them with T-shirts, men and women wear them for sleep shorts and athletes wear them for playing basketball. Boxers are easy to make, requiring only one pattern piece, and no fitting. So ditch those tighty-whities and embrace a new style of colourful drawers today!
You will need:
- 1 yd. [1 ¼] of cotton fabric (45″wide) for waist 24″-36″ [37″-45″] *
- 1 ½” wide sew through sport elastic, buy waist measurement minus 3 inches.
- Coordinating cotton thread
- Kraft paper
* Buy 1/2 yd. more when sewing directional prints, matching a pattern repeat, or making legs longer than 3 ½”.
MEASUREMENTS
Waist – measure around the waistline at navel level
Hip – measure around fullest part of hipline 9″ below waistline
Rise – while sitting measure side of body from waistline to top of seat.
PATTERN

Draw a straight line across top of kraft paper. Label point 1 as shown.
2 from 1 = half the hip measurement + 4″
3 is squared from 2 = rise measurement + ½”
4 is squared from 1 = rise measurement + ½”
5 from 1 = quarter of the hip measurement + 2″
6 is squares from 5 = rise measurement + 9″
7 from 3 = 2 ½”
8 is squared from 7 = 8 ½”
9 from 4 = 3 ½”
10 is squared from 9 = 8 ½”
Join points 8 – 6 – 10.
Point 11 is located midway between 9 and 10.
Using a set square, locate point 12 by drawing a 90° angle 1″ below line 8 – 10 joining points 6 and 11 as shown.
13 from 2 = 1 ½”
14 from 3 = 1½”
Join 13 and 14 to create the fly front on the centrefront (CF) line.
15 from 8 = distance of 11 – 12.
Join 4 – 11 with a smooth shallow curve as shown using a French curve.
Join 14 – 15 with a smooth deep curve as shown using a French curve.
Draw a grainline from point 5 to 6. Label the CF and the CB.
CUTTING INSTRUCTIONS: Cut 2X
ASSEMBLY
1. Once the fabric pieces are cut out, thread mark the center front line (dash line on diagram) on the left and right sides for reference in making the fly. Pin boxer fronts right sides together and baste.
2. Sew lower part of front crotch curve, using a 1/2″ seam allowance from inner leg to 1/2″ above fly-front extension. Clip crotch curve right under fly extension, clipping seam allowance to within 1/4″ of crotch curve stitching.
3. Place shorts on the table with the right sides of the fabric facing you. Decide which side of the shorts you prefer the fly front to lap. (Men’s shorts lap left over right, but if you are making them for women then no fly is need. Trim away the fly extension). Mark lap over side with “O” and lap under side with “X” on some low-tack masking tape and place on each appropriate front piece.
4. On “X” side, fold under 1/4″ on fly extension. Fold again so that the first fold lines up with center-front marking. Sew 1/8″ from fold.
5. On “O” side, fold in fly extension to the wrong side along center-front line. Fold again so that raw edge is enclosed and lap-over side has three thicknesses and the folded edge lies along center-front line. Stitch lap-over side of the fly into place along inside edge of fly extension. This stitching will show on right side of shorts.
6. Position fly onto its placement line and press. Topstitch horizontally across the bottom edge of the fly and across top edge of fly 2″ away from the waistline edge.
7. With right sides together, sew backs to fronts at inner-leg seam. Finish seam with flat fell or overlocked seam. Turn one leg right side out. Insert this leg into the wrong side out leg. Pin remaining crotch curve together. Sew back crotch curve, continuing stitching from front crotch curve. Clip curves and finish seam.
8. Boxers are now ready for the elastic casing at waist. Press down raw edge 1/4″ along entire edge of waistline. To form casing, fold the width of the elastic plus 1/4″ to wrong side of boxers. Topstitch casing closed, leaving a 3″ opening at shorts back to insert elastic.
9. Start out by cutting the elastic your waist measurement minus 3″ or use a pair that you own as your guide to how tight to pull in the elastic. Insert elastic into casing. Try on shorts to determine how snug you would like them to fit. (If the boxers are for sleeping, elastic should be looser. Teenagers like to wear them a little lower than the waist so longer elastic is preferable).
10. To join elastic, butt ends of elastic over a piece of fabric cut twice the width of the elastic. Wrap elastic with fabric scrap. Zigzag-stitch the ends of elastic to fabric scrap. This method eliminates bulk in elastic and works to prevent frayed ends from protruding. Close opening in casing.
11. To hem shorts, press under raw edge of legs under 1/2″. Fold again so that raw edge of fabric is enclosed. Pin and baste. Topstitch hem into place.

August 21, 2008 at 10:34 am
i love ur website……n’ i will ensure i ask ppl to come here n’ visit this website…i hvn’t tried out any of the patterns….but i think that ur thgts deserve a lot of appreciations…;)
August 27, 2008 at 9:00 pm
thx for the shout out..much appreciated.
May 7, 2009 at 9:05 am
[…] Boxer-Short 3 […]
June 8, 2009 at 7:10 pm
i have just visit ur web site i’m going to make the boxer for my son i hope it came out good,,suppose he is bigger than the pattern wat must i do to make it a little bigger like say 4inch
more..thank you…
June 9, 2009 at 12:31 am
Thx Pauline, what size measurements we talking about?
July 17, 2009 at 6:36 pm
Hi there love your site and have been slowly digesting it all 🙂
Just a quick question, how much ease would you use in this pattern if you were making the boxers shorts out of stretch material?
Many thanks
July 17, 2009 at 6:51 pm
Thx Carol-Anne
Regarding ease, I don’t have a simple answer for you because it will depend upon the stretchiness of your fabric. It is a bit of a trial & error approach.
If you are using a stretch knit, determine the elasticity of the stretch. To do this, take a strip 4″ x 1″ and stretch the strip to its maximum give.
For example, if the 4″ piece can stretch to 8″ it has double the elasticity; if it only stretches to 6″ it has a quarter of the elasticity. If the stretch fabric has a quarter the elasticity, then reduce the ease in the draft by 1/4 and if it is double; then reduce the ease by half. If you are using a stable knit, then do not reduce the ease at all.
WD
October 6, 2009 at 12:00 am
heluuuuuuuu
March 5, 2010 at 4:48 pm
is the pattern already with the seam addition?
March 29, 2010 at 8:22 pm
[…] Found here! Bookmark Idea […]
April 16, 2010 at 5:46 pm
r boxer shorts to be worn with(on) an underware???
May 5, 2010 at 6:06 am
i tried for 4yr old son adjusting the pattern.it was very easy
this website is very usefull and i ve planned to try more
July 31, 2010 at 3:33 am
I think the best fashional boxer briefs must be the nice pattern printed,mesh fabric made is the best style of boxer briefs for men .
May 25, 2011 at 1:45 pm
[…] Free Boxer Shorts Pattern […]
October 19, 2011 at 10:14 pm
[…] a similar pattern – I haven’t tried it, so use at your own risk – and here is a DIY […]
February 27, 2013 at 4:01 pm
[…] I got home I set about searching for a good boxer pattern & came across these instructions for drafting your own. After a little modification I got a pretty good pattern. One correction though, “6 is […]
October 21, 2013 at 2:40 am
[…] out, and I thought that sounded like a huge pain and waste of printer paper. But then I found this free boxer short pattern that included simple instructions to draft your own pattern from just three measurements. The only […]