 This pattern design method can be used to determine drafting measurements from a given figure height combined with girth measurements for the chest, waist and hips. Knowing the person’s height allows for formulations of various lengths based on the Golden Mean and combined with established size parameters, a trouser or torso pattern can be drafted for an average human body.
H = full length of body; also the span of laterally outstretched arms, measured from finger-tip to finger-tip, is equal to the height of the body.
1/2 H = upper part of body (torso) or lower part of body (legs)
1/4 H = length of leg from ankle to knee and length from chin to navel
1/6 H = length of foot and length of forearm (measured from elbow to wrist)
1/8 H = length of head from crown to bottom of chin
1/10 H = height of face; also length of hand
Drafting By Height: Trousers (based on 8 heads per figure)
The theory based upon the Golden Mean can be used to determine drafting measurements from a given figure height of an average or off-proportioned body. You need the following measurements to draft a trouser pattern: height, waist and hips. The scale is one head equals 1/8 of the total height.
Example:
for a person who is 5 feet 8 inches tall, one head length is 8 ½”
5′ 8″ = 68″ 68″/8 = 8.5″
Rise is 1 head plus 1″ ease plus width of the waistband
eg. rise = 1/8 height + ease + waistband width
Inseam is 4 heads minus Y (amount taken off for width of trouser cuffs)
eg. inseam = 1/2 height – Y
Outseam is inseam plus rise, or
5 heads plus ease minus Y plus waistband width
eg. outseam = 5/8 height + ease – Y + waistband width
Example:
Given a height of 5 feet, 8 inches, trouser cuff width of 18″ and a waistband 1-1/2″ wide, then:
rise = 68/8 + 1 + 1.5 = 11
inseam = 68/8 – 2.5 = 31.5
outseam = 5/8 x 68 + 1 – 2.5 + 1.5 = 42.5
Table for Leg Reduction (Y amount)
| for bottom width | take off Y amount * |
| 24″ | 1″ |
| 23″ | 1.25″ |
| 22″ | 1.5″ |
| 21″ | 1.75″ |
| 20″ | 2″ |
| 19″ | 2.25″ |
| 18″ | 2.5″ |
* for shaped trouser cuffs, use less Y amount (0.5″ to 0.75″)
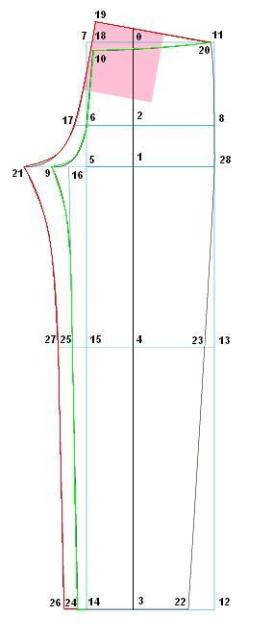 Trouser draft:
square both ways at 0.
0-1 = body rise + 3/8″ [1cm]; square across
0-2 = waist to hip; square across. (approx. 8-9″ [20-23 cm]).
0-3 = outseam; square across
1-4 = midway between 1-3 minus 2″ [5 cm]; square across.
1-5 = 1/12 hip mmt. + 5/8″ [18 mm]; square up to locate points 6 and 7.
6-8 = ¼ hip mmt. + 3/8″ [10 mm]
5-9 = 1/16 hip mmt. + 3/8″ [10mm]
7-10 = 3/8″ [10mm] squared across and 3/8″ [10 mm] squared down
Join 10-6 with straight line and join 6-9 with a curve line as shown.
This is the centerfront crutch seam.
Square up and down from point 8.
10-11 = ¼ waist mmt. + 3/8″ [10mm] (note: point 11 will “sit” on line 7.)
12 is located at intersection of 3 and 8.
13 is located at intersection of 4 and 8.
Square down from 5 to locate 14 and 15
5-16 = 1/2 mmt of line 5-9
6-17 = ¼ mmt of line 5-9
7-18 = 3/8″ [10mm]; join 17-18 and extend as a tangent line
19-20 = ¼ waist mmt. + 3/8″ [10 mm], taken at a 90 degree angle from tangent line so that line 19-20 touches the line 7-11. (Note: point 19 will be located on the right angle and the constructed line may not touch at point 11 as shown.)
9-21 = ½ mmt. of 5-9
Join 17-21 with curved line as shown
3-22 = 1/4 trouser cuff width minus 1/4″ [6 mm]
23 is located on kneeline.
3-24 = ¼ trouser cuff width minus 1/4″ [6 mm]
4-25 = 4-23
Join 24-25 with a straight line and 25-9 with a curved line as shown.
24-26 = 3/4″ [20 mm]
25-27 = 3/4″ [20mm]
Join 26-27 with a straight line and 27-21 with a parallel curved line as shown.
5-28 = ¼ hip mmt. + 1/4″ [6 mm]
Join 22-23-28-8 and gently curve into 20 to draw outseam leg seam.
This is an easy fit type trouser pattern. Trace off front and back patterns. If you desire extra ease (seat angle) in crutch of trouser’s back portion, cut along back hipline and open a wedge about 1-1/2″ [40 mm] wide at CB to nil at side seam. Redraw centerback seam.

March 28, 2008 at 10:39 am
It was interesting and easy to understand. However, I have not tried it practically. Let us hope for the best.
March 30, 2008 at 7:11 am
Thanks for posting this fyi. I’ve wanted to learn how to do this for a while. So now (of course) i have some points that could use clarification.
1) Where exactly do you place #10? I figured I’d fake it and that seemed to work until I connected 17-19 which…
2) My 17-19 line fell on the inside of point 10.
3) My 19-20 line was several inches shorter than my/your calculations would suggest. Of course there may be a number of reasons for this.
I think my ultimate question is if the posted diagram is what my pattern should look like.
I had a momentary confusion when i read “bottom width”. I thought for a while you might be talking about the seat. So instead of saying “bottom width” or “trouser bottom” I suggest “cuff circumference” or “trouser cuff”.
Thanks again. I think overall it’s quite easy to read. Yey!
March 30, 2008 at 2:37 pm
Thanks Deirdre for the suggestions. Always good to have someone actually proofread the instructions. Sometimes my words get “lost in translation”. LOL!
As for the diagram, it is not to scale so your draft may not look exactly as shown but trust your measurements. It is only a map to follow the point location.
March 18, 2009 at 1:45 am
[…] This pattern is drafted by height. […]
May 7, 2009 at 8:49 am
[…] Hose […]
May 28, 2009 at 6:42 pm
[…] This tie is drafted by height. […]
August 14, 2010 at 1:41 pm
wat hv been lookin 4
August 14, 2010 at 1:46 pm
i love dis