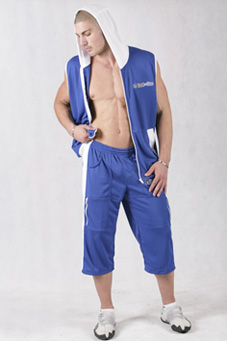
 Featured: Dry Max Hooded Vest
Chill in a unisex hoodie vest.
You will need:
- Sweat suit fleece *
- Rib binding *
- 1 separating zipper (equal to CF less 1” [25mm])
- Coordinating thread
- Kraft paper
* yardage will depend upon finished length.
The featured hoodie vest from Australian label Black and Blue is 28” long [71 cm].
MEASUREMENTS
Bust/Chest – measure around fullest part of upper torso, just under the arms.
Hip/Seat – measure around the fullest part of seat, 9” [23 cm] below waistline.
Back waist length – measure vertically from nape of neck to waistline.
Shoulder – measure from side of neck to socket joint of arm.
Finished Length – measure vertically from nape of neck to desired length.
PATTERN

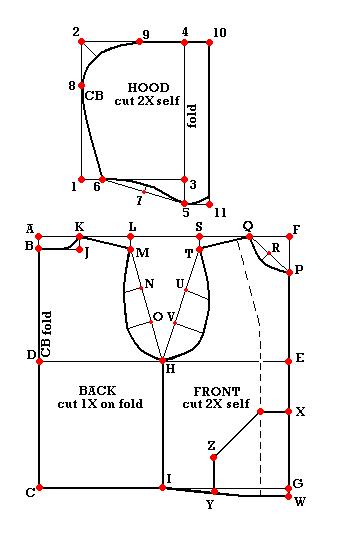
BACK SECTION
Square 2 lines from A at 90°.
A-B = 1” [25mm]
B-C = finished length + 1” [25mm]
B-D = ½ back waist length
Square across all points.
D-E = ½ bust or hip (whichever is greater) + 1” [25mm]
Square up and down from E to locate F and G.
D-H = 1/4 bust or hip (whichever is greater)
Square down from H to locate I.
B-J = 3 ⅜” [85 mm]
J-K = 1” [25mm]
Connect B to K with a shallow curve as shown.
K-L = shoulder length
L-M = 1 ⅜” [35mm]
Draw a construction line from M to H and divide it into 3 equal parts. Label points N and O.
Draw the back armhole with a smooth curve from M to H, passing through points 1 ⅜” [35mm] from N and 1 ½” [37mm] from O.
FRONT SECTION
F-P = 3 ½” [90mm]
F-Q = 3 ¼” [82mm]
Draw a construction line from P to Q and divide it into 2 equal parts. Label point R.
Draw the front neckline from P to Q passing through a point ¾” [20mm] from R.
Q-S = shoulder length
S-T = 1 ⅜” [35mm]
Draw a construction line from H to T and divide it into 3 equal parts. Label points U and V.
Draw the front armhole with a smooth curve from H to T, passing through points 2” [50mm] from U and 2 ¼” [57mm] from V.
G-W = ¾” [20mm]
Join I to W with a smooth curve. The corner at W is a 90°angle.
For the front facing, draw a line 3” [75mm] parallel to centerfront tapering to 1 ½” [37mm] at the shoulder-neck. Trace off the facing onto additional paper.
For the pocket, W-X = 10” [25.5 cm]
W-Y = 10” [25.5 cm]
Square up from Y; Y-Z = 5” [12.7 cm]
Draw a line from Z to intersection on facing point.
Trace off the pocket onto additional paper.
HOOD SECTION
Square 2 line from 1 at 90°.
1-2 = 13’ [33 cm]
1-3 = 10” [25.5 cm]
Square across from 2 and square up from 3 to locate 4 at the intersection.
3-5 = 3” [76 cm]
3-6 = front neckline mmt. + back neckline mmt. from body draft.
Draw a construction line from 5 to 6 and divide it into 2 equal parts. Label point 7.
Draw the neckline with a smooth curve between 5 and 6, passing through a point ½” [12mm] from point 7.
1-8 = 7 ¾” [19.8 cm]
2-9 = 6 ¼” [16 cm]
Join 8 to 9 with a curved line passing through a point 2 ¼” [57mm] from point 2.
For hood facing, 4-10 = 2” [5 cm]
5-11 = 2” [5 cm]
Join 10 to 11 and trace off neckline between 5 to 11.
Add seam allowances to all pattern pieces except hemline.
Grainlines are parallel to CF and CB.
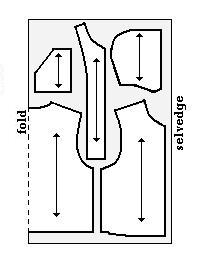
 CUTTING
Back – cut 1X self on fold
Front – cut 2X self
Front Facing – cut 2X self
Hood – cut 2X self
Pocket – cut 2X self
Cut rib binding to fit.
Design Tip: Use a contrast colour for the hood and rib binding
ASSEMBLY
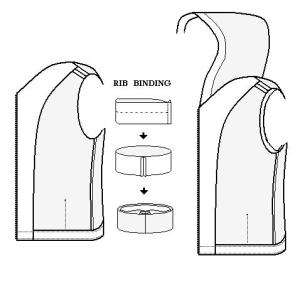
- Trim pocket opening with ribbed binding.
- With pockets up-side down and FACE DOWN on CF, stitch top of pocket to fronts.
- Flip pockets FACE UP and align with bottom edge of fronts. From the inside of the pocket, stitch short side from pocket opening to hem to the fronts. Baste the rest of the pocket to the fronts.
- With fronts FACE UP, stitch zipper (separated) face down to CF and 1” [25mm] from bottom edge.
- Align and match front facing to zippered edge with right sides facing together. Stitch facing to CF and 1” [25mm] from bottom edge. Trim bulk from bottom of facing at the hem and turn right side out.
- Attach fronts to back at shoulders. Stitch shoulder seam and press open.
 Trim armholes with ribbed binding.
- With right sides together (RST), match side seams and sew fronts to back. Press seam towards back. Trim seam allowance or overlock and topstitch on FACE SIDE along the seam on back section.
- Turn up hem 1” [25mm] and press. Open fold and re-fold raw edge to crease line. Fold up remainder of hem. Stitch down.
- On FACE SIDE, topstitch hem edge including the front facing.
- Align and match neck of front facing to neck of fronts. Secure front facing at the shoulder seam.
- With fronts FACE UP, topstitch CF along zipper.
- With RST, align and match top and CB of hood. Stitch center seam. Press to one side. Trim seam allowance or overlock and topstitch on FACE SIDE along hood’s center seam.
- Neaten facing edge of hood with a seam finish or overlock.
- With RST, align and pin/baste neckline of hood to body’s neckline. Wrap hood facing around the CF edge and back along neckline. Stitch hood to neckline. Trim and grade seam allowance.
- Flip hood facing FACE UP and turn facing to inside the hood. Edge-stitch open edge of hood facing to the hood.
- On FACE SIDE, topstitch along neckline seam.
July 31, 2009 at 4:04 am
This is just in time for the teens who are going back to school and sports. Thanks for the pattern. Cordially, Nehmah
August 1, 2009 at 1:46 pm
Thank you so much for your site. You have given me so much. I am a BWOF small petite size 15. Seeing how to draft something has been so great, i now have a master pant/trouser, bodice/jacket and skirt through you. I hope you will do a twist top that twists near the neckline, asymetrically angling toward the left shoulder. The twist tops are nice but most twist between the breasts and I want one that twists below the neckline but above the breast with the drape going towards the left shoulder.
Susan White
August 2, 2009 at 3:14 pm
Thank you for the kind words Susan. The twist style that you desire is obtained through a technique called “draping”. What I show here is flat pattern techniques. Draping relies on the bias grain of the fabric to create shaping around the human body. This is difficult to realize whenever doing the flat pattern method which uses the straight of grain. My suggestion is to check out your local library in the Science & Technology section and look for DIY books about draping and design your own twist on a dressform in your chosen fabric.
WD
August 3, 2009 at 12:57 pm
Hi, I just stumbled on this site via a sewing mag’s blog and I’ve already forwarded the address to my mother and my best friend. It’s amazing. I love drafting patterns, even if my sewing ability is rubbish. There’s a real sense of accomplishment about creating the pattern from scratch though, so I’m looking forward to getting out my tape measure and paper and having a go with some of these patterns (even if I don’t sew them).
Looking back over past posts, I saw a couple have needed to be removed. Copy right is a tricky issue, and I really hope that you are able to work out a way to keep sharing your skills while showing the patterns. Do you ever post images of the projects you have done yourself? I assume that the pics you’ve posted are of the items you’re imiating (or inspired by, perhaps!).
Anyway, thanks for this. It’s amazing. I’ll keep coming back.
August 3, 2009 at 4:31 pm
Thx for the kind words Anny. The ideal purpose of doing your own pattern drafting is that you are able to have clothing made-to-measure for you or for someone else who you may be designing for. Often there isn’t even a pattern involved; just some basic body measurements. I am certain everyone loves their Chanels and Diors but they are still purchased “off-the-rack” and need alterations. Although you must sew it, you get the choice of fabrics and colours as well.
The fashion and home decor examples I choose are not complex and simple construction that anyone without drafting knowledge can do. The examples in my blog are culled for the world of fashion and design. The reason why I do not use my own designs is that I create for a specialty market and would not be of any interest to readers.
WD
January 28, 2010 at 1:43 am
Ok is it me or are these things getting more and more popular? Not that its a hoodie but look at the dang Snuggy, I would have never guessed that those would become a hot item.
January 28, 2010 at 1:29 pm
Hello Mike, It isn’t just your perception. I live in the Nashville area, and don’t know of a male from 5 up to 75 who doesn’t have at least one of these handy garments. Cordially, Nehmah
May 20, 2011 at 9:43 am
[…] Something just for the guys – a Hooded Vest. […]
May 26, 2011 at 11:43 pm
[…] Free Shirt Patterns: Hoodie […]