 These long and loose bottoms score high on the comfort index. The fabrics are fluid and the prints are fun, which means they are less for curling up on the sofa than for spending a weekend afternoon in style. Think silk, linen, rayon, or cotton…something lightweight and drapy. Balance them with a body-fitting top or stay faithful to the bedtime look with a big and beautiful sweater.
Featured: Blue-green silk pajama pants from Dries Van Noten
The cut and fabrication of these loungers is novice level and fits many shapes and sizes. It’s an easy “no-pattern” afternoon project.
You need:
- 1 ½ yds. of fashion fabric, 44-45″ wide
- Coordinating thread
- 1 pkg. of 1″ wide waistband elastic or 60″ drawcord
- Tailor’s chalk
- Tape measure
PATTERN
No real pattern is required but if you wish to make several pants you can make a paper template.
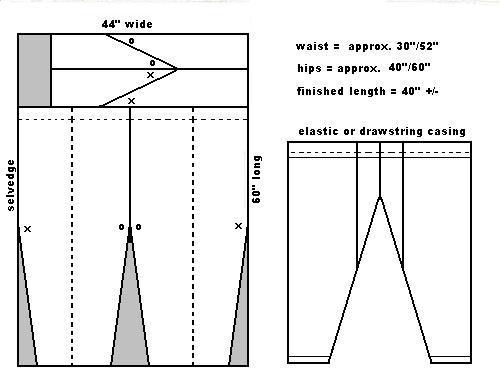
Recommended to control the fullness at the gathered waist is elastic or a drawsting. The waist can accommodate 30″ to 52″ approximately.
For the cut, measure your finished pant length. (waist to heel). Add 1″ for cuff hem allowance and 1 ½ ” for waist casing to this measurement. Record it.
Straighten the cut edges of your fashion fabric and square across the width.
Measure along the selvedge the pant length measurement and square a line across the width with tailor’s chalk
Divide the section equally in half parallel to the selvedge with a chalk line. These are the left and right leg sections.
On each leg section, measure in approx. 2-4″ from the lines. This may vary based on how fitted a bottom cuff you want (must be able to get your foot through however). Then, measure along the length and find the midpoint. Chalk a notch. (X and O on diagram). Join Xs and Os to bottom points at hem with a straight edge using chalk.
Take this “midpoint” measurement and plot it along the waistline. Add 13″ for the rise. Square up on remaining fabric parallel to selvedge and mark with chalk. This is the gusset section.
Divide the gusset section in half by squaring across the fabric width.
Measure across top and bottom the distance equal to half the leg distance from waistline to X. Plot it and mark with chalk. Repeat but measure the dividing line from the opposite end. Join the notches with a straight edge. (see diagram).
Cut on the chalk lines. You will have a left leg side, a right leg side, and 2 pairs of gussets.
ASSEMBLY
Finish raw edges with desired seam finish. (I used pinking shears).
With right sides together, pin and baste a gusset to each center portion of the legs. (Match Xs and Os). Stitch seam and press open.
With right sides together, fold each leg section in half lengthwise and pin and paste inseam from crotch to hem. Stitch inseam and press seam open.
Turn one leg section right side out and place it down the other leg section. Match up CF and CB at waist and align inseams. Pin and baste gussets together and stitch crotch seam. Press open. Turn pants right side out.
Turn under 1/2″ at waistline and press. Turn under 1″ all round and machine stitch down to create a casing. Open a slit in the front crotch seam at the waist to insert an elastic or drawcord. (make elastic equal to your waist measurement less 2″ if using).
Hem bottoms of legs using a 1″ hem allowance.

August 2, 2009 at 1:16 pm
I think i’m going crazy, but does the assembly tell me to sew the gusset section to the right side of these pants? heeeelp?!
August 2, 2009 at 3:00 pm
What is meant by “right side” is the face side of the fabric as opposed to the back (wrong) side of the fabric. In other words, what will become the outside of the garment. My apologies for the misunderstanding in language use.
August 4, 2009 at 4:43 am
Thanks i was having brain issues (or lack thereof) i get it now…
Also should have mentioned it before – I love your site – is inspiring.
November 12, 2009 at 12:29 pm
[…] The Pajama Pant […]
February 11, 2011 at 12:09 am
[…] The Pajama Pant […]
July 21, 2011 at 8:44 am
[…] to make my own? This should be quite easy as there is no fitting required with loose trousers and these pajama pants over at WkndDesigner are just perfect for the job. Now, when I was in Borneo I bought quite a few […]
June 18, 2012 at 4:41 am
[…] fit. I’m continuing to sew; this week I tried making a pajama pant following the Weekend Designer‘s ideas. Well, the pants look ghastly because I didn’t measure the rise. The WD says […]