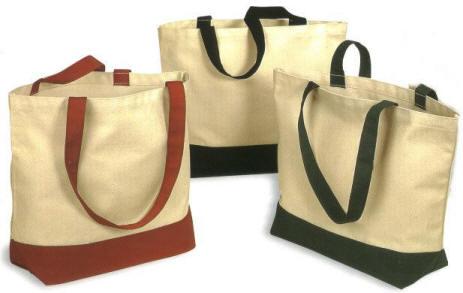
A duffle tote is an ideal type of luggage that no traveler should be without. The duffel bag is one of the most versatile and functional forms of luggage. It can be used as a carry-on for plane trips, and can also serve as the perfect overnight or weekend bag. Duffel bags can be made in a variety of styles, designs, colours and fabrics. Therefore, anyone from a business traveler, to a camper, or everyday vacationer, will find use for a duffle tote bag.

You need:

  • 1 heavy-duty closed plastic zipper
  • 2 D-rings, 7/8″ wide
  • 3 or more yards of polyester web strapping, 1″ wide
  • 1 yard of canvas/upholstery weight fabric, 54″ wide
  • Coordinating thread
  • Tape Measure

PATTERN

The size of your duffel tote bag is based on the circumference of a circle. The larger the circle, the larger the bag. Look for a circular object to use as a template or use a compass. (I traced around a large pie plate).

Next, measure the circumference of the circle pattern using the edge of the tape measure. eg. a 9″ pie plate has a circumference of 28 ¼”.

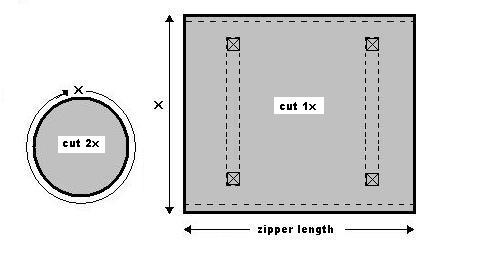
Add 1″ to the circumference measurement. This is the bag height or X. (see diagram)

Now, to determine the width of the duffle, choose your desired zipper length. The longer the zipper, the wider the bag. (I chose a 22″ large-toothed plastic zipper). Measure the zipper tape, end to end, with the tape measure. This is the bag width.

Draw out a rectangle pattern (height x width).

Fold rectangle pattern in half and then each half again to quarter. Open the pattern flat.

Mark out strap placement lines on the foldlines closest to the ends. Allow 3-4″ free from top and bottom edges of rectangle pattern. (see diagram)

Cut the rectangle piece 1 time and the circular end pieces 2 times from your fabric on the straight grain.

ASSEMBLY

  1. Turn the top and bottom edges of the rectangle piece to the wrong side by ½” and press.
  2. Using the pattern as a guide, chalk the placement lines for the strapping on the fabric.
  3. Place the webbing over the placement lines and pin in place. Begin in the center of the center of the placement line and allow for the desired strap looping (I used 3 yds. of webbing and matched the colour to the colour of my zipper) then continue down the opposite end and allow the same amount as before for the strapping loop and finish where you started. You may overlap the ends together or “melt” the shorts end with a match to seal to prevent fraying of the webbing.
  4. Following the dotted lines on the diagram, topstitch the webbing to the fabric as shown. To reinforce the bottoms of the strap loop, sew an X through the webbing at each of the 4 points.
  5. Using a zipper foot, place one of the folded edges on top of the zipper tape with the zipper and face side of the fabric up. Topstitch in place.
  6. Then, place right sides of the fabric together and on the opposite folded edge, open the fold and stitch to the opposite side of the zipper. Open the zipper and face side up, topstitch the folded edge to the zipper. Close the zipper and stitch across the open end. You will have a “tube” shape.
  7. Cut 2 pieces of webbing 1″ long. Wrap each piece through a D-ring. Stitch each D-ring tab to the ends of the zipper tape with the D-ring facing the center of the tube.
  8. Divide the tube ends in quarters, beginning at the zipper position. Divide each circle into quarters.
  9. Open the zipper halfway. Pin the circle ends to each end of the tube following the quarter marks. Using a 3/8″ seam allowance, stitch in place. (You may have to clip the straight edge to sew into the curved edge to release any buckling of the fabric). Check for any uneven stitching then do a second row of stitching on top of the first to reinforce the seam. Turn the bag right side out through the zipper.

You can make a shoulder strap to attach to the D-rings if you desire.
Shirred sundresses with spaghetti straps are a fun wardrobe item. Whether you’re hanging out by the pool or just chilling on a summer day, this dress keeps you looking sweet and fresh all day long. The border print detail on the fashion model (ASOS Dresses) adds to the shirred bust panel with thin ribbon tie shoulder straps. This is a quick little dress that is easy to whip up in a day without a pattern and looks flattering on most body shapes.

You need:

  • Shirring elastic thread
  • Coordinating thread
  • 2 yds of cotton fabric (border print is optional), 44-45″ wide

1. For the fabric cut, measure the bust and double the measurement and this will be the width of fabric you will need.

Measure from very top of crease of underarm down to where you want the finished length to hit. (I usually prefer the knee or little higher). Add 1 inch to measurement. This will be the length of fabric you will need.

For example, for a size 10/12 and a dress length of 22 inches, the bust is 32 inches.

So fabric needed is approximately 64 x 23 inches for the dress.

From the excess fabric, cut a strip of fabric 1 ½” x 60″ for the ribbon ties.

2. To make it easy, I would find a border print that would work widthwise (44-45 in) as opposed to the usual lengthwise. Cut the length of fabric to this measurement. You are going to do this parallel to the selvedge to make effective use of the border (railroaded pattern).

On the other hand, for directional cutting on the straight of grain, cut 2 pieces of fabric (bust mmt. x finished length + 1″). This dress will have 2 side seams instead of 1 centerback seam.

3. Finish the raw seam edges of the length as desired. (I used pinking shears). Hem the top of the dress using a ¼” double rolled hem finish.

4. Begin shirring about 3/8″ under the hem stitch line. Continue shirring about 20 to 22 more rows down. Space the shirring about ½” or width of your presser foot parallel to your last row of shirring. Make sure to hand-wind the elastic thread onto a bobbin and use regular thread on the top, loosen your tension slightly and do some backstitching to tack the shirring so it doesn’t come unsewn.

5. With right sides together, match the raw edges of the back seam and sew it closed. Press seam flat. (I usually do some topstitching to both sides of the seam so it reinforces the seam).

6. Press the fabric strip in half lengthwise with wrong sides together. Open the fold and align each long edge to the foldline and press. Refold the strip and edge-stitch along perimeter of the strip to create the ties. Cut equally into 2 or 4 pieces as desired for ribbon shoulder straps.

7. Try the dress on and mark the placement of the ribbon ties. Sew in place. (When you sew the ribbon ties, I like to sew them on the hemline of the top of the dress and I tack them so they are secure).

8. Hem the bottom of the dress using a ½” hem finish.

The Shape

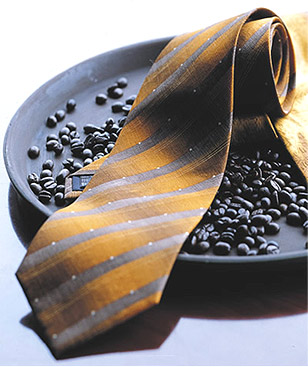
The shape of the necktie is an interesting item as it tends to fade in and out with current styles. Designers prefer a shape known as the “half bottle”. This shape enables a much more becoming knot with a small touch of refinement. However the true half bottle shape which looks like the neck and shoulder of a bottle typically doesn’t lend itself to some of the more narrower styles. By narrow, I mean anything under 3.5 inches.

The four major parts of the necktie draft equation are the length of the tie from the big tip to the knot, the knot itself, the tie around the neck, and finally the tail end of the tie that is hidden behind the front of the tie. The length should be reasonable so that when one tip is touching the belt buckle, the other tip can be securely held in place in the carrier on the back side.

You will need:

  • sharp pair of scissors or rotary cutter
  • silk pins
  • ruler
  • tailor’s chalk
  • thread
  • a new needle
  • 1 square yard of silk fabric
  • approximately 1 yard of wool tie fuse for your interlining.

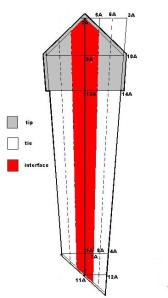
THE NECKTIE DRAFT

A necktie is a symmetrical shape cut on the true bias grain (45 degrees).

You will need your height measurement and your neck measurement.

Tie Width = 3.5 – 3.75 inches (it can vary on current fashion)

Four in Hand Knot = 2 inch allowance

Pratt Knot = 4 inch allowance

Half Windsor Knot = 5 inch allowance

Full Windsor Knot = 6 inch allowance

Take a yard-length of kraft paper (36″) and fold it lengthwise. Open the paper and draw a straight line on the creased fold. Refold the paper.

FACE SECTION

On the fold, mark a point, 1.

2 from 1 = (.30 x height) + neck measurement

Square across from 1 and 2.

3 from 2 = 3 x half the width measurement

4 from 1 = ½ distance of line 2-3

Join 3 to 4 with a straight line.

Divide line 2-3 and line 1-4 into thirds. Label points 5, 6 and 7, 8.

Connect 5 and 7 with a dotted line; connect 6 and 8 with a dotted line.

9 from 2 = line 2-3

Square across from 9. Label the intersection, point 10

Join point 9 to point 2.

11 from 1 = line 1-4

Square across from 11. Label the intersection, point 12.

Join point 1 to point 12.

13 from 2 = 7 inches

Square across from 13. Label the intersection, point 14.

Along the edge 14-10-2, make a parallel line ¼” and add a ½” seam allowance.

Trace all lines with a tracing wheel, then open paper and draw in lines using a ruler to retrace the lines.

To complete top portion, extend the line 1-12 with a tangent line across all lines.

Add ½” seam allowance parallel to tangent line.

Trace out the interface pattern and tip end as shown.

TAIL SECTION

On the fold, mark a point, 1A.

2A from 1A = (.30 x height – 3) + knot measurement

Square across from 1A and 2A.

3A from 2A = 3 x quarter the width measurement

4A from 1A = ½ distance of line 2-3

Join 3A to 4A with a straight line.

Divide line 2A-3A and line 1A-4A into thirds. Label points 5A, 6A and 7A, 8A.

Connect 5A and 7A with a dotted tangent line; connect 6A and 8A with a dotted tangent line.

9A from 2A = line 2A-3A

Square across from 9A. Label the intersection of the tangent line, point 10A.

Join point 9A to point 2A.

11A from 1A = line 1A-4A

Square across from 11A. Label the intersection, point 12A.

Join point 1A to point 12A.

13A from 2A = 6 inches

Square across from 13A. Label the intersection, point 14A.

Along the edge 14A-10A-2A, make a parallel line ¼” and add a ½” seam allowance.

Trace all lines with a tracing wheel, then open paper and draw in lines using a ruler to retrace the lines.

To complete top portion, extend the line 1A-12A with a tangent line across all lines.

Add 1/2″ seam allowance parallel to tangent line.

Trace out the interface pattern and tip end as shown.

Make a carrier loop 6 inches by 1 ½ inches.

See this link to assemble and finish your necktie.

Check out this site to learn how to tie your necktie.

Here’s a clever little idea…convertible clothing. This dress works double duty as a skirt. It’s ideal for weekend wear or travel wear. It’s functional and versatile at the same time.

Basically the concept is a wrap-around garment so it is adaptable to many shapes and sizes. The body proportion that needs to be considered is no more than a 7-8 inch difference between bust and waist measurements. Other than that ratio, it is quite flexible for most body shapes. The look is versatile as well. Through different fabrications it can be anything from a casual wrap by the pool to a sophisticated little black dress for a cocktail reception.

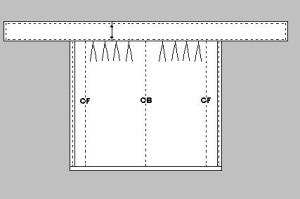
No pattern is needed to construct it. It is a simple block layout. You need a solid colour woven fabric width of 54-60″ wide. (see cutting diagram). Small to medium sizes = 2 yds. in length and medium to large sizes = 2 ½ yds. in length. The grainline is crossgrain so this cut is not ideal for prints unless they are railroaded or abstract in direction.

  • Cut 2 panels along each selvedge edge 15″ wide for wrap ties
  • Remaining fabric panel is wrap skirt portion.

Assembly:

On the large skirt portion, fold in a ½” turn on each short edge to the wrong side of the fabric.

Then turn each folded edge in ½” again. Press. Topstitch to finish.

Along one of the long edges, create a rolled hem by turning ½”, then 1″. Slipstitch or machine stitch in place. Lightly steam the foldline of the hem.

Next, fold the skirt portion in half and align and match the finished edges. Mark the fold on the long raw edge. This is the center of the garment.

From the finished edges along the long raw edge, measure 6″ and mark this location point. Set aside.

Now, take the two tie portions and align them, right sides together, along one short edge. Pin and baste along seam using a ½” seam allowance.

Measure and chalk 1 ½” from each end of the seam. Then measure and chalk 4″ from each of the chalk marks. This will be an open slit when completed.

Machine stitch the seam, leaving the 4″ distances unsewn. Remove basting. Press seam open flat.

Divide the bust measurement by 4. (eg. for size 10 = 34″ divided by 4 is 8 ½”).

From the seam (wrong side face up), measure and chalk ¼ the bust mmt. to the left of the seam and ¾ the bust mmt. to the right of the seam.

Fold the tie portion, matching up the 2 chalk marks and mark the foldline. This is the center of the garment.

Now, with right sides together, align and match the center marks of the tie and skirt portions. Pin together. Align each 6″ chalk point of the skirt portion to the bust mmt. chalk mark on each end of the tie portion. Pin together.

To control the excess fabric on the skirt portion, make 4 pleats equally spaced on both sides of center and pin and baste to tie portion. You will have 8 pleats in total. Ideally all pleats should fold towards center.

Machine stitch seam using ½’ seam allowance. Remove basting. Press seam open then press all seam allowances upward to tie.

Fold tie portion, with right side together, in half width-wise. Align and match raw edges on each tie end. From finished front edges, pin and baste long ties and short ends. Machine stitch using ½” seam allowances. Remove basting. Press seam open. Grade corners.

Turn tie ends right side out and turn in remaining raw edge by ½”. Place folded edge on top of pleating aligning to machine stitching. Pin and baste to encase raw edges. Press a sharp knife edge along the perimeter.

Edge-stitch by machine along the tie portion edge to finished. Align small 4″ opening and slipstitch together to complete garment.

To wear: Wrap garment around bust or waist, slipping the tie end closest to body through the 4″ opening. Continue to wrap tie end around the body and tie together with a bow to the other tie end.


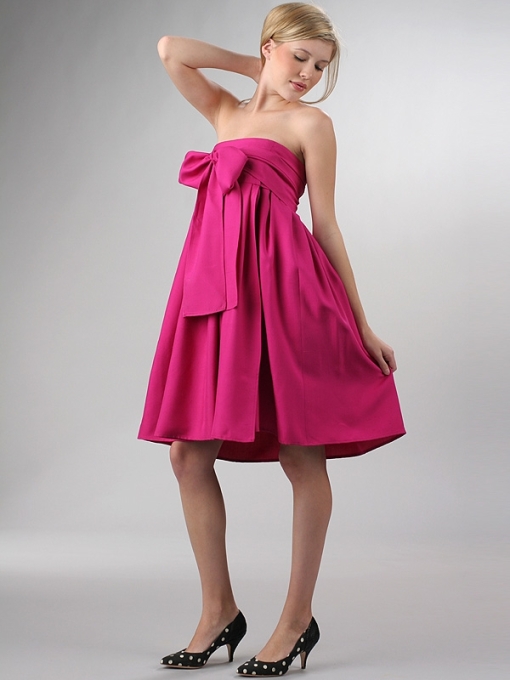
A fun and fabulous trend from the runway that works for all “non-model” body shapes! Baby-doll dresses, with their forgiving fit and romantic feel, are the smart choice for balmy summer weather. Flirty, flowy, and feminine, they are a perfect staple for work, weekend, or travel. Wear with flat sandals for day and transform for night with strappy stiletto heels or wedges. For instant effortless style, choose one in a bold, solid color or floral print, like this one from Nicole Miller at Bloomingdale’s. And if you’re feeling extra daring, try a geometric pattern. Best of all, these dresses work wonderfully well with this season’s essential accessories. Try layering with leggings underneath for a not-so-hot day or cinch high above the waist with a funky belt for an edgier look. Baby-doll dresses have surfaced as one of the most prominent fashions in the collections of designers everywhere. Given the emphasis on short hemlines and loosely fitted clothes, it was perhaps inevitable. There’s only one requirement: a great pair of legs.

THE PATTERNDRAFT

Let’s begin by folding the paper in half, lengthwise (for symmetry).

At the top of the paper, square a line across from the fold.

From this line, measure along the fold the finished length of the dress.

For example, the finish length of the model photo is 28″.

Square a line from this point across the paper from the fold.

Now along each of these draftlines, measure half the hip or bust measurement plus 6 inches (whichever is larger).

Join each point to create a rectangle. Label ABCD.

From line AB, make a parallel line 9 inches down the fold.

Divide this line into three equal sections and label the second third, point X. Square up from X.

Divide the distance from X to the edge in half. Label point O.

Join a straight line from O to D. (side seam)

Parallel to line AB, draft a line across from fold 1 inch. This will be the foldline for the drawcord casing.

Where it intersect line X, label +. Swing a shallow curve from + to O as shown.

Above point D, place a set-square on the sideseam line (OD) and draw in hemline with a smooth curve blending into the line CD from the 90 degree angle. [see bubble for detail].


For the three tiers, draw two parallel lines from line CD, each 3 inches apart.

Trace off each tier for each layer of the dress. [do this on folded pattern paper].

Add seam and hem allowances. Open the folded paper for the complete pattern piece. Indicate the straight grain parallel to the foldline with a grainline on each pattern piece.

Each pattern piece is cut 2 times and is used for both front and back portions.

  • Stitch up sideseams and hem.
  • Layer 2 tiers together and drop third tier inside by stitching together at armholes before turning right side out.
  • Fold over top edge to create a casing and thread drawcord to create gathered neckline.

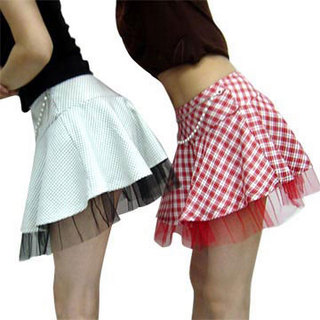
This short and sassy mini skirt duo are a whooping 6-8 inches above the knee – true ‘60s style! Fun, flirty and flowing are the prominent themes with these bias-cuts; fabricated here in cotton sateen and checked gingham with a pretty “net” underskirting.


To draft the skirt pattern you will need:

  • Kraft paper (60” long x 30” wide)
  • Tape measure
  • Ruler
  • Pencil
  • Push pin
  • String


1. Measure around your waistline where you normally wear your skirt. (In the photo, this is a hip-hugger style, approx. 2 inches below the natural waist). Record this measurement.

2. Fold along one end of the paper, 2 inches across its width. Open paper flat and draw in foldline with a pencil.

3. At a right angle (90 degrees), draw a second line perpendicular to the first line along the length of the paper. Do this approx. 2 inches from the edge.
4. Where the two lines intersect, label this point X.
5. Use this formula for a circle to determine a compass point to draft your pattern.

Radius #1 = Waist mmt. x 2 divided by 6.28

6. Tie the string to the pencil and measure the length of the string equal to the Radius. Using a push pin secure it at point X. This is a make-shift “compass” to create a circle.
7. Arc a curved line from A radiating from X . Be sure to hold the pencil upright and keep the string taut as you do so.

This is the waistline of the skirt. (If you measure it with a tape measure, it should equal half your waist measurement).

8. Now, make the string 4 inches longer and repeat the last step from B radiating from X. This is the hip yoke portion of the skirt. Measure this line accurately with a tape measure. Record this measurement.

9. Now below this draft, fold the paper across its width. Open paper flat and draw in foldline with a pencil.
At a right angle (90 degrees), draw a second line perpendicular to the first line along the length of the paper. Do this approx. 2 inches from the edge.

Repeat steps 4 to 7 using this formula:

Radius #2 = yokeline mmt. x 2 divided by 6.28

10. Now, make the string 10 inches longer and repeat the last step. This is the flared skirt portion of the mini.
11. Use the same pattern piece but 2 inches longer for the net underskirt. Trace it off on paper.

12. In the center of each pattern piece, draw a line parallel to the foldline you began with. This is the grainline of the pattern. Indicate it with an arrowhead on each end of the line.

13. Add ½ inch seam allowances to all sides of your pattern pieces and label the following cutting directions:

  • Yoke – cut 4 times
  • Skirt Flare – cut 2 times
  • Net Underskirt – cut 2 times

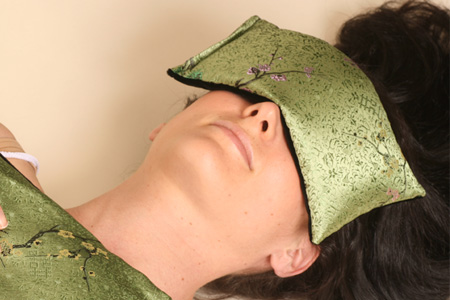
Eye Pillows provide soothing relief in two ways:

  1. Chill an eye pillow in a ziplock bag in refrigerator or use at room temperature to provide soothing relief for your eyes.
  2. Heat for up to 30 seconds in the microwave to use as a “mini” heat pad for other parts of your body. (Do not use heated product on your eyes.)

Eye Pillows are perfect for:

  • Migraines and other headaches
  • Sinusitis
  • Rest for tired eyes
  • Hand or foot warmers

Eye Pillows are made with 100% cotton covers (size 4″ by 9″) filled with natural grains such as millet or rice, or seeds like flaxseed or linseed, or an herb mix, such as lavender which is a favorite for calming nerves.

Combine Eye Pillows with soothing music and scented candles to maximize your relaxation experience.

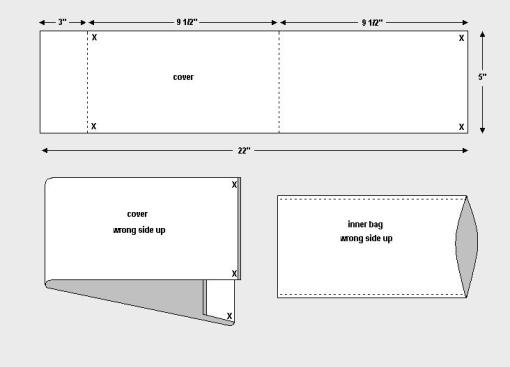
To make an eye pillow, select 100% cotton percale or sateen for the inner bag. Cut a rectangle 5″ by 19″ [13 cm by 49 cm].

For the outer cover, select 100% cotton sateen or flannel. Preshrink fabric. Cut a rectangle 5″ by 22″ [13 cm by 56 cm].

To assemble outer cover, turn and stitch a ¼” double-roll hem on each short end of rectangle. Fold one end of rectangle with right side together (RST) 2″ [5cm] to create a flap. Fold opposite end of rectangle with RST to align ½” [1.25 cm] short of flap fold. (see X location on diagram). Stitch through all layers along long edges. Turn right side out.

To assemble inner bag, fold rectangle in half with RST and stitch along long edges. Turn right side out. Fill bag with a ½ lb. [200 g] of grain/seed/herb mix. Turn under ½’ [1.25 cm] at open end to inside and stitch opening closed. Insert inner bag into cover.


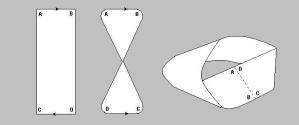
John Lennon sang on the White Album of the Beatles; “Your inside is out, when your outside is in” to express the paradox of the oneness free from illusion of a multidimensional world. The German mathematician and astronomer- theoretician A. F. Möbius discovered at the beginning of the nineteenth century, that something with two sides can have one surface: the möbius ring. The inside is the outside when one joins the two short ends together with a twist into a ring – think of the cyclic of time; visualize by joining the frontside to the backside. Isn’t it amazing?


The möbius ring is a popular pattern used by knitters to create scarves and wraps into wonderful fashion accessories out of yarn. I thought the same idea could be achieved by using double faced fabrics such as Yukon fleece. Both sides of the fabric are identical and raw edges do not fray.

The shoulder shawl, similar like the one above designed by Judy Scott of Mountain Color Yarns http://www.mountaincolors.com, can be easily made from a rectangle of two-ply polar fleece. No pattern is needed.

  1. Start with a rectangle (ABCD) approx. 20″ long x 60″ wide.
  2. Give the rectangle a half twist.
  3. Align the short ends so that they overlap and A matches D and B matches C.
  4. Stitch through the overlapped layers and trim closely to the stitching.

You buy organic, ride public transit and recycle. It’s time to achieve the truly ultimate green lifestyle. Create your own reusable canvas shopping tote bag to replace your plastic and paper bags.

Eco-friendly and reusable, you can design a wide-range of fashionable organic totebags — numerous styles, sizes, and colours. These sustainable alternatives to your traditional shopping bags are often made using hemp, bamboo or, most popular of all, organic cotton.

What you will need:

Self fabric – 1/2 yd. of 54″ width natural fibers

Contrast fabric – 3/4 yd. of 54″ width natural fibers

Matching thread

Card or Bristol board – 6″ x 18″

If you want to launder the tote, serge or zigzag the edges of the fabric, preshrink it in the washer and dryer, then cut the bag pieces to size. (note: allow extra yardage if preshrinking)

You should have a new sewing machine needle for this project and match the size to the weight of fabric being used.

All seam allowances are ½” unless stated otherwise. RST = right sides together.

INSTRUCTIONS

Step 1: No pattern is needed. From self fabric [A], cut two 25″ x 14″ panels.

From contrast fabric [B], cut one 25″ x 15″ rectangle for bottom section, two 19″ x 7″ rectangles for the base, and a strip 54″ x 5″ for the handles.


Step 2: Fold fabric B in half lengthwise. Cut out a 2.5″ square at the lower corners of each folded end.

Step 3: For bag straps, fold strip in half lengthwise with WST and press. Open strip and fold raw edges to centerfold. Refold strip on pressed fold. Edge-stitch along open edge, then edge-stitch along fold. Press. Cut in half for handles.

Step 4: Press under top edge of each panel section (fabric A) 1-1/4″ turn. Divide top edge into thirds and mark with a pin. Open folded edge of front panel and place face up. Align strap ends to each pin location and stitch ends in place along edge. Repeat on back panel.

Step 5: Stitch each panel section to bottom section along its width, with RST. Press seams to one side.

Step 6: Fold body of bag in half with RST, aligning side seam at seam of contrasting fabric and at top edge foldline. Stitch fabric pieces together on the sides and press open.

Step 7: Matching the side and bottom seams of the fabric at point X, stitch across corners.

Step 8: Turn under ¼” along bag top and turn under foldline to create a 1″ facing at the top opening. Drop straps inside bag. Stitch facing at top edge catching the handles on the front and the back.

Step 9: Then, flip strap handles up, out of bag. Stitch 1/4″ topstitching at top edge catching handles once more to reinforce.

Step 10: On each base piece, press under seam allowance on one short end. With RST, match both pieces and stitch around edges leaving folded edge open. Grade corners. Turn right side out and slip in cardboard. Stitch open edge closed. Drop lined base into bottom of bag to reinforce.


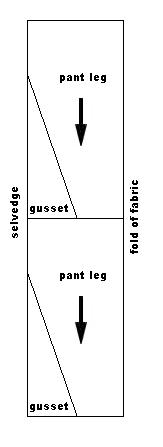
No pattern is required for this easy fit yoga pant as there is no waste. Chalk out cutting lines directly onto the fabric. Working off of a rectangle, I cut a triangular gusset and inverted it, re-attaching to the leg. How wide the leg fabric is depends on how full you want the final pants to be (narrower for a tapered style, wider for a relax fit). Be careful not to cut the rise too large as it will stretch and droop some resulting in a larger drop than you might think.

Use full width of 45″ fabric and select a fabric that can be cut in either direction. (eg. up or down its length). I prefer a lightweight fabric as it gathers easily with an elastic waist.

Straighten cut ends to a right angle [90 degree].

Fold the fabric, with right sides together (RST), in half lengthwise so that selvedges align. Chalk out 2 lengths for each pant leg.

The minimum outseam length is the measurement from your waistline, over the buttock and down the leg to your heel. Take this measurement while touching your toes. Add 2″ for a waist casing, 1″ for hem allowance and 1″ for seam allowance [total = 4″]. Square across fabric width. (see cutting diagram)

At bottom of rectangle, measure half the distance from foldline to selvedge to create the leg cuff . This measurement may be tapered if you desire a smaller opening at the ankle.

For the rise, measure down 13″ from the waist along the selvedge edge. Join this point with the leg cuff point with a straight line.

The remaining piece of fabric from the leg cut with be inverted and become the leg gusset. [2 pieces for each leg].

Open each leg and sew a gusset piece to each inseam RST using a ½” seam allowance. Press seam open.

Fold each leg portion RST and align gusset seams. Sew using ½” seam allowance. Press seam open.

Turn one leg inside out. Insert right-side-out leg into inside-out leg with RST. Sew up crotch seam using ½” seam allowance. Turn legs right side out.

Turn under ½ ” seam allowance along waist edge. Press. Turn under 1-1/2″ once more to create casing. Sew along fold edges. Casing may be for elastic or a drawcord. Leave an opening to insert drawcord or elastic.

Turn up hem allowance ½” and press. Turn ½” again and sew double-turned hem.

Front and back of pants are the same, so if I use an elastic waist I sew a small button to inside CF. This “belly button” indicates the front of my pants.