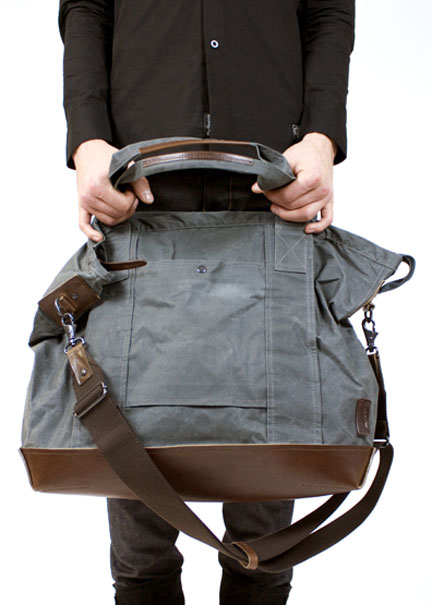
 Featured: Lex Trip Bag
So this weekend will have you jetting off to the coast for sun & surf? For a weekend excursion you need a quick trip bag. Forget the luggage (too bulky); you need a versatile tote made specifically to carry all your belongings from wallet to swimtrunks for a quick weekend getaway. Here is a fun choice in a cotton waxcloth outer with leatherette base and trim, perfect for the do-it-yourselfer, similar to the Lex Trip Bag from PROPERTY OF.
Dimensions: approximately 18″ x 8 x 17″ [45cm x 20.5cm x 43cm].
You will need:
- 6 pop rivets
- 1 metal slider, 2″ dia [50mm]
- 2 latch hooks, 1″dia [25mm]
- 2 d-rings, 1″dia [25mm]
- 1 square ring, 2″ dia [50mm]
- 2 dome snap set, 5/8″ dia [15mm]
- 1 heavy metal zipper, 25″ [64cm] long *
- 1-2/3 yds. [1.5m] of nylon webbing, 2″ [50mm] wide
- heavy-duty thread
- 1 yd. [0.9 m] of upholstery weight fabric, 54″ [137 cm] wide
- 1/3 yd [0.25 m] of polyurethane leatherette, 39″ [100 cm] wide
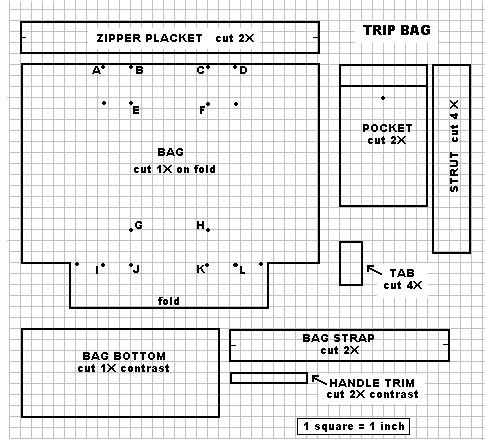
PATTERN
1 square = 1 inch [2.5 cm]
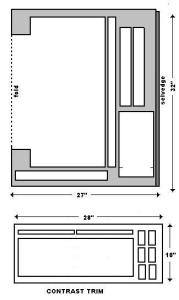 Bag – cut 1X on fold
Pocket– cut 2X
Struts – cut 4X
Handles – cut 2X
Handle trim – cut 2X contrast
Bag Bottom – cut 1X contrast
Tab – cut 6X contrast
DESIGN TIP: Use a permanent marker in the leather colour to carefully “dye” the edges of the leather pieces if you get a white edge after cutting it.
ASSEMBLY
- To make D-ring tabs, wrap tab piece around D-ring and stitch close to d-ring. Open ends of tab flat.
- To make latch hook tabs, wrap tab piece onto latch hook and stitch close to ring.
- To make Shoulder strap, cut a length of webbing 6″ long and another, 30″ long.
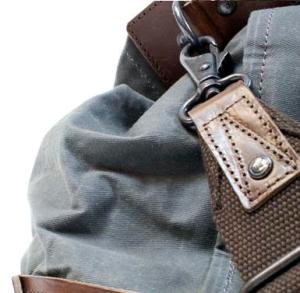 On the 6″ piece, wrap one cut end of the webbing with a latch hook tab and X-stitch in place. Secure tab with a pop rivet. On the opposite end, slip a square ring onto webbing and turn end back on itself and X-stitch it closed.
- On the 30″ piece, wrap one cut end of the webbing with a latch hook tab and X-stitch in place. Secure tab with a pop rivet.
- Slip a slider on to the webbing. On the opposite end, slip the strap through the square ring on the shorter piece and back on itself through the slider.
- Stitch across the end of the webbing and secure with a pop rivet.
- On pocket piece, turn the top edge under 2″ and stitch down.
- Apply the top portion of the snap kit to the pocket following manufacturer’s directions.
- Place pocket up-side down at points G,H and stitch bottom edge to body using 1/2″ seam allowance.
- Fold the pocket upward and mark contact point of snap on body portion.
- Apply bottom portion of snap kit to the body.
- Turn under long edges of struts 1/2″ and press flat.
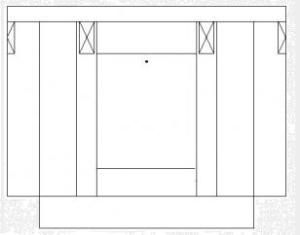 Place a pair of struts at points A,B,I,J and C,D,K,L on the body portion with pocket sides under the strut pieces.
- Topstitch struts in place.
- Repeat the above proceduces for the opposite side of the bag.
- Center contrasting bag bottom piece onto bag and overlap strut ends. Topstitch in place.
- On bag straps, turn under 1/2″ on both short ends. Press flat.
- With right sides together, fold the strap piece in half lengthwise and stitch along the length using 1/2″ seam allowance. Press seam open. Turn strap piece right side out. Press flat. Topstitch perimeter of bag straps.
- Fold the strap in half lengthwise and center a contrast handle trim along the open side of the strap. Wrap the trim around the “doubled” handle edge. Topstitch in place.
- Repeat this for the other bag strap.
- Align the ends of each strap level with the top of the pocket and sew an X-stitch to points A-B and C-D. (Note: ensure you allow for 1/2″ seam allowance at top of bag.)
- With right side together, align and match up the side seams of the bag. Stitch seam using 1/2″ seam allowance. Press seam open.
 Fold across the bottom, centering the side seam in the middle and stitch across the open end using 1/2″ seam allowance.
- On the top edge of the bag, position the zipper FACE UP inside the bag on the wrong side of the fabric. Center it. Pin and baste in place. Unzip the zipper.
- With right side together, sew the pair of zipper plackets together across the short ends using 1/2″ seam allowance. Press seams open. Turn right side out.
- On one long edge of placket, turn under 1/2″ and press flat.
- With right side of placket to wrong side of body, pin/baste raw edge of placket over the zipper opening. Stitch around circumference of opening using 1/2″ seam allowance and ensure that you are securing the zipper tape in the seam.
- Fold over placket face up to right side of bag and align the folded edge with the machine-stitching. Topstitch in place.
- At top of each side seam, below the placket, center the D-ring tabs and apply with topstitching.
* Design Tip: Purchase the metal toothed zipper in the same metal colour/finish as the metal luggage hardware.
January 17, 2009 at 5:52 am
Thanks for the tutorial. It’s a sweet bag.
January 17, 2009 at 7:38 am
This is exactly the bag I have been searching for. I am going to make it immediately.
January 17, 2009 at 7:50 am
You know, I was searching the web for a pattern for a bigger tote bag for my spring weekend away. And this is it! Thanks for this one, I love it!
January 17, 2009 at 3:26 pm
I love it. I never sew a bag but will definitely give this one a try. Thanks!
January 17, 2009 at 5:29 pm
Thank you SO much for this tutorial! I have a large stash of recycled denim and am always looking for different ideas to use it up. This bag is absolutely perfect and I can’t wait to make it!!
January 17, 2009 at 6:13 pm
That bag is awesome. Thanks!
January 17, 2009 at 8:15 pm
Wow the bag looks great I hope I will be able to make it myself 🙂 I am such a rubbish beginner at sewing but I need a bag and this one is just perfect
January 18, 2009 at 1:25 am
Thanks all for the kind words…if you can sew a straight line, you can sew this tote bag.
January 18, 2009 at 6:05 am
Great design! It goes up to my list of projects. I like how it looks like it can handle daily wear and tear. Only obstacle here is if my machine can work through leather.
January 18, 2009 at 7:58 am
Thank you for posting this pattern!! This is exactly what I’ve been looking for. Now to find all the materials and raid the fabric stash…
January 18, 2009 at 10:46 pm
Love it!!! Totally going to make this next week.
January 19, 2009 at 2:47 am
wonderful….I like it very much, thanks, I will find all the materials and try to make this bag
January 19, 2009 at 2:42 pm
I really like your site! & i LOVE bags!!! Thanx for the how to!
January 19, 2009 at 10:15 pm
does anyone know where to get the waxcloth mentioned in the intro?
January 19, 2009 at 10:22 pm
try the upholstery section of your favourite fabric store.
January 20, 2009 at 6:47 pm
[…] love these bags. This weekender bag is genius. I am going to have to make one. Someday. Thank goodness for “someday” […]
January 22, 2009 at 12:13 am
[…] The Weekender Featured: Lex Trip Bag So this weekend will have you jetting off to the coast for sun & surf? For a weekend excursion […] […]
January 24, 2009 at 3:06 pm
Wow. That bag is adorable. Thanks for the tutorial!
January 25, 2009 at 12:15 pm
Great tuturial, it’s just what I need.
Did you make one yourself? If so will you post a picture?
Also if anyone else makes one I’d love to see your version. I’ll check back here to see if anyone leaves a link.
January 26, 2009 at 3:34 am
Can a standard sewing machine handle this project? I have a very basic Singer and want to be sure it’s up to the task before I buy all the materials.
thanks!
January 26, 2009 at 5:11 am
Sure thing Jen…use a size #16 sharps sewing machine needle and set your machine to use a longer stitch length.
If the leatherette is sticking, use a telfon foot or walking foot.
February 2, 2009 at 9:48 am
here is mine.
February 2, 2009 at 5:57 pm
Hi, great looking bag. Where can I find webbing and bags hard wear such as the metatic zip and latch hooks to buy. I would love to make the bag.
February 3, 2009 at 12:53 am
Thanks Olu. Webbing can often be found in the trim section of your local fabric store while metal zips and latch hooks are sold wherever you buy your buttons and other sewing notions.
February 11, 2009 at 10:21 pm
This bag is great. It took me an evening and a bit to get it finished. I made some alterations because I didn’t have the metalwork and made the handles longer so that it wouldn’t need a separate strap. I made it up in a fabulous patterned fabric (lined it too). I love it!!
Have a look..
http://picasaweb.google.com/famillecalvert/WeekenderBag#
February 12, 2009 at 10:39 pm
[…] I went to the fabric store and looked for all my supplies, and couldn’t find half of them so I had to re-think the bag making process. I simplified it. A lot. Here is the original intention: Awesome_weekend_travel_bag […]
February 12, 2009 at 10:50 pm
[…]Brett found this awesome weekender travel bag and instructions on how to make it. After some coaxing from Brett, I decided to try it[…]
March 24, 2009 at 9:44 pm
I LOVE this bag!!! This is an awesome website!! Thanks so much for doing this!! : )
March 25, 2009 at 7:07 pm
[…] feature is from Weekend Designer with a tutorial for this tote–The Weekender: So this weekend will have you jetting off to the coast for sun & surf? For a weekend […]
March 26, 2009 at 1:42 pm
I love it! Thank you!
April 15, 2009 at 9:47 pm
How can I print this without all the comments?
July 10, 2009 at 8:48 pm
Left click (hold your left mouse button down) and drag it across everything you wish to print to high-light it. Next, at the top of your browser, click “file” and “print”. When your print window comes up, under the heading “page range”, click “selection” (the default is “all”). It will now print only what you’ve high-lighted.
April 29, 2009 at 6:30 pm
this is one place where like minded people pool in ideas…since this is my first encounter of such kind…i m inadvertently aghast
May 12, 2009 at 6:11 pm
This bag is absolutely fantastic! Thanks for sharing!
May 17, 2009 at 11:24 pm
So i am trying to make this bag, but some parts dont really make sense. I dont know what i shoudl adjust. In the patter the tabs at 2″x4″ but the d rings are only 1″ and in the picture it does not look folded in any way. should i just recut the tabs to a small size?
May 18, 2009 at 1:06 am
Yellie..you have cut the tabs correctly. Two tabs are folded to its center so that the rings can slip onto it, then folded to complete. The other two tabs are left flat and attached on either end of the bag.
June 10, 2009 at 1:56 am
Thanks- we like our bags too. i run North America for Property of and i like your slant. Nice job. Thanks for exposing our brand to many folks.
jasen
June 10, 2009 at 6:52 am
Thx Jasen for the nod of approval. It is an excellent example of good totebag design. Simple, utilitarian, and fashionable. It has been quite popular with the DIY crowd and non-sewers alike.
WD
July 25, 2009 at 10:36 pm
[…] Tasche 100 […]
August 19, 2009 at 3:55 am
[…] I’m away from the real world I will have my trusty Weekender Bag full of knitting and sketch books to keep […]
September 5, 2009 at 5:51 am
Hello!
Are seam allowances included in this pattern?
Thanks
September 5, 2009 at 4:11 pm
Yes, Paulina the seam allowance is inclusive on the pattern, except for the “leatherette” cut pieces. The dimensions of the tote is approximately 18″ x 8 x 17″ [45cm x 20.5cm x 43cm].
WD
December 3, 2009 at 5:45 am
[…] A Weekend Bag […]
February 20, 2010 at 6:35 pm
awesome bag hope I can make it, I started with the cross body sling but messed up with my choice of fabrics, will try it again and so will this one, Thx for your insight and your motivation mainly to make my own designed bag for my own needs.
March 1, 2010 at 11:20 pm
I would love to make this in a smaller version as a purse. Can you give examples of pop rivets, metal sliders, latch hooks, square rings, and dome snaps… just so I don’t end up buying fishing equipment. It would be much appreciated.
March 31, 2010 at 1:42 am
[…] Found here! Bookmark Idea […]
July 28, 2010 at 11:34 am
You owe me some fabric weekend designer!
Your an inch short on your pattern where the side seams of the bag meet up on one side.
I noticed when measuring out my pattern that the right hand side measurement horizontally across from ‘L’ was one square less than the left hand side. I went with it and now i’m short when meeting up the seams.
There does seem to be a quick solution – cut more the the fabric off, so that the ‘indent’ is closer to L. IE make it symmetrical.
Apart from this it seems to be a pretty good bag, It may be handy to have some more detailed pictures to match up with the first few steps for making the leather attachment bits.
I’ll post a pic soon. Thanksies!
July 28, 2010 at 2:05 pm
Bad WD….thanks for the heads up Sarah. I have changed the pattern grid. In addition, I’ll do a tutorial on how to make attachments for bags in my BAG’N-TELLE design blog. Look for it soon.
Don
July 29, 2010 at 1:53 pm
Thanks. The extra tutorial on attatchments would be cool. Thats the only bit that I got stuck on so changed. I’m just about to put the zip on then I’m done. I’ll post a picture soon.
This is my first project from your website (well, my first proper projects since university fancy dress outfit making)and i’ve been really impressed.
What made you want to set up the website? Its great!
October 30, 2010 at 9:21 pm
wonderful weekend bag!
thanks a lot
February 28, 2011 at 5:38 pm
[…] The Weekender Bag tutorial from The Weekend Designer. […]
March 25, 2011 at 1:30 pm
[…] The Weekend Designer is hands-down the best site I’ve found that include cute projects and very detailed instructions. The site is not updated much anymore but there are tons of projects including this amazing bag that I cannot believe he hand-made. It’s my favourite find this week! […]
March 25, 2011 at 9:43 pm
[…] Designer brings us this DIY weekend bag for anyone with basic sewing machine skills. The waxcloth gives it such a lovely finish. If you’re […]
April 8, 2011 at 12:37 pm
[…] a tutorial for a weekender bag. It looks highly useful and functional, but also pretty involved. Regardless, I want to make […]
June 21, 2011 at 8:17 pm
[…] bag at Better Homes and Gardens Easy tote bags from Needle and SpatulaThe Weekender from Weekend DesignerCloudy Day appliquéd tote at Craft […]
June 27, 2011 at 4:24 pm
[…] bag…more for my sis, whom i call ‘bee’ + & i really want to try to make this weekender bag. time to dust off the ol’ sewing machine. + i loved kyla roma’s week full of simple […]
July 8, 2011 at 6:27 am
[…] Instructiuni aici: the-weekender/ […]
July 8, 2011 at 4:13 pm
[…] tote. Someone made this tote! Seriously! Some impressive crafting […]
July 25, 2011 at 2:10 am
[…] bag at Better Homes and Gardens Easy tote bags from Needle and SpatulaThe Weekender from Weekend DesignerCloudy Day appliquéd tote at Craft […]
August 15, 2011 at 3:36 am
[…] Bag Old School Dufflebag Flat Bottomed Zippered Pouch Fabric Storage Basket Reusable Grocery Bag Weekender Bag Eco World Content From Across The Internet. Featured on EcoPressed What Impact Does Your […]
October 21, 2011 at 12:43 pm
[…] Essa já exige um pouco mais de destreza, mas olha que modelo bacana de bolsão/malinha para uma viagem rápida de final de semana? Um beijo para a Weekend Designer! […]
November 7, 2011 at 2:48 pm
[…] wäre. Nach ein paar Gesprächen über Form und Größe entschieden wir uns, als Vorlage den Weekender aus dem Weekend Designer Blog zu nehmen. Bereits im November 2010 fand der Große zwei schöne […]
November 13, 2011 at 8:21 pm
[…] Tweet The Weekender […]
November 14, 2011 at 9:05 am
[…] the weekender – WK Designer […]
November 26, 2011 at 4:08 pm
[…] – On the Go Carry On – Simple Six-Pocket Bag – The Weekender Bag (not Amy Butler’s!) – Bag with Divider – Large Tote with Rounded Opening – Beach Bag – A Market Bag – Game Day Gym Bag […]
December 2, 2011 at 8:34 pm
[…] aici: the-weekender/ […]
January 3, 2012 at 7:16 pm
[…] 2 latch hooks, 1″dia [25mm] 2 d-rings, 1″dia [25mm] 1 metal slider, 2″ dia [50mm] 1 square ring, 2″ dia [50mm] 6 pop rivets THE WEEKENDER « Weekend designer […]
February 8, 2012 at 12:24 pm
[…] a look at this, a pattern for a different Weekender. I think this would be super hot in navy, but then again, what isn’t super hot in […]
February 18, 2012 at 8:13 pm
[…] THE WEEKENDER « Weekend designer. […]
March 2, 2012 at 11:26 pm
[…] THE WEEKENDER « Weekend designer heavy-duty thread 1 yd. [0.9 m] of upholstery weight fabric, 54″ [137 cm] wide 1-2/3 yds. [1.5m] of nylon webbing, 2″ [50mm] wide 1/3 yd [0.25 m] of polyurethane leatherette, 39″ [100 cm] wide 1 heavy metal zipper, 25″ [64cm] long * […]
March 7, 2012 at 10:37 am
[…] heavy-duty thread 1 yd. [0.9 m] of upholstery weight fabric, 54″ [137 cm] wide 1-2/3 yds. [1.5m] of nylon webbing, 2″ [50mm] wide 1/3 yd [0.25 m] of polyurethane leatherette, 39″ [100 cm] wide 1 heavy metal zipper, 25″ [64cm] long * THE WEEKENDER […]
June 10, 2012 at 7:26 pm
[…] The Weekender Bag Tutorial by The Weekender. This bag is awesome and it would be a really fun challenge! […]
June 23, 2012 at 3:44 pm
[…] Tasche gefällig? • auf Englisch […]
July 1, 2012 at 2:01 am
[…] The Weekender […]
July 2, 2012 at 3:04 pm
[…] : https://wkdesigner.wordpress.com/2009/01/17/the-weekender/ hellocoton_plugin_url="http://lagouagouache.com/wp-content/plugins/hellocoton/"(function() {var […]
September 21, 2012 at 3:10 pm
[…] saved this pattern the same day I saved the tote above. I can’t get over it! I want to make one for Branden as a […]
November 3, 2012 at 1:16 pm
[…] Photo de droite : ma version d’après le patron trouvé sur le site Weekend Designer […]
December 25, 2012 at 11:14 am
[…] Source : https://wkdesigner.wordpress.com/2009/01/17/the-weekender/ […]
January 25, 2013 at 8:01 am
[…] image: The Weekend Designer […]
February 15, 2013 at 3:29 am
[…] Weekender Bag by Weekend Designer […]
March 3, 2013 at 1:51 am
[…] eventually I found this ‘Weekender’ bag. It looked great, and the tutorial seemed pretty straightforward; plus I had pretty much all the materials I needed in my […]
July 8, 2013 at 12:35 pm
[…] of a sewing machine, I decided to make a big bag to carry my life around. I decided to use this pattern, but the fabric I already had didn’t quite fit. So I went back to our local craft store and […]
November 13, 2013 at 2:17 pm
[…] Source : https://wkdesigner.wordpress.com/2009/01/17/the-weekender/ […]
November 23, 2013 at 9:24 pm
[…] Lex Trip Bag: a versatile canvas and leather bag that is just the right size for a few days trip. […]
February 3, 2014 at 9:27 pm
[…] Get the free bag pattern here […]
February 8, 2014 at 7:40 am
[…] THE WEEKENDER | Weekend designer. […]
February 10, 2014 at 1:23 pm
[…] Le blog Wkdesigner […]
June 2, 2014 at 4:49 pm
[…] https://wkdesigner.wordpress.com/2009/01/17/the-weekender/ […]
June 4, 2014 at 3:00 am
[…] https://wkdesigner.wordpress.com/2009/01/17/the-weekender/ […]
June 15, 2014 at 2:21 pm
[…] Source […]
July 5, 2014 at 2:31 pm
[…] The Weekender by Weekend Designer […]
August 13, 2014 at 6:43 pm
[…] The Weekender […]
September 7, 2014 at 4:41 pm
[…] a tutorial for a weekender bag. It looks highly useful and functional, but also pretty involved. Regardless, I want to make […]