 Photo Credit: Arlene’s Interiors
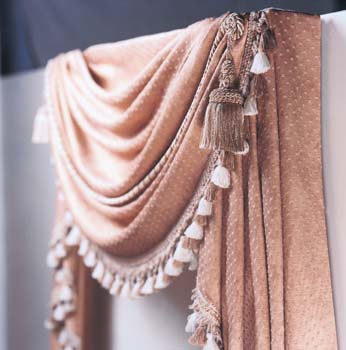
Swags are elegant treatments for tall, narrow windows yet easy-to-make. This window covering is pleated at the sides to create rounded folds and is used most often in formal home décor. Use them in tandem with cascades or jabots.
You will need:
- Drapery fabric, 54” [137 cm] wide. *
- Drapery lining, 54” [137 cm] wide. *
- Twill tape, 1” [25 mm] wide.
- Decorative trim (optional).
- Pelmet mounting board**
- Coordinating thread.
- Staple gun.
- Kraft paper.
* for yardage required, see Cutting Instructions below times the number of windows.
** Pelmet should be slightly wider than window frame.
 MEASUREMENTS
Swag Width = the horizontal dimension of the mounting board or pole hardware. (A)
Swag Depth = the vertical drop of the swag, measured from the center of the board or pole line to the bottom of the swag. (B)
Swag Sweep = the bottom curve length of the swag from the board line, down to the longest point and up to the board line. (C)
Cascade Length = the vertical drop of the cascade from the board line down to the desired finished length. (D) Traditional proportions are equal to 3X the swag depth.
Cascade Width = 1/3 of swag width + mounting board width. (E)
Design Tip: To obtain the sweep measure, mount the pelmet board or pole hardware over the window. Drape a length of weighted cord from one end of the finished treatment to the other. Hold the cord on top of the hardware at each end at the point where the fabric will end. This will give you a finished curve length which includes the pelmet board allowance. Measure the length of the cord and that will be your sweep length.
PATTERN

Swag Section
Draw a straight line on center of paper. Plot point A on line.
A-B = 2 X swag depth + 5″ [12.7 cm] (the featured sample swag depth is 18″ [45.7 cm] long.)
Square across from A and B.
A-C = ¼ of the finished swag width.
A-D = A-C.
B-E = ½ of the swag sweep
B-F = B-E.
Square up from E and F.
E-G = ½ of swag depth. (Note: the angle of C-G will be greater than illustrated)
F-H = E-G.
I is located midway A and B.
Draw a square box with one of its sides touching on the centerline (A-B). Draw a diagonal line through the opposite corners of the box. This is the grainline.
Cascade Section
J-K = finished cascade length + 1” [25mm].
J-L = C-D.
Square down from L
L-M = A-I.
Join M to K.
Square across from K.
J-N = width of mounting board
Square down from N.
O is located at intersection of K and N.
The grainline is parallel to J-K.
Add seam allowances to pattern pieces.
Marking the Pleats:
The length of the pattern and the pleated sides combine to give the swag its character. The length of the pattern determines the fullness of the swag. The sides are pleated into folds which distribute the fullness and give the swag visual interest.
 Mark the center of the top and bottom edges of the swag pattern (A-B).
Fold the pattern along the center and mark the pleats as follows:
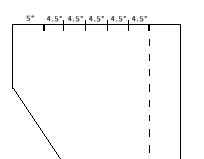
5″ from the top for first pleat. This will determine your “picture” size. (see design tip below)
4″ up from the bottom.
Divide the space between the first and last pleat into equal pleats of 4-6″.
All of the pleats between the first and last must be equal in size. Mirror  markings on opposite side and open pattern flat.
On the top edge of the cascade pattern, mark the first pleat as follows:
5” from inner edge of cascade tail (L).
Divide the space between the first pleat and the corner (J) into equal pleats of 4-6″.

CUTTING (per window)
Swag – cut 1X self
Swag lining – cut 1X lining
Cascade – cut 4X self
Cover pelmet board* with self fabric.
Design Tip: The center of a finished swag is the “picture”. It showcases the motif of the fabric. The first fold on the swag acts as the picture frame. The top of the swag pattern should be aligned on the fabric surface to maximize the motif size in the swag.
For the cascades, you may wish to create a contrast edge by using a solid coloured lining, as the back side of the cascade will be visible.
ASSEMBLY
1. Turn under seam allowance on top edge of swag and press flat. Repeat step on swag lining.
2. With right sides facing together, align and match outer edges of swag and lining.
Baste decorative trim between self fabric and lining along bottom edge, if using.
Pin/baste and sew, leaving top edge open. Turn RIGHT SIDE OUT and press flat.
Edge-stitch the opening closed.
3. Turn under seam allowance on top edge of cascade pieces and press flat.
4. With right sides facing together, align and match 2 pairs of cascade tails. Pin/baste and sew, leaving top edge open. Turn RIGHT SIDE OUT and press flat. Edge-stitch the opening closed.
5. Transfer pleating markings to cloth of swag and pair of cascade tails.
MOUNTING
6. Use a pelmet board, preferably one that is covered in self fabric. Mark the center of the board. Mark the center of the top edge of the swag. Set aside.
7. Staple the top edge of the cascade 1″ [25 mm] up on the top of the board, draping the long side of the cascade across the end of the pelmet board. Fold around the corner of the mounting board and pleat at the first fold. Staple point of the pleat along the edge on topside of the pelmet.
8. Continue pleating all of cascade tail to the end. Mirror the pleats on the left side exactly the same as the right, with the other cascade.
9. Staple the top edge of the swag 2″ [50 mm] up on the top of the board, aligning the center marks.
10. Pleat the first fold, right side and left side. Align point of the pleat along the edge of the top of the pattern. (This first fold sets the ‘picture’ on your swag). Staple top edge in place.
11. Continue pleating all but the last fold.
The distances between the pleats and the angle at which they fall off the board should be equal for all pleats. Pleat the left side exactly the same as the right. The ends of the swag will overlap the cascades.
12. Pleat the last fold. You will also have to take the end of it and pull it up onto the board to secure. This will cause the bottom edge of the swag to tuck neatly up.
13. Neaten the top edge of the treatment by covering the staples with twill tape.
Design Tip: Embellish the swag with decorative fringe, trims, banding, or tassels.
 Featured: Mitered Pillows by Foley & Cox HOME
 The paper triangle patterns have two sides of equal length. Label the pattern with the letter X, at the center point, between these two equal sides. Label the corners on the unequal side with the letter O. With the points and corners of each triangle facing in the same direction, position the triangles on the striped fabric so each O-O line is parallel to and measures the same distance from a stripe. Mark and cut 8 identical triangles from fabric; four for pillow front and four for pillow back.
 3. With right sides of fabric facing, pin pillow front to pillow back along all edges. Sew front to back using ½” [12mm] seam allowance and leaving a wide opening at the center of one edge. Clip corners and press seams open. Turn mitered pillow cover to the right side through opening and press flat.
 Fold the cut end of the satin ribbon at a 45° angle and press. Follow this foldline with a hand-sewn evenly spaced
  The first thing you’ll need is cotton bias tape in a colour that will match the colour scheme you have in mind for the final lamp shade. Press the bias tape open flat.
 Measure the height of the lampshade (A) and cut the material 2 inches longer. [50 mm]
 Turn under ¼” [7 mm] of the top and bottom edge of the fabric and press. Turn these edges under 1″ [25 mm] and press. Machine-stitch the top and bottom hems.
 Place the material over the structure and gently pull it down until it fits snugly over the lamp shade frame. Pull the running stitches and draw around the top and bottom of the frame. Now sew the pleated fabric to the cotton tape that you’ve wrapped around the lamp shade frame. Do this by hand using a


