 Featured: Silk ties by Terrence Dobbs
Make Dad your own specially-designed tie for Father’s Day.
Fresh from the Hamptons, Terrence Dobbs will inspire you with his ‘Father & Son’ ties.
You will need:
- 1 square yard [meter] of fashion fabric (try something silky)
- coordinating thread
- kraft paper
THE NECKTIE PATTERN
This tie is drafted by height.
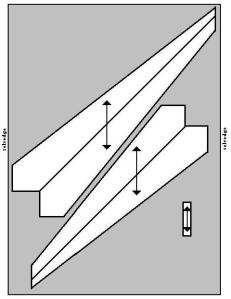
The four major parts of the necktie draft equation are the length of the tie from the big tip to the knot, the knot itself, the tie around the neck, and finally the tail end of the tie that is hidden behind the front of the tie. The length should be reasonable so that when one tip is touching the belt buckle, the other tip can be securely held in place in the carrier on the back side.
Height = measure vertically from top of head to heels.
Neck measurement = measure around base of neck.
Tie Width = 3.5 – 4 inches [9-10 cm] (it can vary on current fashion)
Tie Knot = 5 inch allowance [12.5 cm] (Half-Windsor type)
Take a length of kraft paper and fold it lengthwise. (You may glue 2 pieces together if needed).
Along the fold, plot the following:
 A-B = 0.30 of the height
B-C = neck measurement + ½” [12mm]
C-D = knot allowance
D-E = 0.30 of the height – 3” [75mm]
Square 90° across from foldline at all points.
F-C = 0.75 of tie width
G-C = C-F
Join F and G with a straight line.
H is mid-point of F-G.
I-C = C-D
J-I = C-F
K-A = tie width; square up.
L-K = K-A
M-L = K-A
Join M to J with a straight line.
Join L to H with a straight line.
Using a set square placed on line L-H, square a line from A to locate N on line M-J.
Join L-A and L-N with a straight line.
O-E = 0.50 of the tie width
O-P = E-O
P-Q = E-O
Join Q and F with a straight line.
Join P and H with a straight line.
Using a set square placed on line P-H, square a line from E to locate R on line Q-F.
Join P-E and P-R with a straight line.
Join F to J with a straight line.
At B and D, draw a 1” x 1” square [25mm X 25mm] with one of its sides positioned on the foldline.
Add 3/8” [1cm] seam allowance around the perimeter of the tie pattern.
 Cut out the tie pattern and open the folded paper.
Extend line F-G across the pattern piece. Cut through line F-G.
Draw a grainline through opposite corners of the square box at B and D.
CUTTING
 Cut 1X self for upper portion of tie.
Cut 1X self for under portion of tie.
Cut 1X self for carrier – 6” X 2 ½” [150 mm X 65mm]
Tip: A rotary cutter is ideal for cutting fabric on bias grain.
ASSEMBLY
1. Make a carrier loop 6 inches by 1 ½ inches [150mm X 40mm].
2. With right sides facing, align and match upper and under portions of tie together at center seam. Pin/baste and stitch seam using a ¼” [5mm] seam allowance. Press seam open.
3. With right sides facing, align and match each tie end along raw edges. Pin/baste and sew each tie point using a 3/8” [1cm] seam allowance. Press seam open. Grade and trim points. Turn tie right side out.
Tip: A wooden chopstick lets you get into tight corners when pressing a seam open.
4. Fold the tie fabric with wrong sides together; align and match raw edges along length of tie. Baste both layers together.
This tie is self-lined. Select which side of the tie will be the face side.
5. Fold the tie carrier in half to form a loop and secure it 10” [25.5cm] from the front tip on the face side of the tie. Sew it to the seam allowance.
6. With the tie face down, fold the basted raw edge 3/8” [1cm] over the center of the tie along its length. Herringbone stitch along the raw edge catching only the top layers of fabric.
Tip: Use waxed thread and a new needle whenever doing hand-stitching.
7. Place the folded edge over the basted raw edges and align to center (careful not to stretch fabric). Slipstitch along folded edge, catching only the top layer of fabric to complete the tie.
8. Without touching the fabric, gently steam the tie shape. Let fabric cool before handling. (Do not press the tie.)
May 29, 2009 at 1:52 pm
This is a great gift!
June 9, 2009 at 2:26 pm
This is useful posting!^^
June 19, 2009 at 1:22 pm
[…] Custom Handmade Tie. Dad has enough paisley–find a funky fabric or something vintage to cut up and recreate into a brand new… tie. […]
March 31, 2010 at 12:36 am
[…] Found here! Bookmark Idea […]
November 15, 2011 at 4:04 am
[…] Men’s Tie […]