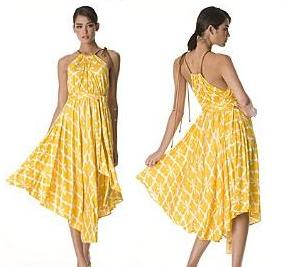
An exotic twist on the classic wrap dress, this deliciously flattering style is designed for drapey, fluid fabrics like silky jersey, luscious rayon or lightweight cottons. The dress has a below-knee length half-circle wrap skirt, and features a gathered neckband on a halter tie. This great wrap-around is sure to become a staple of your wardrobe – it’s your go-to style for dressy daywear or a low-key evening outfit on the town. The dress is easy to make, requiring only two pattern pieces, and no fitting is required.
You will need:
- 2 ¾ yds. of fashion fabric, 45″ wide
- Coordinating thread
- 60″ drawcord
- Kraft paper
PATTERN
Begin by taking a square sheet of paper and folding one corner to its opposite corner at 45 degrees.
On the folded edge, mark a point X. (see fig. 1)
FRONT WRAP
From X measure 10-inch intervals to a maximum of 60 inches.
Square a line across the paper at each point.
Divide the distance between X and 10″ mark is half. Square across.
On this line, measure 5″.
At the 20″ mark, measure 1/4 of hip measurement. Label this point A.
At the 30″ mark, measure 30″.
Join X to this point with a straight line passing through A.
Join the 60″ mark to this last point at the 30″ interval.
BACK WRAP
On the 10″ mark, measure 5″. Square down to the 20″ interval.
From this intersection, measure 10″. Label this point B.
Join the point at the 10″ interval to point B.
Square down from point B to the bottom line.
Cut the line at the 5″ interval.
Open the draft and trace onto a new sheet of paper. This is the FRONT.
Re-fold the draft and cut out the solid heavy line beginning at the 10″ interval. This is the BACK.
CUTTING (see diagram for cutting marker)
Cut front 1X
Cut back 1X
Cut along selvedge fabric strip for front ties. Cut in half (2 ties).
Cut along width of remaining fabric, 2 fabric strips for back ties.
Fabric tie strips = 3″ wide.
ASSEMBLY
On all edges press under 1/4″.
Turn all edges 1/2″ except for tops and stitch down. Miter at corners.
Along each top edge, turn under 1″ and stitch to create a casing.
Press under 1/4″ along the long edges of the fabric strips and one short edge.
Fold strip in half lengthwise with wrong sides together. Stitch along open edge. Press. Stitch along folded edge.
At notch A and B sew on a waist tie.
WEARING THE WRAP.
Insert drawcord through back casing and front casing to gather neckline. Tie over one shoulder and adjust the slack of the cord based on where the waist ties are positioned on the body.
Wrap back around body and tie in front.
Wrap front over back and crisscross tie straps around waist and draw fullness in close to body. Tie ends with a bow.

August 29, 2008 at 1:30 pm
great design, thanks
May 7, 2009 at 8:47 am
[…] Kleid 14 […]
June 9, 2009 at 4:59 pm
I am a bit confused. Do you sew the front and back pieces together? It doesn’t seem like it. So, how do you keep the sides closed while you wear it? Especially under the arms… I feel like this would just flop open and you’d be naked. Maybe you could clarify how this keeps you covered up.
June 10, 2009 at 6:41 am
Hi Emory,
it is a wrap dress in 2 pieces. As you see in the photo, the back portion wraps around your body at the waist, then the front portion wraps around your body at the waist going the opposite direction. Since everyone has a different body shape, this will determine how much is wrapped around. Adjusting the gathers on the shoulder tie will reveal/cover as much of the shoulders and neckline as you desired.
WD
July 24, 2009 at 7:02 pm
I’m a bit confused, as well. Point A is 1/4 of hip measurement, so 9″ in my case, but the diagram shows A as being further from folded edge than Point B, which, if I’m not mistaken, is 15″ in from the folded edge (both on the 20″ line).
So, my A would be at 9″, B would be at 15″, which is the reverse order of what the diagram shows.
It’s quite possible that I’m being thick and misunderstanding the instructions. Thank you in advance! 🙂
July 24, 2009 at 11:21 pm
That is correct Kay. Use your own measurements. Do realize that the back and front are being drafted one on top of the other. The front is bigger because it must wrap to the back. The excess in fabric will “release” in the sweep of the skirt and gather up at the neckline allowing for an “adjustable” fit.
WD
March 17, 2010 at 1:55 pm
hey,
I’m a bit stumped with the instructions when you say: “Join X to this point with a straight line passing through A.”, My A is 10” from the fold, so it’s not possible to draw a straight line from X to the 30” point on the 30” mark. Am I being stupid and missing something? It would be great if you could help…
August 12, 2010 at 3:53 pm
[…] Free Flutter Skirt Dress Pattern […]
February 19, 2012 at 12:35 am
[…] Halter Dress Cap Sleeve Jersey Dress Pin-Up Inspired Dragon Dress Formal Off-the-shoulder Dress Easy Flutter Sun Dress Mila […]
August 8, 2014 at 3:07 pm
[…] ab (ich hab endlich einen simplen und passenden Schnitt für meine Verrückte gefunden, diesen hier). Drückt die Daumen, mit etwas Glück gibt es in Kürze eine Bilderreichen […]
August 13, 2014 at 6:43 pm
[…] Flutter Skirt Dress […]