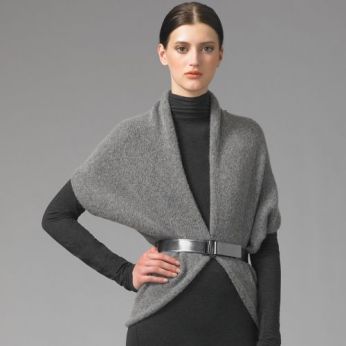
 Saks Fifth Avenue features this season’s trendy cover up, the shrug by Vince. The shrug pattern is an ideal project with which to experiment with fashion design for several reasons — it is knitted or sewn in one piece, there is minimal finishing, it is easy to wear, and relatively quick to make. The Vince version is an angora knit but can be made up in any stretch fabric. Try mohair, stretch velvet, or double knit. Plus, these shrug patterns are easy to adjust. For instance, this basic shrug pattern is relatively snug and feature elbow-length sleeves. If you want to make longer or shorter sleeves or make the back larger, adding or subtracting length is easy. Wear it belted like the model.
SHRUG MEASUREMENTS: SIZE S (M, L)
Cuff-to-cuff: 45 ½ (46 ½, 47 ½)”
Width at back: 16 ½ (17 ½, 18 ½)”
Top-to-hem: 21 (22 ½, 24)”
NOTE: The greatest stretch of the knit fabric runs around the girth of the body (usually the crosswise grain from selvedge to selvedge). Most stretch fabrics are available in 60″ widths. You’ll need about 2/3 yds. (65 cm).
Measure a rectangle 21″ by 45½” (length X width) for a size SMALL. (Use the measurements above for MEDIUM or LARGE.)
Measure 14½” in from each short end of the rectangle and mark as A,B,C, & D according to the diagram.

Measure 4½ inches down from the top & up from the bottom of each long end of the rectangle and mark as E, F, G, & H.
Measure 2½ inches down from A, B & up from C, D. Mark as I, J, K & L.
With a ruler, draw a line from E to K, F to I, G to L and H to J.
Blend a gentle arc between AF, BH, CE, & DG.
Cut along these 4 lines.
Fold fabric with right sides together. Pin points E to F, A to C, B to D & G to H.
Sew ½” seam allowances along edges A to F and B to H, leaving an opening between AB & CD to form the “body” portion. Turn right side out.
Turn in raw edges at cuffs and body opening by 1″ and hem. Add a large hook & eye as a closure at waist level.

March 18, 2008 at 6:26 am
there seems to be something missing with instructions… such as the front side of the pattern maybe?!
March 18, 2008 at 5:29 pm
Hi Isabelle,
Can you be more specific? As I see it, if you pin and sew up E to F, A to C, B to D, and G to H you will have a complete garment. The area from A to B creates the upper front opening and neckline and the area from C to D creates the lower front opening and hemline.
October 12, 2008 at 11:50 am
Hi!
I just discovered your blog and i am so excited! i love this shrug and would like to make it right now, but i think something doesn’t make sense here.. i made a small paper pattern and folded it thousand ways but i don’t get it…
for example you say A-B C-D to form sleeves but sleeves in the pattern are marked E-F G-H…
i would like some advice! 🙂 sorry if it is me that can’t figure out the pattern
Thanks!
lucia
October 12, 2008 at 1:05 pm
Thanks for the kind words, Lucia.
If you fold your fabric with right sides together, and pin points E to F, A to C, B to D & G to H you will have the correct shape. Sew along the curved edges A to F and B to H to form the sleeves; leave A-B and C-D un-sewn to create the “body” portion of the shrug.
Also note that in the diagram, the bottom portion illustrates the basic drafting points of the shrug pattern and the upper portion shows the completed draft (a kind of 2-in-1 view if you will).
I will amend my instructions to be a little more clear with the sewing method. Thx.
D.
October 13, 2008 at 1:32 pm
Thanks for the quick answer, i think it is much more clear now!
and finally i understood, hehe
thanks again!
Lucia
February 17, 2009 at 3:18 am
Correct me if I’m wrong. When you fold the pattern the front and back are wrong sides together and form both the front and backso that you have a folded edge around the neck and down the front. Is this correct?
February 17, 2009 at 5:03 am
The shrug is folded is half through its longest length (which is actually the width of the shrug). When you sew up the 2 ends, it creates the sleeves. The center portion between the 2 sleeves, is left un-sewn, creating the opening for the shrug. One edge is the neckline ; the other is the hem.
February 28, 2009 at 9:30 pm
hi,
i did what is write exactly but could not understad how I will wear it when i sew long the curved edges A to F and B to H ;leave A-B and C-D un-sewn. I mean it is diffucult for me understand. When I sew it thanks..
March 27, 2009 at 7:51 am
[…] Craft Link : Shrug Pattern […]
March 28, 2009 at 12:28 am
Nil, I could not understand it for the life of me. I kept thinking I would have to cut it somewhere, until my husband showed me.
He was wearing a pullover sweater and he simply pulled the front over and behind his head (without taking it off). And there it was! A shrug! Try it.
ABCD form a circle, like the bottom hem of the pullover sweater, and you wear CD behind your neck and AB under your shoulder blades (or, if it really is as roomy as in the picture for us non-models, over your rear end.)
May 7, 2009 at 8:48 am
[…] Shrug […]
August 28, 2009 at 4:46 pm
So… I read all the comments, and have made shrugs before. Crafters beware… this pattern DOES NOT make the shrug pictured, it has long sleeves that do not drape as pictured. It is also short in the back, it fits right under the shoulder blades (and I’m petite). I even added a rectangular wrap around the ABCD circle and it looks a “bit” better, more frumpy-stylish, but its still a really ugly shrug.. NOT AS PICTURED!!
August 29, 2009 at 2:38 pm
Sorry Ms. Nepa if you felt mislead; there was no intention of doing so. The shrug pictured is from Vince (a knitwear manufacturer) and is used only as an example of what you can do with a shrug pattern. The pattern draft is that of a basic shrug pattern. I have made suggestions to how it may be adapted based upon body shape/size and type of fabrics used.
WD
September 6, 2010 at 11:57 am
[…] wanted to start out with something simple and easy, I chose a shrug.I drafted the pattern, following the instructions from Weekend Designer. One pattern piece is […]
October 18, 2010 at 1:10 pm
[…] Weekend Designer Shrug […]
October 20, 2010 at 12:17 pm
[…] Weekend Designer Shrug […]