 Featured: Dirndl Skirt by Valentino

The Dirndl skirt (a full skirt with a gathered waistband) has come a long way since its origins in traditional German costume. Lots of prominent designers have included dirndl skirts in their collections recently. The Dirndl featured above is from the Valentino collection.
You can incorporate this adorable look into your wardrobe. The Dirndl skirt looks great on everyone! In contrast with the full skirt, the tight waistband highlights curves and minimizes your waistline. The full skirt also makes legs appear thinner.
Overall, the look is very figure flattering and feminine.
You will need:
- 2 – 3 yds. of fashion fabric, 60″ wide
- 1 – 1 ½ yds. of fusible interfacing, 22″ wide
- 1 skirt zipper, 7″ long
- 2 hook & eye set, size 0
- Coordinating thread
- Heavy-duty thread
- Kraft paper
PATTERN
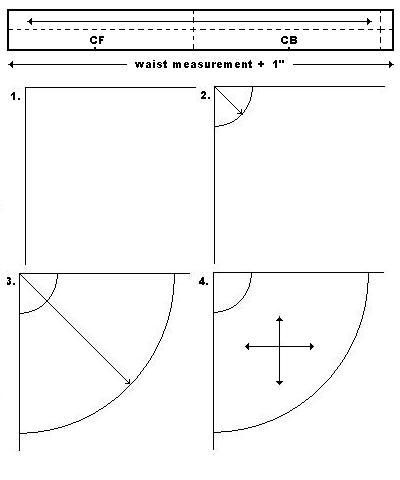 On kraft paper, draw a line equal to your waist measurement. Add a 1 inch extension.
Draw a parallel line 4 inches from first line. Connect the 2 lines by joining the ends together. Draw the grainline through the center of the pattern. Add ½” seam allowance to the perimeter. This is the waistband.
Draw a right angle on kraft paper. (1)
From the right angle, pivot an arc using a compass equal to your waist measurement. (choose radius from the chart). (2)
 From the right angle, swing an arc equal to the chosen radius measurement plus 22 inches or desired finished length. (3)
Draw grainlines parallel to the vertical and horizontal axis in the center of the pattern piece. Add ½” seam allowance to the waistline and ¾” seam allowances to the side seams. (4)
CUTTING
Cut waistband 1X self
Cut skirt 2X self
Cut waistband interfacing 1X fusible
ASSEMBLY
- Mark the center on each skirt piece.
- Staystitch the waist seam on each skirt piece. Do this from the side seam to the center.
- Do a seam finish on the side seams to neaten raw edges. (I used pinking shears).
- Layer the skirt pieces with right sides together and pin/baste the left side seam. Stitch the seam beginning 7 ½” from the top, using a ¾” seam allowance. Press seam open.
- Insert skirt zipper using a lapped zipper application.
- With right sides together, pin/baste the right side seam. Stitch seam using ¾” seam allowance. Press seam open.
 Open zipper and place heavy-duty thread slightly above the waist staystitching. Zig-zag stitch over the thread. Do this along the whole waistline. (Use a wide, long zig-zag and loosen your machine tension slightly).
- Turn under the seam allowance on one long edge of the waistband and press.
- At one short end, clip seam allowance 1 ½” from end for the extension.
- Fold the waistband in half with right sides together, and stitch the short ends. Grade seam and trim corners. Turn right side out.
- Divide the waistband in quarters excluding the extension. Beginning from the back of the skirt, pin the unpressed edge of the waistband to the skirt matching quarters to the CF, CB and side seams.
- Gather up excess fabric by drawing up on heavy-duty thread and shirr the skirt waist evenly and in proportion. Sew seam slightly beneath the staystitching at the waist.
- Turn the raw seam up into the waistband and encase it. Align the pressed edge of the waistband to the machine stitching. Slip-stitch the waistband to the skirt and the opening on the extension tab.
- Stitch a pair of hook and eyes on the inside of the waistband and the extension tab.
- Hem the bottom of the skirt with a ¼” double-rolled hem.

December 24, 2008 at 11:43 pm
This skirt pattern makes a poodle skirt not a dirndl. The waist measurement arc makes a form fit waist, not enough extra material to be gathered. I also haven’t checked the conventions for the site for cutting out, but the quarter circle arc is to be placed on the fold of the fabric, which I did not see in the instructions.
I was disappointed that the pattern had only a passing resemblance to the photo.
December 25, 2008 at 11:08 am
hahahahahaha…thx Clarinda…you made my day.
February 3, 2009 at 12:20 am
Okay, thanks, Clarinda. That makes more sense that we’re looking at one quarter of the skirt, not half.
February 3, 2009 at 12:50 am
Sorry you are mistaken Barbara. The draft is half of the skirt. If you cut it twice , you will have the front and back portion. The waist of the shirt is double the length of the waistband. You gather the skirt waist into the waistband to create a dirndl style as illustrated in this post.
March 4, 2009 at 3:28 pm
I am making this with my fabulous Shine Shine Obama fabric I got in South Africa.
Make sure I get it before I cut::
I cut 1 of drafts 3 and 4, and each is cut to my waist size, so the finished waist is twice my size, which accts for the gathers. Yes?
March 4, 2009 at 4:52 pm
Hello Tink
Dia. #4 is the final pattern. Add seam and hem allowances.
Cut 2X (front and back). Sew up side seams. On the left side of the skirt insert a 7″ skirt zipper. The top of the skirt with be approximately twice your waist. Gather at at 2:1 ratio into the waistband.
Happy sewing!
WD
May 7, 2009 at 8:47 am
[…] Rock 30 […]
May 26, 2009 at 7:30 am
Whipped up this skirt from your pattern, loved it and thought it was very well explained. Thanks matey and keep up the excellent work tiger! xx j.
October 10, 2009 at 8:18 pm
*Thank you!*
Great, well-written directions… and made a great skirt!
Blessings!!!
Patricia
October 11, 2009 at 4:12 pm
Thx Pat….hope you’ll send me a pix of it.
May 13, 2010 at 6:00 pm
Hello,
I am trying to sew that skirt but as I am from Germany I don’t understand the table above.I measured my waist and it is 63 cm which are 24,8 inches.Which one do I pick now?
Plus,I don’t get what the numbers 3/8” or 3/4” say.I’d be pleased if you helped me here.
Have a jolly good day.
May 14, 2010 at 3:09 am
imperial to metric conversion is cm X 0.39= inches
3/8″ = 10 mm and 3/4″ = 20 mm
August 13, 2014 at 6:38 pm
[…] DIRNDL SKIRT […]