 The waterproof rain cape is excellent for touring or commuting; in just a couple of seconds, you can slip it on over whatever you’re wearing, and you are protected from the rain. This model from Echo at Bloomingdales has a waist tie, ¾ zipper front, and high collar. This rain cape is generously sized, for maximum coverage and is reversible. Its four-piece design and construction give it very nice shaping and minimizes seams at the same time.

You need
- 1 18″ reversible nylon closed zipper
- 2.5 yds. of shell fabric, 60″ wide
- 1.5 yds. of liner fabric, 60″ wide
- Coordinating thread
- 1 roll of kraft paper or pattern-making papper
- 1 tracing wheel
PATTERN
On a sheet of kraft paper, draw a straight line about 2″ from the edge along the length.
In the middle of this line, mark point 1.
 2 from 1 = 29″
3 from 1 = 29″
4 from 1 = 29″
Connect points 2, 3, 4 with an arc radiating from 1 as shown.
5 from 1 = 1 ½”
6 from 1 = 3 ½”
7 from 1 = 4 ”
Connect points 5 and 7 with a shallow curve. This is the back neckline.
Join points 6 and 7 with a deep curve as shown. This is the front neckline.
8 is located midway between point 6 and 3. This is the zipper opening.
Square down from 7 and across from 8 to locate point 9.
10 from 5 = 1 ½”
11 from 7 = 1 ½”
Connect 10 to 11 with a curved line parallel to line 5-7.
Draw a tangent line from 11 passing through point 9 and continue to locate 12 at the intersection.
With a tracing wheel, trace out onto a new sheet of paper the following from this draft:
For the shell: trace points 6-7-5-2-4-12-3-8-6.
For the liner: trace points 10-2-4-12-9-11-10.
For the front facing: trace points 10-11-9-12-3-8-6-7-5-10 on folded edge of paper.
For the collar, draw a rectangle 9″ x 25″ *
For the tie, draw an oblong strip 5″ x 60″
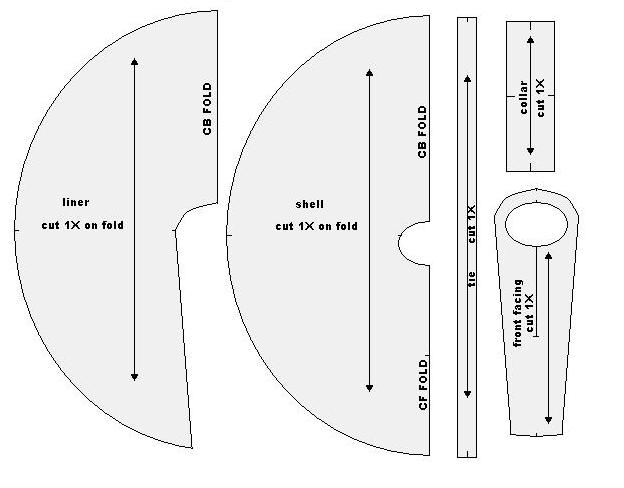
*Note: The neckline on the draft may be measured to verify collar dimensions. For the demonstration, the neckline equaled 24″ around plus a ½” seam allowance.
ASSEMBLY
Cut out 1 each of the shell and liner sections on the fold of the fabric along the straight grain. (I used waterproof marilite nylon for the shell and a printed polar fleece for the liner).
Cut out 1 tie, 1 collar, and 1 front facing in the shell fabric.
With right sides together, pin and baste front facing section to liner section, matching notches at CB, shoulders, and hemline. Stitch seam. Press seam to one side towards liner portion. On face side of liner, topstitch along this seam.
 Reinforce the front centerline with stay-stitch along the zipper placement line. (Make this the zipper length plus ½” for seam allowance and ½” wide for a ¼” turn). Repeat on shell section.
On the front facing, cut down center of stay-stitching ending with a triangular clip into each corner. With right sides together, pin and baste collar to neckline of liner and stitch seam. (You may have to clip seam allowance to flatten seam).
Pin and baste zipper into the opening from collar fold notch to bottom of stay-stitching. Insert zipper using a zipper foot attachment.
With right sides together, pin and baste liner section to shell section, matching notches at CF, CB, and sides (point 4). Stitch around perimeter using a ½” seam allowance. Clip notches into the curved seam allowance to flatten. Turn right out through neck opening. Press edges. Topstitch edge.
Cut down center of stay-stitching on shell layer, ending with a triangular clip into each corner. Pin and baste shell fabric to zipper tape.
Turn under seam allowance of collar along the neckline and short ends and press. Pin folded edge of collar to zipper tape and overlap the neck seam of the liner portion. Baste into place. Complete insertion of zipper by topstitching around the zipper opening and sewing the collar to the neckline.
On the liner side where the facing is joined to the liner, make a pair of 2-inch ‘buttonholes’ for the tie openings. Align the tie openings with the zipper bottom at the facing seam. (Make certain the layers of fabric are flat before you make the “buttonholes” at point 9).
To make the tie, press under ½” on both short ends. Fold the fabric strip in half lengthwise, with right side together, and stitch seam using a ½” seam allowance. Turn strip right side out. Press flat. Topstitch around perimeter of the tie. Insert through tie openings on poncho.

August 27, 2008 at 5:57 pm
I’m in love!!!
September 3, 2008 at 12:25 pm
You have beautiful patterns, pics & instructions. I will definitely make this one. I’ll tell everyone I know about your blog.
October 7, 2008 at 8:26 pm
Hello Weekend Designer.
Beautiful site.
We’d love to include your raincape pattern in our print magazine for cyclists. Hoping you’ll contact me as I don’t see a contact for you here.
Thanks!
Amy
November 6, 2008 at 1:34 pm
[…] public links >> rain WATERPROOF RAIN CAPE Saved by heidilow on Wed 05-11-2008 pt and rain… Saved by djwudi on Wed 05-11-2008 Penampang […]
December 9, 2008 at 1:01 am
Hi Don,
Love your site! My mom directed my to it when she asked me to make the Convertible Rain Cape for an upcoming trip she is planning to take. I have managed to cut all the pieces of fabric required, but I’m having a bit of trouble understanding the instructions, specifically the first part where I attach the front facing to the liner – is it possible for you to clarify this at all?
Thank you very much!
May 7, 2009 at 8:48 am
[…] Regencape […]
February 1, 2010 at 4:36 pm
Thank you for the information, I will try to make one!
March 29, 2010 at 8:24 pm
[…] Found here! Bookmark Idea […]
December 17, 2014 at 9:20 pm
[…] klikni OVDE […]