 A handkerchief pointed-hem skirt is flattering to all, but especially for short-legged people because the points break up that horizontal hemline. No pattern is needed to make this skirt style. It is a simple block layout.
One easy way to get that effect is to hem two squares of fashion fabric, each having four points (called a “handkerchief” hem) and layer them for an eight-pointed look. Experiment with swatches of opaque and transparent fabrics as you design and discover what happens when you overlap two layers of the same colour or harmonizing colours. The top layer could be trimmed shorter than the under layer for a tiered look and the hemline could be decorated with flat braid trim or fringe, if desired. Be creative!
You will need:
- 2 ½ yds. of fashion fabric, 45″ wide
- 1 yd. of waist band elastic, 1″ wide
- Coordinating thread
- 10 yds. of flat ribbon braid (optional)
PATTERN
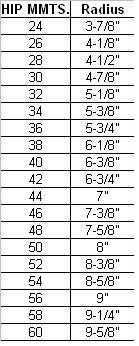 The size of the circular opening should be just big enough to pull over your hips, and can then be tightened with elastic. The circumference of a circle is about 3 times its diameter, so for a person with 44″ hips, a 7″ radius is needed to create the opening. Use the chart provided to make the circle you need. Fold a square piece of paper in half, then half again. From folded point, measure out a radius to create a circle equal to your hip measurement and draw an arc. Cut on this line and open paper flat. Measure the circumference of your template.*
ASSEMBLY
Cut 2 squares of fabric doubled the finished length.
Hem each square with a narrow double-rolled hem.
Apply trim (optional) parallel to hem, several inches from the edge. Miter at corners.
Layer both squares, with bottom layer FACE DOWN and top layer FACE UP, as illustrated for an eight-pointed look.
 Place template in center of square and trace out.
Stitch on chalk mark. Cut out center of circle allowing for a ¼” seam allowance.
Turn bottom layer out through the opening so that bottom layer lies flat on top. Press seam flat.
Topstitch around the edge of the circle.
Cut elastic equal to your waist measurement less 3 inches.
Butt the ends of the elastic together and zigzag stitch together.
Sandwich elastic between the 2 layers without twisting the elastic.
Stitch through all layers around the opening to encase the elastic. Make casing slightly wider than the width of elastic.
* TIP: Increase or decrease the circle by 1/8″ to change the overall total circumference measurement by 1/2″.

November 12, 2008 at 9:07 am
A super way to make a handkerchief skirt. Very simple to follow instructions and beautiful result. I’ve made three lovely outfits following this design.
April 27, 2009 at 7:07 pm
Dear Week End Designer,
Thanks a LOT, thank you, thank you, thank you for your instructions! You are a genius, and a generous one to boot. I’ve just made your handkerchief skirt, and would have liked to send you a picture of my endeavor, but I don’t know how… Je vous baise les mains de gratitude. The next one of yours I’ll try will be your flutter dress.
Encore merci. Claire
August 11, 2010 at 8:51 pm
hii.!
i jst wanna ask smethng 4m yew..actly m a undrgraduate stdt and searchng 4 designer frock’s drafting and its papper pattern as v r askd 4 a prjct..i tryd alot 2 search dis on intrnt but didn’t get ny spicifc result..so plz hlp me..
August 12, 2010 at 2:31 am
Arshia I don’t think you’ll find your request on the internet. Try your local library in the science & technology department for what you are looking for. If you have a local school of fashion, try the college’s bookstore.
WD
May 7, 2009 at 8:47 am
[…] Rock 29 […]
June 13, 2009 at 7:07 pm
[…] ali i za šivenje. Na engleskom se zove handkerchief skirt i njen kroj možete pogledati na blogu Weekend desinger. Ova naša je jednoslojna i ima drugači pojas – nije uvučen klasičan lastiš, već je […]
June 20, 2009 at 4:08 am
This is an AWESOME pattern! Thank you SOOOOO much for the directions. A handkerchief skirt was just what I had in mind for a dress for my daughter and this was such a simple way to do it!
June 24, 2009 at 3:43 am
[…] Pattern Page: Handkerchief Skirt […]
July 5, 2009 at 1:58 am
[…] an easy, feminine handkerchief skirt with this great tutorial from Weekend […]
August 16, 2009 at 5:34 pm
bonjour je n’est jamais fait de couture mais jaimerai me lancer dans une robe telle que celle-ci est-ce quelle ne serai pas trop difficile pour moi ?
August 16, 2009 at 8:39 pm
Salut Roxane… c’est une jupe simple à coudre pour un novice nouveau à la couture. Il n’y a aucun modèle exigé mais des mesures précises doivent être prises. Recherchez également les livres de couture à votre bibliothèque locale pour vous aider. Bonne chance.
WD
April 19, 2010 at 8:35 am
that was good pattern!!
April 19, 2010 at 11:36 pm
I just have one question. Under assembly, it says to: “Layer both squares with wrong sides together as illustrated for an eight-pointed look.” Wrong sides together? Really? Shouldn’t it be wrong of one square and right of the other?
April 20, 2010 at 3:35 am
You are absolutely correct. Thx…I’ll be certain to change the assembly directions.
April 22, 2010 at 7:51 pm
GB:SAYS
I have a question how can I use these directions if I have the actual handkerchiefs? They are very large handkerchiefs.
Reply
April 26, 2010 at 9:44 pm
Skip over the drafting and cutting instructions, Geraldine, and go directly to the assembly method.
July 11, 2010 at 6:17 pm
I’m new to sewing and would love to try this project! Great idea!
September 17, 2010 at 9:43 pm
Thank you for the simplified handkerchief hem pattern. Its much easier than i thought it would be.
November 18, 2010 at 1:46 am
Incredible! I love how you can put any dress bodice you like on it, within reason…I was looking for something flowy and asymmetrical to go with this gorgeous red-on-black floral print I got on sale…now to pick just the right bodice!
March 15, 2012 at 1:33 am
[…] 10 yds. of flat ribbon braid (optional) PATTERN Coordinating thread The size of the circular opening should be just big enough to pull over your hips, and can then be tightened with elastic. The circumference of a circle is about 3 times its diameter, so for a person with 44″ hips, a 7″ radius is needed to create the opening. Use the chart provided to make the circle you need. HANDKERCHIEF SKIRT « Weekend designer […]
July 1, 2012 at 1:01 am
[…] Easy Fit Yoga Pants RUCHED EMPIRE DRESS Just Tute’s Double Tie Wrap Pants DIRNDL SKIRT HANDKERCHIEF SKIRT Nighties/Underwear/Bathing Suits/etcHalter Gown 20 Minute SkirtSuper Simple NightieRuffle Skirt […]