 (Courtesy of Vogue/Butterick)
The wraparound obi style belt is sized in small, medium and large. Choose your size by measuring your waist and comparing your measurement to the chart below.
| S | M | L | |
| IN. | 24-25 | 26-28 | 30-32 |
| CM | 61-63.5 | 67-72 | 76-81 |
You will need:
3/8 yds (.35 m) of synthetic suede or leather fabric.
Matching polyester thread.
SOBO TM Fabric glue.
Pattern Piece Key
1. Front
2. Sides
3. Tie Ends
4. Tassel

Enlarging the Pattern
Each Square = 1″ (2.5 cm)
Includes ¼” (6mm) seam allowances.
Enlarge your pattern on 1″ graph paper or a pattern tracing material such as Red Dot TM by HTC. Pieces 1 and 3 are given on a fold. For ease of cutting, makes theses full pieces.
Cutting
Front – cut 1
Sides – cut 2
Tie ends – cut 2
Tassels – cut 2
Marking
Use a water-soluble tracing paper and tracing wheel or marking pen. Mark the pleat lines on the wrong side of the belt. Mark the cutting lines for the tassel fringe on the wrong side of each tassel section. Cut along the lines.
Make A Belt In 6 Easy Steps

1. Make tucks on the FRONT section by bringing the lines of small ●’s together: stitch. Turn in ¼” (6mm) on the curved edges; then stitch 1/8″ (3mm) from the edges. Note: These edges may also be glued in place.
2. Turn in ¼” (6mm) on the long edge of the SIDE sections. Stitch 1/8″ (3mm) from these edges. Note: These edges may also be glued in place.

3. With right-sides together, stitch the SIDES to the FRONT. Turn the seam allowances towards the sides; from the right side stitch close to the seam and again 1/8″ (3mm) away.

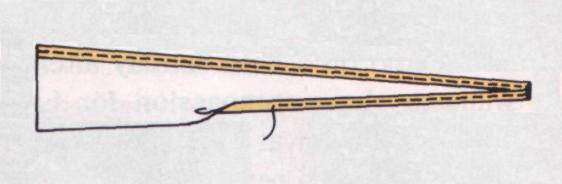
4. Fold each TIE END into lengthwise thirds by turning in ¼” (6mm) on one long edge; then turning in ¼” (6mm) on the remaining long edge. Note: Glue edges in place.

5. Fold the ends of the SIDE section over the TIE ENDS, lapping ¾” (20mm). Starting on SIDES, stitch securely through all thicknesses close to the raw edge. Pull thread ends to the inside and knot.
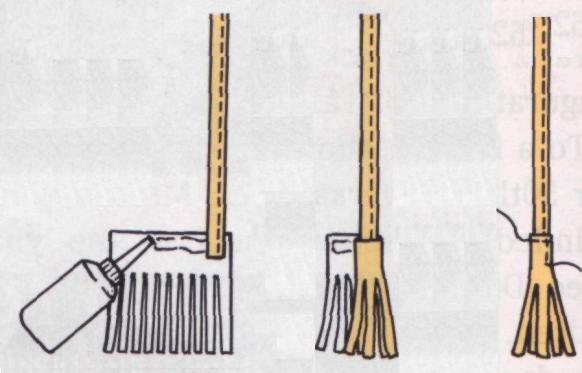
6. Place TIE ENDS on the wrong side of TASSEL section. Overlap about ½” (13mm). Apply a bead of fabric glue to the upper edge of the TASSEL. Roll the TASSEL around the TIE END. Let glue dry. If desired, stitch close to the edge and across the top of the tassel to secure.

September 7, 2007 at 3:48 pm
WOW!!! Your instructions are AWESOME–clear and easy to understand, especially the illustratons!!!
Thanks!
With friendship,
Lisa
September 13, 2007 at 6:04 pm
Love the belt and the instructions, will have to add this to my list of projects.
July 29, 2008 at 11:54 pm
Courtesy: Free accessories pattern Beret & Belt from Vogue/Butterick’s Fine Sewing magazine.
March 13, 2009 at 2:18 pm
gracias por sus post .he aprendido mucho.por favor siga publicando.un beso
May 7, 2009 at 9:29 am
[…] Gürtel 4 […]
October 15, 2009 at 5:01 am
[…] bekijk de stap voor stap afbeeldingen en print de patronen bij Beret & Belt […]
January 2, 2012 at 10:58 pm
Hello I’ve a blog which indexes frees tutorials, and I’ld like to indexe Your, if, You’re OK. If you go on my blog you’ll can see I respect the autors and their tutorials. Sorry for my English.
June 24, 2012 at 4:59 pm
[…] the dress, is also made by me and especially for this dress, it needed a belt. The instructions are here. Here is a photo from that website, but it seems to be a courtesy of […]
February 11, 2013 at 4:46 am
Many thanks for posting “BERET & BELT (part 1) � Weekend designer”.
I reallymight definitely be back for far more browsing and
writing comments soon. I am grateful, Terrell
April 4, 2014 at 5:28 am
[…] Автор МК Don […]